Table of Contents
Advertisement
Quick Links
Advertisement
Table of Contents

Subscribe to Our Youtube Channel
Related Manuals for BEYES Comfortek


Summary of Contents for BEYES Comfortek
- Page 1 Comfortek ® Dental Cart System Instruction for Use...
-
Page 2: Table Of Contents
Table of Contents 1. User Responsibility ................3 2. Product Introduction ................3 3. Technical Specifications ..............4 4. Product Diagram.................. 5 5. Symbols Legend .................. 7 6. Unpacking & Set-Up ................8 7. Operating Instructions ................. 10 8. Daily Cleaning and Maintenance ............13 9. -
Page 3: User Responsibility
• If there are any malfunctions observed (i.e. excessive vibration or heat generation) while the machine is in use, please turn the unit off immediately and contact Beyes or an authorized dealer. • Do not dismantle the machine. This product should be only be repaired by an authorized Beyes technician. -
Page 4: Technical Specifications
2.1 Application Scope This equipment is a mobile cart system for mobile dentistry. Comfortek® Dental Cart System is available in 4 models: Dental Cart System Air Compressor Suction system √ √ √ √ √ √ √ √ 2.2 Product size Length: 45.1cm (17.75") -
Page 5: Product Diagram
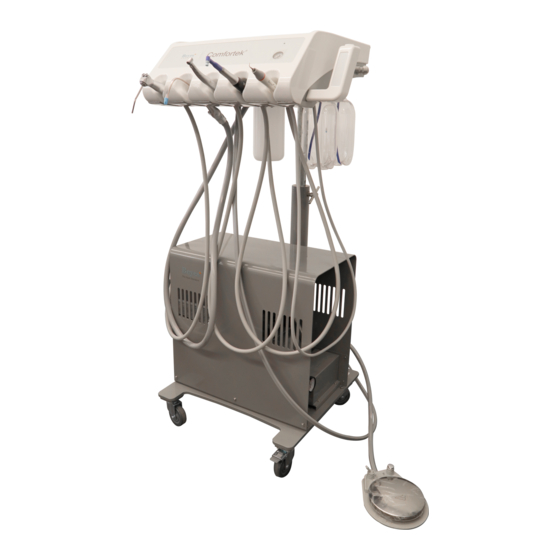
4. Product Diagram Figure 1 Figure 1: 1. Tabletop 5. Air Compressor (C1/C2 model only) 2. Suction System (C1/C3 model only) 6. Foot Pedal Control 3. Water bottle (2) 7. 2.5-inch Castors 4. Height Adjustment Knob... - Page 6 12 13 14 Figure 2 Figure 3 Figure 2 & Figure 3: 1. Air/Water Syringe 2. Suction Handpiece (C1/C3 model only) 3. High Speed/Low speed handpiece 4. High speed/Low Speed handpiece 5. Piezo Scaler 6. Water Bottle Toggle Switch 7. Safety Toggle Switch (to depressurize water system) 8.
-
Page 7: Symbols Legend
Figure 4 Figure 5 Figure 4 & Figure 5: 1. Compressor ON/OFF Switch 2. Safety purge valve 3. Compressor Pressure Gauge 4. Drain Valve 5. Air Regulator Valve 6. Main Power Switch 7. Overcurrent protector 5. Symbols Legend Symbol Symbol Switch on Handpiece water regulator Switch off... -
Page 8: Unpacking & Set-Up
6. Unpacking & Set-Up Figure 6: Carefully unpack the box (all accessories are contained in a small bag or box), please check packing list to ensure components are complete. Have another person assist you to remove the unit from the box to avoid injury. The round foot pedal should be placed on the flat bottom plate. - Page 9 Figure 8: Connect the power plug of the power and press the main power switch (when the low power supply voltage and load startup, may trigger overload protector to cut off the motor’s power. At this time, the device needs to stand for approximately 10 seconds to cool down the protector.
-
Page 10: Operating Instructions
7. Operating Instructions 7.1 Changing water in the bottle Fill the water bottles with distilled water (or your choice of solution) and install it by screwing it on at the bottom of the tabletop segment of cart. 7.2 Water bottle toggle switch and water bottle safety toggle switch A is the water bottle toggle switch, the left side is to set water source to 1# water bottle 1/the right side is to set water source to 2# water bottle 2 B is the safety toggle switch to pressurize or depressurize the water system. - Page 11 7.4 Air Water syringe Check 7.5 Drive air pressure and chip air regulator Water flow adjustment knobs Handpiece chip air regulator Handpiece drive air regulator...
- Page 12 7.6 Setting drive air 0.2-0.3 MPa (30-40 PSI) 0.3-0.4 MPa (40-60 PSI) Low speed handpiece High speed handpiece 7.7 Suction handpiece (Model C2/C4 do not have this function) Please select and install the suction tip that best meets your treatment needs: A.
-
Page 13: Daily Cleaning And Maintenance
To activate suction, press the button on the foot pedal Use the knob on the handle to adjust the suction flow 8. Daily Cleaning and Maintenance 8.1 Unplug unit from wall out and wipe down unit, cords and handpieces with water and non-chloride non-iodine disinfectant. - Page 14 Warning: The capacity of the suction bottle is 1L. However, it is recommended to empty and clean the suction bottle after each use. Suction bottle should be cleaned out before exceeding 500 ML point or risk of contamination may occur if suction gathered fluids spill.
- Page 15 8.3 High Speed and Low Speed Handpieces Lubrication Oil High Speed and Low Speed handpieces prior to first use, and oil after every use. 1. After cleaning the handpiece, apply lubricant before sterilization. lubricant is placed in the smaller of the 2 large holes at the base of the handpiece. Use only a high quality lubricant such as BeyesLube.(Figure 11) 2.
-
Page 16: Troubleshooting Guide
8.5 Compressor 1. Open the drainage mechanism at the bottom of the air purge valve to empty the water inside. (Figure 13) 2. At the end of the day, turn off the machine and unplug the electrical outlets. 3. Loosen the screw on the drain valve below the tank to remove all pressure (a dry cloth is recommended to avoid getting wet). - Page 17 1. Make sure the compressor has proper ventilation (you can’t cover the vents or stop the air from circulating around the compressor it needs to breathe) Note: For any errors experienced that are not found on this guide, please contact Beyes technical support...
-
Page 18: Replacement Parts
10. Replacement Parts Code Parts VHP6018P M800P-M/PD HP6008 PD Swivel MT2010 Air Motor SL1002 4:1 Straight nose attachment 19054 DPA FIRM 19053 DPA SOFT UL2420 Tip Wrench UL2022 Scaler handpiece UL2300 E-G1 UL2301 E-G2 UL2302 E-G4 UL2305 E-P1 UL2306 E-P3 C2360 Turbine HSP3008... -
Page 19: Water-Air Connection Diagram
11. Water-air Connection Diagram... -
Page 20: Electrical Connection Diagram
12. Electrical Connection Diagram... -
Page 21: Technical Support
14.1 Scope of Warranty BEYES Dental Canada Inc. ('BEYES') warrants to the original retail purchaser that it will be at BEYES discretion to repair or replace components of the dental products manufactured by BEYES (except for components not warranted under 'Exclusions') that are defective in material or workmanship under normal use and service. - Page 22 (12) Products that would otherwise by covered under Sections 1 and 2 of this limited warranty, but are acquired: (i) from a person or entity that is not BEYES or one of its authorized dealers; or (ii) from a BEYES dealer that is not authorized to...
- Page 23 14.5 Warranty Disclaimer This limited warranty is beyes only warranty and is in lieu of all other warranties, express or implied. Beyes makes no implied warranties of any kind including any implied warranties of merchantability or fitness for a particular purpose. This warranty is limited to the repair or replacement of defective parts.
- Page 24 Federal law restricts this device to sale by or on the order of a dentist, physician, or any other practitioner licensed by the law of the states in which he or she practices to use or order the use of this device. Beyes Dental Canada Inc. Lotus NL B.V.
Need help?
Do you have a question about the Comfortek and is the answer not in the manual?
Questions and answers