Advertisement
Quick Links
V2.0 20210205
Quick Start Guide
快速启动指南
1.
WARNING
2.
3.
4.
5.
1.
注 意 事 项
2.
3.
4.
5.
This guide is only applicable to Voxelab Proxima 6.0 3D printer
中文P17
Please put on gloves while using photopolymer resin to avoid
direct contact with the skin.
To ensure the printing quality, please don't open the light shield
unless it's necessary.
Unused photopolymer resin needs to be stored in a dark, dry,
and cool place.
Please clean the finished model with anhydrous alcohol.
Please install the build plate correctly, without dust and items,
to avoid damage to the LCD screen.
当使用光敏树脂溶液时,请戴上手套,避免与皮肤直接接触.
除必要情况下,打印时请勿打开遮光罩,以免外界光照影响打印效果。
未用完的光敏树脂溶液需放置在避光环境,保持环境阴凉通风。
模型在打印完成后可用无水酒精进行清理。
操作时请确保平台安装正确,无异物,以避免损伤LCD屏幕。
本手册仅适用于Voxelab比邻星 6.0 3D打印机
Proxima 6.0 / 比邻星 6.0
Advertisement

Related Manuals for Voxelab Proxima 6.0


Summary of Contents for Voxelab Proxima 6.0
- Page 1 Please install the build plate correctly, without dust and items, to avoid damage to the LCD screen. 当使用光敏树脂溶液时,请戴上手套,避免与皮肤直接接触. 注 意 事 项 除必要情况下,打印时请勿打开遮光罩,以免外界光照影响打印效果。 未用完的光敏树脂溶液需放置在避光环境,保持环境阴凉通风。 模型在打印完成后可用无水酒精进行清理。 操作时请确保平台安装正确,无异物,以避免损伤LCD屏幕。 This guide is only applicable to Voxelab Proxima 6.0 3D printer 本手册仅适用于Voxelab比邻星 6.0 3D打印机...
- Page 3 For your convenience, please read this guide carefully before use and follow the guide strictly. The Voxelab team is always ready to provide you with the perfect service. Please contact us with phone or email listed in the guide, if you have any problems.
- Page 4 35cm. Electricity Safety Always use the directly with a properly grounded outlet. Do not refit device plug. Do not use Proxima 6.0 in damp or wet environment. Do not expose Proxima 6.0 under sunshine. Do not abuse the cable.
- Page 5 The resin stored at low temperature should be shaken well and used at room temperature (above 20℃). Photopolymer Resin Requirements Do not abuse the photopolymer resin. Please make sure you use the Voxelab photopolymer resin or the photopolymer resin from the brands accepted by Voxelab.
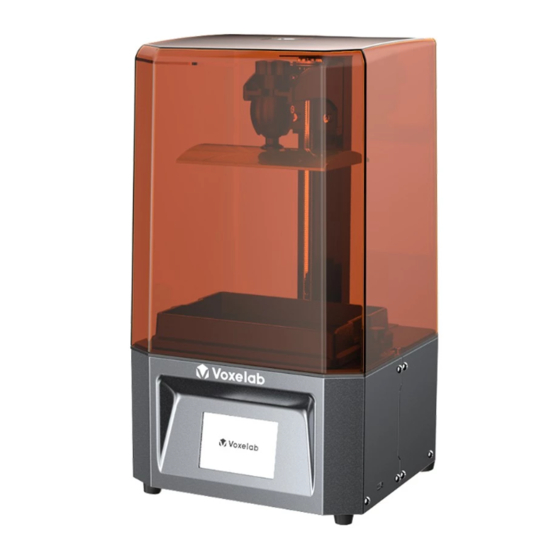
- Page 6 Getting to Know Your Proxima 6.0 1. Platform Tighten Knob 2. Z-axis 3. Build Plate 4. Resin Box 5. Box Tighten Knob 6. Touched Screen 7. USB Stick Port 8. Light Shield 9. Power Switch 10. Power Slot...
- Page 7 Parameter Technology Liquid Crystal Display 405nm UV integrated light array Light Resource 0.050mm(2560*1620) XY Resolution 0.025-0.1mm Suggested Layer Thickness Net Weight 110-220V, 50-60Hz 12V, 5A, 60W AC Input CHITUBOX/VoxelPrint Software 3.5’’ color IPS Touch Screen Screen Connectivity USB Stick Production Dimensions 230*200*410mm Build Volume 130*82*155mm...
-
Page 8: Accessory Box
LCD screen. aftersales@voxelab3dp.com 注 意 事 项 对光敏树脂溶液进行操作时,请戴上手套,避免与皮肤直接接触。 打印时若非必须请勿打开遮光罩,避免外界光照影响打印效果。 未用完的光敏树脂溶液需放置在避光环境,保持环境阴凉通风。 模型在打印完成后可用无水乙醇(无水酒精)进行清理。 操作时请确保平台安装正确,无异物,避免损伤LCD屏幕。 This guide is only applicable to Voxelab Proxima 6.0 3D printer 本手册仅适用于Voxelab Proxima 6.0 3D打印机 Proxima 6.0 Power cable Quick start guide After-sales card USB stick Build plate... - Page 9 Leveling Open the paper box and take out the Proxima 6.0 on the desk. Remove all protective foam. 1. Connect the power adapter and power cable. Plug the output end of the power adapter into the power input port on the back of the printer and turn on the switch.
- Page 10 3. Install the build plate on the plate 4. Tighten the platform tighten knob. holder. If the build plate cannot fix well, please to do step 5 first, then do the step 4. 5. Just loose two screws in the front 6.
- Page 11 Print Tool Systerm Manual Exposure Set Z=0 Stop Back 7. Remove resin box.Put a piece of A4 paper on the 6’ LCD screen. 0.1mm 10mm 8. Tap [Tool] - [Manual] and open a new window. Tap [Home] and wait for stop movement of Z-axis.
- Page 12 Press Tighten the screws If twitch a piece of A4 paper and feel the large resistance, press (not heavy) the tap of the build plate with one hand to let four corners of build plate to touch the LCD screen evenly. And just tighten lightly the screws in the front and right side of cradle head first.
-
Page 13: First Print
First Print 1.Make sure LCD screen, build plate and 2. Tighten the two box tighten knobs. resin box is clear. Install the resin box on the LCD screen. 3. Verify the installation of resin box and build plate first. Then pour the resin into the resin box. - Page 14 Print Tool Systerm Model-01 Model-02 Model-03 Model-04 4. Close the light shield after all above 5. Tap [Print] and choose the printed file preparatory work. in the list. Tap the printed file and star to print. Note: Do not open the light shield in the process of printing to avoid eyes hurt. Postprocessing Print completed! Time: 02h57m...
- Page 15 Remove the printed model carefully by metal scraper and put the model into the cleaning box with anhydrous alcohol to clean excess resin. Note: Do not damage the FEP film in the resin box or the LCD screen in the process of removing model.
- Page 16 Note During installation and removal of the build plate, please be extra careful to prevent the LCD screen from damage by build plate falling down. Please observe the priting process regularly to avoid printing failure, especailly for long printing time. Please make sure the printing environment to keep clean with less dust.
-
Page 17: Software Operation
Software Operation CHITUBOX CHITUBOX V1.0 Open Project 1. Install and open the ChiTuBox 64.exe Save ProJect program. Open... Save As... 2. Click the upper left menu button, and 【Open...】to choose the printed files. CHITUBOX V1.0 untitled* File List Select All Solid X-Ray 0.00... - Page 18 Settings Proxima 6.0 Default Machine Resin Print Infill Gcode Advanced Layer Height: Bottom Lift Distance: 0.05 Bottom Layer Count: Lifting Distance: Exposure Time: Bottom Lift Speed: mm/min Bottom Exposure Time: Lifting Speed: mm/min Light-off Delay: Retract Speed: mm/min Bottom Light-off Delay:...
- Page 19 Systerm Model-03 Model-04 2. Pull USB stick into the USB stick port in the Proxima 6.0. Tap [Print] in the touched screen and open files list. Only showed in the list, the files are recognized successfully . Note: USB stick permit to remove in the process of printing.
- Page 20 前 言 注 意 每台3D打印机在出厂前都经过打印测试,若料槽内存在耗材残留或打印平台有 轻微划痕,都属正常现象,不影响使用。 尊敬的用户: 感谢您选择、使用闪铸科技的产品。感谢您的大力支持和帮助。闪铸科技的产品质量 优、性能上佳。为了您使用方便,请您在使用之前仔细阅读该说明书,并严格按照说明书 的指示进行操作。整个闪铸科技团队时刻准备为您提供最优质的服务。在使用过程中无论 遇到什么问题,请按照说明书结尾所提供的电话、邮箱与我们进行联系。 为了您能够更好地体验我们的产品,您还可以从以下途径获取设备的操作知识: 快速启动指南 请您小心拆箱,您可以从最上层的泡沫中取出附带的快速启动指南。快速启动指南将帮助 您以最快的速度熟悉设备并成功完成初次打印体验。 注意事项 安全提示:请确保认真阅读以下安全提示 工作环境安全 请保证打印机的工作台面干净整洁。 请保证打印机工作时远离可燃性气体、液体及灰尘。设备运行产生的高温有可能会与空气 中的粉尘、液体、可燃性气体反应引发火灾。 儿童及未经培训的人员请勿单独操作设备。 设备运行环境要求 设备放置要求 室内温度在15-30度为宜。 设备需要放置于干燥通风的环境中。设备 湿度在20%-70%为宜。 左侧、右侧以及后侧必须要留至少20cm 的空余距离,前侧必须要留至少35cm的 空间距离。...
- Page 21 用电操作安全 请务必将设备接地。切勿改装设备的插头。未接地 / 未正确接地 / 改装插头必然会增加漏 电风险。 请勿将设备暴露在潮湿或烈日环境中。潮湿环境会增加漏电的风险/暴晒会加速塑件老化。 请勿滥用电源线,务必使用闪铸科技提供的电源线。 切勿在雷雨天气使用设备。 如长时间不使用设备,请关闭设备并拔下电源线插头。 个人操作安全 设备兼容耗材要求 请勿用手直接触碰光敏树脂溶液。 在使用该设备时,请使用闪铸提供或指定 在操作设备时,请带上橡胶手套和口罩。 的耗材。市场上耗材鱼龙混杂,质量良莠 请勿直视光机光源。 不齐。质量低劣或不兼容的耗材可能容易 请勿在饮酒、服药之后操作设备。 影响打印成功率,影响使用体验。 设备使用提示 耗材储存要求 切勿长时间离开正在运行的设备。 请将光敏树脂溶液存储在阴暗干燥的环境 请勿自行对该设备进行任何改装。 下,请放置在儿童不可触及的位置,请保 请勿在强光环境下进行打印作业。 证瓶身标识面朝向醒目可视方向。低温存 请在通风的环境下操作设备。 储的溶液需要摇匀,且恢复到室温(20℃ 请勿利用该设备进行违法犯罪的活动。 以上)后使用。 请勿利用该设备制作食物储存类产品。 请勿利用该设备制作电器类产品。 请勿将打印模型放入口腔。 请勿用蛮力卸下打印模型。 模型排布注意事项 模型排布尽量避免形成倒扣漏洞状; 打印密集排布的模型可以适当降低曝光时间。 法律申明...
- Page 22 设备介绍 3. 成型平台 1. 平台紧固旋钮 2. Z轴 4. 溶液盒 5. 溶液盒紧固旋钮 7. U盘端口 8. 遮光罩 9. 电源开关 10. 电源线插槽 6. 触摸屏 机器参数 成型技术 LCD光固化 110-220V, 50-60Hz 电源要求 12V, 5A, 60W 光 源 紫外集成光源(波长405nm) XY轴精度 0.050mm(2560*1620) 操作屏幕 3.5英寸触摸屏 推荐厚度设置 0.025-0.1mm 连 接 U盘...
- Page 23 LCD screen. aftersales@voxelab3dp.com 对光敏树脂溶液进行操作时,请戴上手套,避免与皮肤直接接触。 注 意 事 项 打印时若非必须请勿打开遮光罩,避免外界光照影响打印效果。 未用完的光敏树脂溶液需放置在避光环境,保持环境阴凉通风。 模型在打印完成后可用无水乙醇(无水酒精)进行清理。 操作时请确保平台安装正确,无异物,避免损伤LCD屏幕。 This guide is only applicable to Voxelab Proxima 6.0 3D printer 本手册仅适用于Voxelab Proxima 6.0 3D打印机 3D打印机 电源线 快速启动指南 售后服务卡 橡胶手套 U 盘...
- Page 24 机器调平 打开纸箱,小心地取出打印机,拆除打印机上所有的保护包装。 1. 连接电源适配器和电源线,将电源适配器输出端插入打印机背部的电源输入端口,打开开关。 打 印 工 具 系 统 Z轴移动 底板曝光 设Z为零 紧急停止 返回 2. 点击屏幕 [工具]--[Z轴移动],进入Z轴 移动界面,点击[↑]图标,使平台上移 0.1mm 10mm 不少于10cm。...
- Page 25 3. 将平台安装到平台支架上。 4. 拧紧平台固定旋钮。如果平台拧不紧, 请先做步骤5再做步骤4。 5. 使用内六角扳手将打印平台上云台前方 6. 用手摇动打印平台,确认打印平台能够 和右侧的螺丝拧松。 前后左右自由晃动。...
- Page 26 打 印 工 具 系 统 Z轴移动 底板曝光 设Z为零 紧急停止 返回 7. 取下溶液盒。放一张A4纸在6寸LCD屏上。 0.1mm 10mm 8. 点击[工具]--[Z轴移动],进入Z轴移动 界面,点击[home]图标,然后等待Z轴 移动停止。...
- Page 27 向下按压 拧紧螺丝 9. 当抽动A4纸有明显阻力时,用手按压平台上方,使平台四个角受力均匀的贴合在屏幕上( 避免重力损伤屏幕)。在按压的同时,先将平台前方和右侧的螺丝都预拧紧,然后再分别锁 紧。如果抽动A4纸没有明显阻力时,可点击“0.1mm”,以0.1mm的距离下降Z轴,直到 抽动A4纸有明显阻力为止,再锁紧螺丝。 注意:因拧紧平台螺丝后可能会改变A4纸抽动时的松紧度,所以需再次微调Z轴高度。 若抽动A4纸无阻力或阻力较小时,点击“0.1mm”,以0.1mm的距离下降Z轴;若无法 抽动A4纸,以0.1mm的距离上升Z轴;抽动A4纸时,以阻力较大,但还是能将A4纸抽出 为准。 0.1mm 10mm Z轴移动 底板曝光 设Z为零 紧急停止 返回 10. 点击[返回],点击[设Z为零],设置当前位置为零位。然后可以通过[Z轴移动]功能将平台上 升到适当位置,完成调平。 注意:除了首次使用需要调平之外,更换新打印平台、屏幕更换等情况也需要进行打印平台 调平操作。若出现打印异常,如打印模型一侧掉板,也需要进行调平操作。...
- Page 28 首次打印 1. 确认LCD屏、打印平台和树脂槽清洁无异物。 2. 紧固旋钮固定锁紧。 将溶液盒安装在LCD屏上。 3. 确认溶液盒和打印平台安装无错位。将光敏树脂倒入溶液盒中,溶液盒中的光敏树脂液位 必须在上限标记线之下。...
- Page 29 打 印 工 具 系 统 Model-01 Model-02 Model-03 Model-04 4. 完成上述准备后,盖上遮光罩。 5. 点击打印,进入模型列表。找到要打印的模 型文件,点击模型文件,点击开始打印。 注意:打印过程中不要打开遮光罩,避免眼睛损伤。 打印后处理 打印完成,用时02h57m 确定 Model-01 00h01m 02h57m 899/899 1. 待打印完成后,显示屏会显示打印完成 2. 旋松平台紧固螺母,取下打印平台。 提示,点击[确定],打开遮光罩。...
- Page 30 3. 用铲刀将模型铲下,放入装有无水酒精的容器中进行清洗。 注意:取下模型时,要小心不要戳伤溶液盒底部的FEP膜或者LCD屏幕。 4. 完成清洗后,将模型上的酒精用无尘布擦干或用气枪吹干。可使用光固化箱进行二次固化。 打印后剩余的树脂 过滤纸 干净的可密封的容器 5. 将溶液盒中的溶液进行过滤后,倒回树脂瓶中(建议和新树脂分开装)。最后用无尘布 和酒精清洁设备,关闭机器的开关。...
- Page 31 注 意 安装平台和取下平台时,需要格外小心,防止平台掉落砸坏LCD投影屏。 在打印过程中不时查看打印进程,避免打印失败。 注意使用环境卫生,保持清洁,避免灰尘较多。 新手进行平台调平时,请多次确认安装、调平间隙情况。 更新溶液盒FEP膜 FEP膜需要安装或者更换时进行 1. 拆卸溶液槽底部螺钉,将薄膜固定框从 2. 将FEP膜对准螺钉孔位,夹装在两个固定 溶液盒中拆下,取掉旧的FEP膜。 框中间,拧紧螺钉。 注意:安装固定框有正反面,通过螺钉孔 槽可确定正确安装面。 3. 将薄膜固定框装回溶液盒底部,拧紧螺钉使FEP膜拉紧。然后在溶液槽中导入水或者溶液, 检查是否发生漏液,如有漏液更换FEP膜重新安装; 注意:以上过程注意保护FEP膜,防止破损、脏污。...
- Page 32 软件操作 CHITUBOX CHITUBOX V1.0 打开项目 1. 安装并运行ChiTuBox 64.exe程序。 保存项目 打开... 另存为... 2. 打开左上角菜单按钮,点击[打开...], 选择模型文件。 untitled* CHITUBOX V1.0 文件列表 全选 实体 透视 0.00 +90° -90° 0.00 0.00 +90° -90° 0.00 0.00 +90° -90° 0.00 切片设置 切片 放在底板上 按面放平 居中 重置 重置 3.使用平移、旋转将模型摆放到合适的位置,模型不能低于底板网格面。...
- Page 33 切片设置 Proxima 6.0 Default 机器 树脂 打印 填充 Gcode 高级 层数: 底层抬升距离: 0.05 底层数: 抬升距离: 曝光时间: 底层抬升速度: mm/min 底层曝光时间: 抬升速度: mm/min 灯灭延迟: 回程速度: mm/min 底层灯灭延迟: 4.点击[打印设置],弹出打印设置窗口。建议采用默认参数。 (一般只需调“层厚”、“底层数”、“曝光时间”、“底层曝光时间”等) untitled* CHITUBOX V1.0 机器:Proxima 6.0 树脂:normal 体积:1.8 (ml) 重量:2.0 (g) 价格:0.05$ 打印时间:2h50m17s 网络发送...
- Page 34 模型导入 1.将模型的“.fdg”文件在电脑端复制到U盘里。拔出U盘时先在电脑安全弹出U盘,再拔U盘, 避免模型数据遗失或损坏。 Model-01 Model-02 打 印 工 具 系 统 Model-03 Model-04 2.将U盘插在设备USB接口,在主界面点击打印进入文件列表,点击上下翻页按钮,找到需要 打印的模型文件,则表示模型文件被成功识别。打印过程中,U盘不能移除。 设备维护 切勿将使用过的光敏树脂溶液倒回原溶液瓶。 废弃的光敏树脂溶液倒入密封袋密封,随后放在阳光下曝晒直至树脂固化。 若长时间不打印,请将溶液盒中剩余光敏树脂过滤后倒入密闭的容器中,并做避光保存。 若剩余溶液有固化的模型掉入,需尽快取出。 操作平台时,要注意避免损伤LCD屏幕。 请勿用锋利的金属铲子或者锐器处理溶液盒内的残留物,以免对FEP膜造成伤害。 如不慎有溶液滴落在LCD屏幕上,请及时用无纺布擦拭干净;如溶液已固化,请将无纺布 浸润酒精后擦拭干净。 请保持下图所示两处透光部位洁净。保证无尘无指纹。...
- Page 36 Voxelab Voxelab Voxelab Voxelab 3D Printing 售后专线:support@voxelab3dp.com After-Sales Service: support@voxelab3dp.com 电话:400 886 6023 官方网站:www.voxelab3dp.com 地址:浙江省金华市仙源路518号 Tel: +86 579 82238626 Web: www.voxelab3dp.com Add: 2/F, No.518, Xianyuan Road, Jinhua, Zhejiang, China...
Need help?
Do you have a question about the Proxima 6.0 and is the answer not in the manual?
Questions and answers