Advertisement
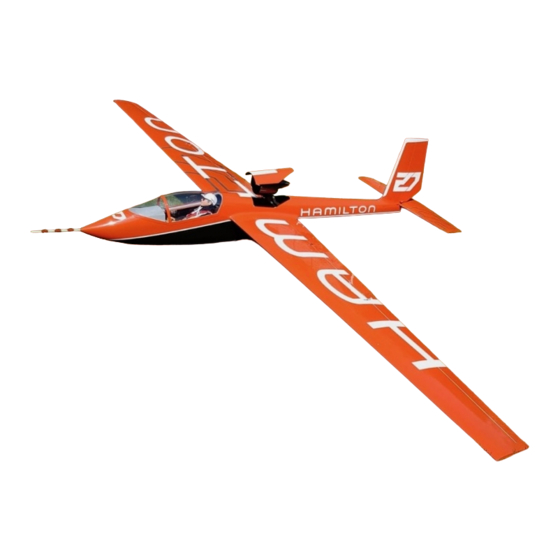
The CARF-Models KOBUZ-3 is the replica of one of the most famous aerobatic gliders,
built in the 60s and won numerous Glider Acro Competitions. But it is not only a "scale
replica", it also has the pedigree of an ultra high performance glider as it could not be any
stronger, faster, more precise - and even in thermal conditions more efficient.
The CARF-Models KOBUZ-3 is readily built. Only RC equipment (and a turbine or EDF)
must be installed in order to fly. However, a few design features are important to
understand and some advises are to be followed in order to build and fly this airplane
successfully.
1) The Wings
The CARF-Models Kobuz-3 wings are made from all carbon UD and bi-directional fibre. It
is total area vacuum sandwiched and has the control surfaces attached by "elastic
hinge". The hinge is at the bottom of the wing, the slot at the top, and that slot has a
perfectly fitted lip installed to seal the gap. Control horns are on the top, and they do have
very specific angle and position to allow to use maximum Butterfly settings for landing,
since we have (due to performance and safety) omitted the spoilers/speedbrakes
commonly found in these gliders. The internal design consists of a multi layer main spar
and 2 rear spars for flaps and ailerons. The rectangular socket for the carbon wing joiner
is bedded in the main spar with lots of carbon. These wings are literally undestroyable in
the air and it has been tested! Servo mounts are installed and the hatches are pre-fitted.
The wing joiner is also a full carbon design with 3 foam cores. It is literally undestroyable
in the air, just like the wings.
The ailerons and flaps are set up to be used for a very powerful butterfly action during
landing. Therefore geometry of horns, linkages and servo arm positions are crucial. The
control horn positions are precisely set and glued to position and they are NOT identical
on aileron and flap. That's on purpose. The following are most important details for Servo
Installation:
-
Use servos which fit the side mounts well. All Servos for the Kobuz-3 are Standard Size
and should have a torque of 25 kg min
-
Always put a drop of silicone on the servo case before you finally mount it in the frame.
That silicone is easy to remove but still keeps the servo from ever so little sliding in the
mount, which could give annoying trim irregularities in flight.
-
Flap servo arm LENGTH 18 mm, ANGLE 90 degree (vertical) to the servo for FLAP
NEUTRAL position
-
Ail servo arm LENGTH 14.5mm, ANGLE 30 degree backwards from vertical for
AILERON NEUTRAL position (approx. perpendicular to the linkage)
CARF-Models
KOBUZ-3
Instruction Manual
Advertisement
Table of Contents

Related Manuals for Carf-Models KOBUZ-3


Summary of Contents for Carf-Models KOBUZ-3
- Page 1 flap. That’s on purpose. The following are most important details for Servo Installation: Use servos which fit the side mounts well. All Servos for the Kobuz-3 are Standard Size and should have a torque of 25 kg min Always put a drop of silicone on the servo case before you finally mount it in the frame.
- Page 2 (not only put on a switch). 2) The Fuselage Also the fuselage of the CARF-Models KOBUZ-3 is manufactured from all carbon fibre. The strength and stiffness is unmatched, especially because of its large cross section all the way to the tail. Only the front area under the canopy glass is a patch of fiberglass only, that is because in this area the RC equipment is placed and we do not want the carbon to shield the RC signals.
- Page 3 Use a 35 mm long servo horn and install the linkage with a ball link, so that you can move the linkage around 3-dimensionally. This is needed to attach it to the elevator. You need to practice a little to remove and attach the elevator linkage, you can do it without removing the rudder, it just requires a little try and error and then practice.
- Page 4 The Kobuz-3 will require approx. 1 kg of lead in the nose. Only if an EDF is installed, this lead can be laminated and replaced by large battery packs. A note for the first flight: If a turbine or EDF is used to take off from a runway, or even from grass, you will notice that the plane tends to dive with its nose into the runway when throttling up suddenly.
Need help?
Do you have a question about the KOBUZ-3 and is the answer not in the manual?
Questions and answers