Table of Contents
Advertisement
Quick Links
Please follow the installation steps below to set up your D5110/D5111 Indoor IR Dome Camera.
Check the package contents against the list below. See P.1
Physical overview. See P.1
Install the hardware and connect all cables. See P.3
Use the software CD to install Intelligent IP Installer.
For more information, please check the User Manual available in the Software CD or you can download the latest
software from
http://www.zavio.com
Package Contents
Camera
Quick Installation Guide
Software CD
Mounting Bracket
Adaptor
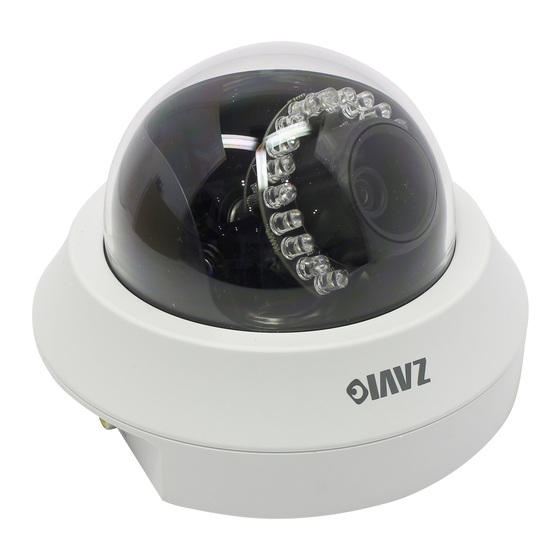
Physical overview
Reset button
Ethernet Socket
RCA
Zavio D5110/D5111 Quick Installation Guide
D5110 / D5111 Indoor IR IP Camera
Brief product information and quick installation
IP Surveillance Software
Intelligent IP Installer
User Manuals
Language Packs
Three plastic anchors and screws,
Alignment sticker,
4pin I/O connector
12V DC, max 8W
12V DC Jack
Focus puller
Zoom puller
DI/DO
DO DI GND 12V
Dome bubble
See P.6
1
Light sensor
Lens rubber
IR LEDs
SD Indicator
Card slot
Power Indicator
PAL/NTSC
Advertisement
Table of Contents

Related Manuals for Zavio D5110


Summary of Contents for Zavio D5110
-
Page 1: Table Of Contents
Zavio D5110/D5111 Quick Installation Guide Please follow the installation steps below to set up your D5110/D5111 Indoor IR Dome Camera. Check the package contents against the list below. See P.1 Physical overview. See P.1 Install the hardware and connect all cables. See P.3 Use the software CD to install Intelligent IP Installer. - Page 2 LED Indictor: Color Indication Steady green for Network link. Green Network Flash orange while Network activity. Orange Steady red for booting up process; Steady red 30 Seconds when WPS configure failed. Blue Steady blue for booting up competition. Power Purple Flash purple during firmware upgrading.
- Page 3 Install the hardware and make all cable connection a. Wall mounting and Ceiling mounting 1. Attach the alignment sticker to the wall/ceiling and drill two pilot holes into it. 2. Hammer the supplied plastic anchors into the holes. 3. Align the three holes on the base of camera with the three plastic anchors on the wall and ceiling, insert the supplied screws to the corresponding hole and screw them.
- Page 4 c. To adjust the view angle- 3 axis Mechanism Design c1. Turn the lens module right and left to your desired pan position. c2. Turn the lens module up and down to your desire tile position. c3. Turn the lens module to adjust the image orientation to satisfied angle. d.
- Page 5 f. Completion f1. Clean the dome bubble to remove the dust and finger print. f2. Rotate the black shield on the dome bubble to match the camera’s position. f3.Fasten the dome cover to the base clockwise and make secure two parts reaching the final position by checking two small dots on the side of housing.
-
Page 6: Microsoft Os
Microsoft OS:Use the software CD to install Intelligent IP Installer Power on your PC and insert the CD-ROM. The setup page will show up automatically. Please follow those steps below to install the firmware. Select “Intelligent IP Installer” and follow the installation process to complete the installation. Access the IP Camera using Intelligent IP Installer 1. - Page 7 4. When accessing the IP Camera for the first time, a yellow information bar appears below the address bar: This website wants to install the following add-on: „AxvideoView.cab from „Zavio Inc‟. 5. Click the information bar, and select Install ActiveX control.
-
Page 8: Change The Web Interface Into Your Preferred Language. See
Change the Web Interface into your preferred language Use the settings screen to set the language of the Web Interface. Go to “Setting → Basic → System → Language”. 1. Insert Software CD into your CD-ROM. 2. Browse and select the preferred language from language pack in the Software CD and then click OK. 3. -
Page 9: Day Night Function Setting. See
Select Safari function → Enter IP address in the web link → enter username and password (default value admin/admin) → The Zavio user interface and Live Image will show up in the middle of the screen. 2. Mobile phone viewing a. -
Page 10: Access To Internet Via Static Ip, Dynamic Ip Or Both. See
b. 2.5G Mobile Phone Viewing b1. WAP viewing For 2.5G WAP mobile phone viewing, type “ http://<IP>/mobile.wml ” into your 2.5G web browser. b1. Browser viewing For 2.5G mobile phone browser viewing, type “http:// <IP>/mobile.htm ” into your 2.5G web browser. Access to Internet via Static IP, Dynamic IP or both a. - Page 11 c. Internet Connectivity of the IP Camera can be established if your router is UPnP (Universal Plug and Play) enabled. The IP camera is automatically detected and added to “My Network Places” on your computer. Please note that only Home Routers manufactured after 2006 support the UPnP function. c1.
-
Page 12: Application Of Ip Camera. See
Application of IP Camera...
Need help?
Do you have a question about the D5110 and is the answer not in the manual?
Questions and answers