Bloomfield SS2 Series Owner's Manual
Ss2 - series dual satellite coffee brewers with electronic programmable control
Hide thumbs
Also See for SS2 Series:
- Program manual (15 pages) ,
- Maintenance manual (8 pages) ,
- Owner's manual (24 pages)
Table of Contents
Advertisement
Quick Links
Download this manual
See also:
Programming Manual
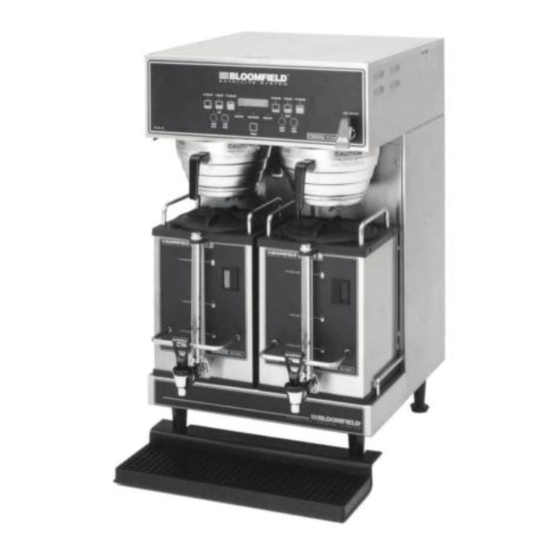
Model 9520 Dual Satellite Brewer
with optional
3901 Drip Tray
74345
p/n
Rev. J ECN-12887
PRINTED IN UNITED STATES OF AMERICA
OWNERS MANUAL
for
SS2 - SERIES
DUAL SATELLITE
COFFEE BREWERS
with
ELECTRONIC
PROGRAMMABLE
CONTROL
and
INTERNALLY HEATED
SATELLITE SERVERS
MODELS:
9520 9520FB
9521 9521FB
Includes:
Installation
Operation
Use & Care
Servicing Instructions
05
M672
672
0825 cps
Advertisement
Table of Contents

Subscribe to Our Youtube Channel
Related Manuals for Bloomfield SS2 Series


Summary of Contents for Bloomfield SS2 Series
- Page 1 Model 9520 Dual Satellite Brewer with optional 3901 Drip Tray 74345 Rev. J ECN-12887 PRINTED IN UNITED STATES OF AMERICA OWNERS MANUAL SS2 - SERIES DUAL SATELLITE COFFEE BREWERS with ELECTRONIC PROGRAMMABLE CONTROL INTERNALLY HEATED SATELLITE SERVERS MODELS: 9520 9520FB 9521 9521FB Includes: Installation...
- Page 2 NOTE: For your protection, please note that equipment in this shipment was carefully inspected and packaged by skilled personnel before leaving the factory. Upon accep- tance of this shipment, the transportation company assumes full responsibility for its safe delivery. IF SHIPMENT ARRIVES DAMAGED: VISIBLE LOSS OR DAMAGE: visible loss or damage is noted on the freight bill 1.1.
-
Page 3: Table Of Contents
50/60 Hz 1ø 9521 120/240 VAC 9521FB 50/60 Hz 1ø Thank You for purchasing this Bloomfield Industries appliance. Proper installation, professional operation and consistent maintenance of this appliance will ensure that it gives you the very best performance and a long, economical service life. -
Page 4: Features & Operating Controls
FEATURES AND OPERATING CONTROLS Fig 1. SS-2 Satellite Brewing System Features & Operating Controls... - Page 5 Brewer Adjustable Legs Brewing Controls Connector Digital Readout Bypass Nozzle Hot Water Faucet Nameplate Power Key Power Switch Brew Chamber Brew Chamber Wire Rack Satellite Brew-Thru Lid Connector Handles Nameplate Serving Faucet Sight Glass Drip Tray (optional) FEATURES AND OPERATING CONTROLS (continued) Allows brewer to be leveled.
-
Page 6: Precautions & General Information
GENERAL INFORMATION AND PRECAUTIONS WARNING: Electric Shock hazard All servicing requiring access to non-insulated electrical components must be performed by a factory authorized technician. DO NOT open any access panel which requires the use of tools. Failure to follow this warning can result in severe electrical shock. -
Page 7: Installation
Plumbing installer must supply the shut-off valve. A 1/4-turn ball valve is recommended. Bloomfield recommends the use of a water strainer to help prevent deposits in the brewing system. Flush the water line before connecting to the brewer. - Page 8 SWITCH to ON. When power is first applied to the brewer, the display will read “BLOOMFIELD” briefly, and a “beep” will sound. Press the POWER key on the front panel. The inlet valve will energize and the tank will begin filling. The display will read “Filling…”...
-
Page 9: Operating Instructions
Fig. 3 Control Panel GETTING STARTED Check the brewer and satellites: Check that the brewer is clean and the drip tray (if used) is empty. Check that the satellites are empty and clean with lids properly installed. Check the spray heads: Remove the brew chambers. - Page 10 Make sure the wire rack is properly installed in each brew chamber. Insert one (1) Bloomfield paper filter into each brew chamber. Make sure the filter is properly supported by the wire rack. Add a measured amount of grounds to each brew basket.
- Page 11 OPERATING INSTRUCTIONS (continued) WATER FLOW Fig. 6 Water Flow Diagram INLET The INLET VALVE is controlled by a signal from the CONTROL BOARD. If the WATER LEVEL PROBE does not detect water, the inlet solenoid is opened until water is again sensed. BREW The BREW VALVE fed by gravity from the hot water tank, and is controlled by a signal from the CONTROL BOARD.
-
Page 12: Cleaning Instructions
CLEANING INSTRUCTIONS CLEANING INSTRUCTIONS CAUTION: Burn Hazard Brewing and serving temperatures of coffee are extremely hot. Hot coffee will cause serious skin burns. WARNING: Electric Shock Hazard DO NOT immerse or submerge satellites. Fluid may saturate the insulation and short-circuit the receptacle connectors. - Page 13 PROCEDURE: Clean Satellite PRECAUTIONS: Drain Satellite before Cleaning FREQUENCY: Twice Weekly TOOLS: Sight Glass Brush, Sanitizer Soft Clean Cloth, Bucket 1. Remove and drain satellites. 2. Place 1 packet of Sanitizer into 2-1/2 gallons of warm tap water. Pour approximately 1 gallon of sanitizer solution into each satellite.
-
Page 14: Programming Instructions
PROGRAMMING MANUAL, p/n 74346. This brewer can be programmed with a personal computer. Please contact your Bloomfield Representative for details PROGRAMMING INSTRUCTIONS 672 74345 Owners Manual Dual Satellite 9520/9521 NEW MENU SETTINGS Menu Program: Press POWER key to enter OFF mode. - Page 15 FEATURES 1. Energizing the Brewer: Turn the brewer on by pressing the POWER key. The brewer will start to fill the tank with the message on the screen “filling…”. With the proper water supply the tank should be filled in about 2½ minutes. Once PROGRAMMING INSTRUCTIONS (continued) PRECISE BREWING TEMPERATURE™:...
- Page 16 PROGRAMMING (continued) ON/OFF – Normal Operation (Non Automatic Timer): To turn the brewer OFF, press the POWER key: 2 beeps will be heard and the brewer will be turned OFF, indicated by all lights being off. To turn the brewer ON, press the POWER key: 2 beeps will sound, all lights will flash once, then the POWER LED will glow.
- Page 17 7. Automatic Start-Up in Previous Mode: If the Satellite Brewer automatic timer is OFF (the factory setting) and power is disconnected, the brewer will start up when power is restored, in the mode it had been in prior to the power disconnection. If the Satellite Brewer has the timer setting ON and power is disconnected, the brewer will start up in the mode that it should be in at the time the power is restored.
- Page 18 PROGRAMMING (continued) The factory programming has the After Hours™ mode turned OFF. While in the After Hours mode, the POWER LED will flash continuously. Keypadlock™ deters unauthorized operation of the brewer. This feature is OFF in the standard factory settings. 12.
-
Page 19: Troubleshooting Suggestions
Allow brewer to cool, verify water level, reset hi-limit Clean water level probe Verify ground connection Replace inlet valve Replace brew valve Use one genuine Bloomfield paper filter per brew Clean brew chamber Correct programming Verify supply voltage De-lime hot water tank... -
Page 20: Servicing Instructions
SERVICING INSTRUCTIONS CAUTION - CHEMICAL BURN HAZARD Deliming chemicals are caustic. Wear appropriate protective gloves and goggles during this procedure. Never siphon deliming chemicals or solutions by mouth. This operation should only be performed by qualified and ex- perienced service personnel. IMPORTANT: DO NOT spill, splash or pour water or deliming solution into or over any internal... - Page 21 Rinse satellite with clean water. Reinstall one empty satellite under each brew chamber. Brewer is ready to use. SERVICING INSTRUCTIONS (continued) NOTE: Normally, silicone hoses do not need to be delimed. Should deliming hoses become necessary, Bloomfield recommends replacing the hoses.
-
Page 22: Exploded Views / Parts Lists
EXPLODED VIEW CABINET AND EXTERIOR COMPONENTS... - Page 23 PARTS LIST - CABINET AND EXTERIOR COMPONENTS...
- Page 24 EXPLODED VIEW INTERIOR COMPONENTS 6 2 7 4 3 4 5 O w n e r s M a n u a l D u a l S a t e l l i t e 9 5 2 0 / 9 5 2 1...
- Page 25 PARTS LIST - INTERIOR COMPONENTS...
-
Page 26: Wiring Diagram
EXPLODED VIEW WIRING DIAGRAM... - Page 27 SATELLITE EXPLODED VIEW, PARTS LIST & WIRING DIAGRAM SATELLITE ASSEMBLY 9340 120V SCHEMATIC P/N 73061 MODEL VOLTS WATTS 9340 ITEM PART NO. DESCRIPTION 83863 TANK LID ASSY 83099 HANDLE, SATELLITE TOP SCREW, 8-32x3/8“ BLK OXIDE STIFFENER BRACKET, LEFT 83558 TOPCOVER, SATELLITE FRAME, DECAF (PART OF #9) 83092 DOOR, DECAF...
- Page 28 Bloomfield Industries proudly supports CFESA Commerci al Food Equi pment Servi c Bloomfield Industries, Inc. Division of Carrier Commercial Refrigeration In US and Canada Telephone: 775-689-5700 Fax: 888-492-2783 Fax: 800-356-5142 ( for orders only website: www.wellsbloomfield.com PRINTED IN UNITED STATES OF AMERICA...
Need help?
Do you have a question about the SS2 Series and is the answer not in the manual?
Questions and answers