
Related Manuals for Edision picco T265 pro


Summary of Contents for Edision picco T265 pro
- Page 1 T265 pro Digital Terrestrial & Cable Receiver DVB-T2/C H.265/HEVC User’s Guide Support...
- Page 2 For information about EDISION Hardware or Software matters, please contact support@edision.gr The CE certificate of the product is available on our webpage, by visiting this link: https://www.edision.gr/en/support Version of December 3th, 2021...
-
Page 3: Table Of Contents
Contents ►Safety ........................ 4-5 ►Remote control ....................6 ►Description ......................7 ►Features ....................... 8 ►Information Bar (InfoBar) ...................9 ►EDIVISION – Your Electronic Program Guide ...........10-11 ►Installation ......................12 Terrestrial Scan DVB-T/T2 ....................12 Cable Scan DVB-C .......................13 ►Channel ......................14 Organizing Services ......................14 Organizing Favourites ...................... - Page 4 ►Important safety instructions 1) Please read these instructions carefully. 2) Keep these instructions in a safe place for future reference. 3) Pay extra attention to «warning» points. 4) Follow all instructions. 5) Do not use the device near water. 6) Clean with a dry cloth only. 7) Do not use near heat sources, such as radiators, heat accumulators, ovens or other devices (including amplifiers) generating heat.
- Page 5 This symbol indicates that there is risk of electric shock. This symbol indicates that the operating instructions contain important operating and maintenance infor- mation. This symbol indicates that the product has a double insulation between voltage and user accessible parts. Only use parts provided by the manufacturer during repair. This symbol on the product or in the operating instructions indicates that the electrical or electronic de- vice must be disposed of separately from household waste at the end of the service life.
-
Page 6: Remote Control
3. Switching between TV/AV mode [TV/AV] Displays a file-list The other 39 keys are for the control of the EDISION set-top-box. • Press [SET] key in the up right hand side TV keypad panel area continuously for 5 Safe USB Removal Sec. -
Page 7: Description
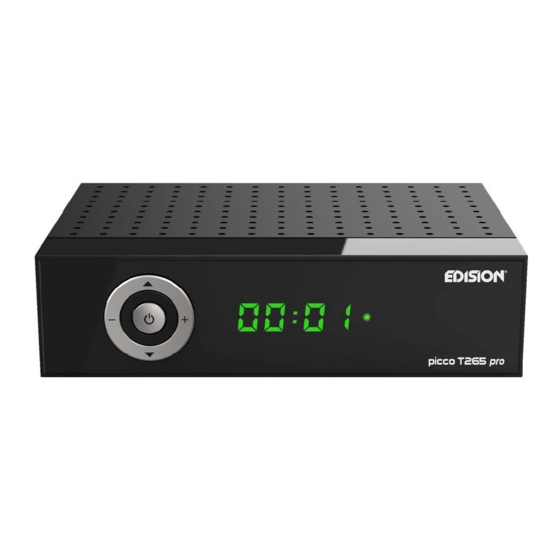
►Description Front Panel POWER button: ( ) Activates/Deactivates the device Buttons: (-/+, ) for moving in the program lists and for volume adjustment Display LED, displays current information Infrared sensor for the reception of remote control commands Back Panel ANT IN: Input for connecting to terrestrial or cable signal from the antenna S/PDIF: Audio interface for amplifier/audio... -
Page 8: Features
Support ►Features Technical features: • Type: Digital Terrestrial & Cable Receiver DVB-T2/C H.265/HEVC 10 Bit • H.265/HEVC 10 Bit decoding support (covered by patents listed at patentlist.hevcadvance.com) • Resolution: 576i, 576p, 720p/50Hz, 720p/60Hz, 1080i/50Hz, 1080i/60Hz, 1080p/50Hz, 1080p/60Hz • Video resolution up to Full HD 1080p •... -
Page 9: Information Bar (Infobar)
►Information Bar (InfoBar) When in the TV/Radio mode, the ‘INFO’ button displays an information bar (InfoBar) at the lower edge of the screen. This bar is faded-in up to 5 seconds. How to change the duration of fading of the information bar: 1. -
Page 10: Edivision - Your Electronic Program Guide
►EDIVISION - Your electronic program guide Basic information: EDIVISION is an online program guide with its own OSD menu. EDIVISION displays the information provided by the program vendor in a variety of ways, concisely and concisely. Furthermore, you can use it to schedule up to 8 time-adjustable recordings (Timer). Note that not all channels/program provid- ers have accompanying program information. - Page 11 In all functions you can use the following functions and the following keys: The red button displays a sum- mary of the existing channel lists (groups). Use the arrow keys to navigate through the summary mode and the OK key to specify the channel list that you wish to be used by EDIVISION.
-
Page 12: Installation
►Menu: Program ► Installation ► Channel ► System ► Media / Internet ►Installation ► Terrestrial Scan DVB-T/T2 ► Cable Scan DVB-C DVB-T/T2 This menu item will come in handy when setting up DVB-T reception. Make sure the anten- na is in a good receiving posi- tion. - Page 13 Green key (TP Edit): If you select “TP Edit” (Manual Search) in the next item and press the OK button, the search process starts according to the settings you made. Exit the “DVB-T2” menu by pressing the EXIT key. DVB-C TP index: Set the transmitter here.
-
Page 14: Channel
► Channel ► Organizing Services ► Organizing Favourites ► Delete All Channels Organizing Services In this menu you can configure your channel lists for TV or radio channels. Notes: Make sure the receiver is in operation. If you want to edit a radio channel, the receiver must be in Radio mode. - Page 15 How to lock a channel: 1. Place the cursor (blue bar) in the channel list on the channel you want to lock. 2. Now go to the right side of the menu using the arrow key on the right and navigate the cursor with the up/ down arrows to the “Lock”...
- Page 16 Organizing Favourites In this menu you can configure the lists of your favourite TV and radio programs. In the favourites lists you can organize your fa- vourite channels, which you will find very useful. Basic information: This menu is structured in three columns.
- Page 17 How to delete a channel from the favourites list: 1. Place the cursor (yellow bar) in the favourites list in the right menu window on the channel you want to re- move. 2. Now go to the middle column of the menu and navigate the cursor to the “Delete” symbol. The symbol is highlighted in color.
-
Page 18: Language
►Settings ► Language ► Software Upgrade ► Timer setting ► Miscellaneous Settings ► A/V settings ► Lock Control ► Time Setting ► Information Language Menu functions and settings: Menu language: Here you select the language in which the menus are displayed. First audio language: Select the audio language for the first channel here. - Page 19 HYPERLINK “http://www.edision.gr/” http://www.edision.gr Save the file downloaded to your computer to the USB memory stick and insert it into the “picco T265 pro” USB port. Note: The speed of the update via USB may depend on the organization of the data in the USB memory. It is recommended to pre-format the USB memory via the “HDD formatting”...
- Page 20 Timer setting In this menu you can make up to 8 time-supported entries (Timer). You will also find a lot of informa- tion in the EDIVISION section. Menu functions and settings: Timer number: Opening the “Timer” menu automatically switches to the next one (avail- able) adjustable timer.
-
Page 21: Av Setting
AV setting TV Standard: The options Auto, 576i, 576p, 720p_50, 720p_60, 1080i_50, 1080i_60, are available, 1080p_50 and 1080p_60. Scart TV Ratio: Adjust here the aspect ratio of the image to be displayed (4:3 or 16:9) Aspect Mode: Choose between (Automatic, 4:3 Letter Box, 4:3 Pan Scan) SPDIF/HDMI: Here you can adjust the function of the digital Audio output. -
Page 22: Time Setting
Information Here you will find information about the device. This informa- tion may be helpful when you want to contact the EDISION Technical Department or the point of sale by telephone. Here you also find out about the soft- ware version that the receiver has. -
Page 23: Media / Internet
► Photos ► USB Remove Network Setting Supports USB WiFi & Online Software upgrade The PICCO T265 pro Terrestrial Dig- ital and Cable Receiver supports USB WiFi for the following internet applications. * The connection is achieved with an optional USB WiFi dongle (07- 02-0002 WiFi EDI-Mega). -
Page 24: Record Files
Step 2. Select SSID and set the WiFi password Record Files Basic information: This menu is only available if you have con- nected a suitable USB data stor- age device recognized by the receiver. Otherwise you will not have access to this menu. Menu functions and settings: File Backup: Specify the file name for the backup here. -
Page 25: Youtube
Exit the “PVR Settings” menu by pressing the EXIT key. ΥουΤube Access your favorite YouTube videos Weather Weather information, through the menu of your favorite EDISION receiver. With the green key you can add a city. Version of December 3th, 2021... -
Page 26: Photos
Videos, Music, Photos Use the arrow keys to select between “Videos” mode “Music” “Photos” In these functions, you can play photos, videos and au- dio files via USB stic USB Remove Safely remove the USB device Version of December 3th, 2021... - Page 27 Version of December 3th, 2021...
- Page 28 . e d i s i o n . g r EDISION HELLAS LTD • FARMAKEIKA - 57001 N. RISIO • THESSALONIKI - GREECE...
Need help?
Do you have a question about the picco T265 pro and is the answer not in the manual?
Questions and answers