
Related Manuals for Edision progressiv hybrid


Summary of Contents for Edision progressiv hybrid
- Page 1 F u l l H D D V B - C / T 2 R e c e i v e r Operating instructions www.edision.gr...
- Page 3 F u l l H D D V B - C / T 2 R e c e i v e r Operating instructions...
-
Page 4: Table Of Contents
CONTENTS ►safety ........................ 6-7 ►Remote control ....................8 ►Description ......................9 ►Features ......................10 ►Information bar (InfoBar) ................11 ►EDIVISION – Your electronic program guide ..........12-13 ►Channel ......................14 Edit channel ..........................14 Edit favourites ........................16 ►Installation ......................18 Terrestrial Installation ......................18 Cable Installation ........................20 Netw ID Scan ........................20 ►Menu system settings ..................20 Language ..........................20... - Page 5 ►Internet .......................28 Ethernet Settings ........................28 YouTube ..........................29 Web TV ..........................29 Pss Reader ...........................30 Weather Forecast ........................30...
-
Page 6: Safety
►Important safety instructions 1) Please read these instructions carefully. 2) Keep these instructions in a safe place for future reference. 3) Pay extra attention to «warning» points. 4) Follow all instructions. 5) Do not use the device near water. 6) Clean with a dry cloth only. 7) Do not use near heat sources, such as radiators, heat accumulators, ovens or other devices (including amplifiers) generating heat. - Page 7 This symbol indicates that there is risk of electric shock. This symbol indicates that the operating instructions contain important operating and maintenance information. This symbol indicates that the product has a double insulation between voltage and user accessible parts. Only use parts provided by the manufacturer during repair. This symbol on the product or in the operating instructions indicates that the electrical or electronic device must be disposed of separately from household waste at the end of the service life.
-
Page 8: Remote Control
►Remote control On / Off button. Mute On/Off. Selection of TV/Radio program. Input of numbers or letters in the menus. Toggles between TV and Radio mode. ZOOM Returns to the previous program. Displays the main menu. Displays the information bar. Use the arrow buttons to navigate through the menu. -
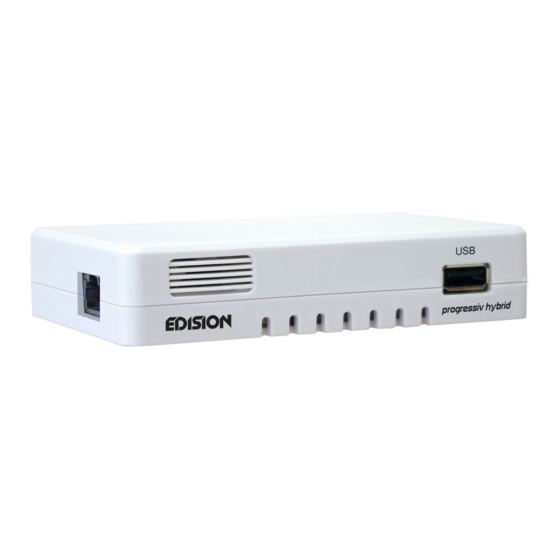
Page 9: Description
►Description Front panel /USB: Connection for USB1 memory devices. Infrared sensor for the reception of remote control commands. Back panel ANT IN HDMI DC-5V LNB IN: Connection for the coaxial cable to the signal from the satellite system. HDMI: Connection to an HDTV quality TV. IR IN: Infrared connection AV OUT: For broadcasting video and sound signals. -
Page 10: Features
Language Selection ►Features • Type: DVB-T/T2 / DVB-C Full High definition receiver • Resolution: 480p, 576p, 720p/50Hz, 720p/60Hz, 1080i/50Hz, 1080i/60Hz, 1080p/50Hz, 1080p/60Hz TV- Standard • 1 x Conax card reader • 1 x HDMI output for High Definition audio/video • 1 x LAN •... -
Page 11: Information Bar (Infobar)
►Information bar (InfoBar) When in the TV/Radio mode, the ‘INFO’ button displays an information bar (InfoBar) at the lower edge of the screen. This bar is faded-in up to 10 seconds. How to change the duration of fading of the information bar: Press the ‘MENU’... -
Page 12: Edivision - Your Electronic Program Guide
►EDIVISION - Your electronic program guide Standard: ΤEDIVISION is an electronic program guide with its own OSD menu. EDIVISION presents the information provided by the service provider in detailed views. In addition, up to 8 time-controlled recordings (Timer) can be programmed from here. Note that not all channels/program providers provide program-related information. - Page 13 EDIVISION window in ‘Timetable’ mode To navigate between the channel list and the PREV/ NEXT buttons to navigate daily overview. Use the up/down arrow buttons to navigate between the weekdays in the respective list. If the cursor is located on the right-hand column side of a program title, even more detailed information about this...
-
Page 14: Channel
►Menu program ► Channel ►Menu Installation ► Settings ► System ► Media ► Internet ► Channel ► Edit channel ► Edit favourites Edit channel Your channel list(s) for TV or Radio channels can be customized in this menu. Notes: Make sure the receiver is in the correct mode. - Page 15 Select TP: All channels of a transponder can be selected here. The ‘FIND’ button allows quick search for channel (names). A search window appears after pressing this button. Entry into the search field is done via a letter or numeric field actuated with the arrow buttons and by pressing the OK button.
- Page 16 character in the letter field. A space is added by navigating with the arrow buttons to the character. Confirm your entry by navigating with the arrow buttons to the ‘OK’ area. The new name is now added to the channel list. The input window can be exited at all times by using the EXIT button and thereby cancelling the process.
- Page 17 When in the left column, the ‘FIND’ button enables quick search of channel names. The search window appears after pressing this button. Entry into the search field is done via a letter or numeric field actuated with the arrow buttons and by pressing the OK button. Provided that channels with appropriate initial characters are found in the list, these will be displayed on the left-hand side.
-
Page 18: Installation
‘<-’ character in the letter field. A space is added by navigating with the arrow buttons to the character ‘--‘. Confirm your entry by navigating with the arrow buttons to the ‘OK’ area. The input window can be exited at all times by using the EXIT button and thereby cancelling the process. Exit the ‘Edit favourites’... - Page 19 Cable Installation Press [OK] key to enter the selected item. You can select the Scan Mode, Manual Scan or Blind Scan. You can input the Frequency by use the numeric button of the RCU. You can input the Second Frequency by use the numeric button of the RCU, if you set the Scan Mode to Blind Scan.
-
Page 20: Menu System Settings
►Menu system settings ► Languages ► A/V Control ► Time setting ► Timer ► Parental Control ► Factory setting ► Information Languages Functions and settings in the menu: Menu language: Select the language in which the Menu is displayed. First audio: Set the audio language here for the first channel. -
Page 21: A/V Control
in this item, accessing the menu is only possible via PIN code. Channel bar, EDIVISION and favourite lists are exempt. Channel lock: Specify here whether or not channels can be locked in general. New password: Specify a new password here. Confirm password: Repeat the new password. -
Page 22: Timer
Date: This item can only be reached when the ‘Off’ option was set for the ‘GMT User’ item. Enter the date via the number buttons. Time: This item can only be reached when the ‘Off’ option was set for the ‘GMT User’ item. Enter the time via the number buttons. -
Page 23: Parental Control
Parental Control You can set a password for anyone who wishes to operate in the “Installation” menu. And you can also set the password for the lock channels. (How to set the lock channel please refer to LOCK) Here will show you how to setting and how to revising the password. -
Page 24: Information
Http Upgrade Auto Upgrade When selecting this menu item, the receiver tries to connect with the factory-set server by EDISION. A correct cable configuration and providing the proper values in ‘Network Settings’ menu item according to your network, the receiver connects and retrieves the file list from the server. - Page 25 ‘USB/HDD Update’ is that the appropriate software file is located on the USB data storage. This file with the ‘.abs’ file extension can be downloaded from the Edision website via a PC with Internet connection. http://www.edision.gr Save the downloaded file from...
- Page 26 Backup to USB/HDD Functions and settings in the menu: Backup of the file: Determine the file name for the backup file here. Press the OK button to display a letter and number field and specify with the arrow buttons and OK button the name for the backup file. Delete the last character by navigating in the letter field with the arrow buttons to the area ‘<-’...
-
Page 27: Media
Port: Show information about an existing card into port. Information Smart Card: Here you can set if you want to display information about the inserted card or not. Exit the menu «Smart Card» or «Info Smart Card» by pressing the EXIT button. ►Media ►... - Page 28 Check-Speed USB In this menu item you can control the speed of the connected USB memory. The result window displays the possible transfer / write speed and if the speed is possible to store high definition channels. Furthermore you see how many channels can be recorded simultaneously.
-
Page 29: Youtube
IP Address: Enter an unassigned IP address from your network here. Subnet Mask: Enter the netmask corresponding to the network here. Gateway: Enter the IP address of the Gateway to the Internet here. DNS Preferred: The IP address for a so-called name server (DNS Server) can be indicated here. -
Page 30: Weather Forecast
Rss Reader This menu item offers access to brief information from the Internet. The list of the information providers (RSS channel list) can be found in the left column and in the right column (RSS news list), news reports and information provided, if available via Internet. - Page 33 www.edision.gr...
Need help?
Do you have a question about the progressiv hybrid and is the answer not in the manual?
Questions and answers