Advertisement
THANK YOU FOR
CHOOSING ROBOTIQ
This step-by-step guide will allow you to install
and use your CNC Machine Tending Kit on
e-Series Universal Robots.
1.WHAT IS SUPPLIED?
Standard upon delivery of
CNC-RWC5-ES-UR-KIT
Dual Gripper Hand-E........................
Hand-E Fingertips Starting Kit.............
Hand-E Fingertips Extender Kit...............
2F85 Fingertip Conversion Kit.............
Grooved Fingertips for 2F-85, v4............
Machine Tending Copilot Kit....................
Robotiq Wrist Camera Kit (optional)..............
Required hardware
2.TOOLS YOU NEED
3mm
4mm
2mm slotted
hex key
hex key
screwdriver
3.GET THE LATEST
robotiq.com/support
Visit:
D
URCAP
OWNLOADING THE
1. Select product > CNC Machine Tending Kit >
Universal Robots > Software > CNC Machine Tending
Software.
2. Select DOWNLOAD ZIP.
3. Decompress Zip file to a USB stick. Three URCap files
are included.
BEFORE OPERATING THE GRIPPER,
PLEASE READ INSTRUCTION MANUAL.
4.MOUNTING
For easier mounting, move the robot tool flange
to make it point upwards.
I
W
C
F YOUR KIT DOES NOT INCLUDE THE
RIST
AMERA
!
"M
A
P
H
-E G
OUNTING THE
DAPTER
LATE AND
AND
M
W
C
OUNTING THE
RIST
AMERA
1. Place the Wrist Camera on the tool flange. Align with the
dowel pin already installed on the Wrist Camera.
2. Insert a dowel pin into the top part of the Wrist Camera,
then place the tool plate unto the Wrist Camera. Align
using dowel pin.
3. Insert a dowel pin into the tool plate, then place the
adapter plate unto tool plate.
M
A
P
H
OUNTING THE
DAPTER
LATE AND
AND
4. Insert four M6 screws and toothlock washers into the
adapter plate, and secure it to the tool flange.
5. Insert a dowel pin into a socket of the adapter plate.
6. Place a gripper coupling on the socket, and align using the
dowel pin.
7. Secure the gripper coupling to the adapter plate with four
M6 screws and toothlock washers, using a 4mm hex key.
8. Secure Hand-E to the gripper coupling with four M5 screws
and toothlock washers, using a 4mm hex key.
9. Repeat steps 4, 5, 6, 7, and 8 for the second Hand-E
gripper.
10. Secure the M8 splitter to the front of the adapter plate
with two M4 screws and lock washers, using a 3mm hex key.
11. Connect the M8 splitter to the robot tool connector.
For details on using the "Fingertips Extender Kit"
or the "2F85 Conversion Kit", please refer to the
instruction manual of the CNC Machine Tending
Kit.
D
O NOT CONNECT YOUR GRIPPERS TO THE
!
T
,
HIS WILL BE DONE AT A LATER STAGE
WHEN CONFIGURING YOUR
T
P
.
GRIPPERS ON THE
EACH
ENDANT
,
SKIP TO SUBSECTION
".
RIPPERS
gripper coupling
dowel pin
M4 screws
and washers
dowel pin
tool flange
-E
GRIPPERS
robot tool
connector
1. Have a USB stick that contains the required .urcap files
(
SEE SECTION
2. Insert the USB stick in the robot teach pendant.
3. Tap the triple bar icon in the upper right corner, and
select Settings.
4. Tap the
5. Open required .urcap files:
Grippers: UCG-X.X.X.urcap
•
Machine Tending Copilot: UCS-X.X.X.urcap
•
Wrist Camera (optional): UCC-X.X.X.urcap
•
M8
.
SPLITTER YET
6. Tap the Restart button to activate the URCap files.
7. The Gripper and Active Drive toolbars will display
shortly after software has been installed.
8. Connect to the robot controller the provided USB
dongle containing the Machine Tending Copilot license.
Hand-E gripper
M5 screws
and washers
M6 screws
and washers
M6 screws
and washers
adapter plate
Wrist Camera
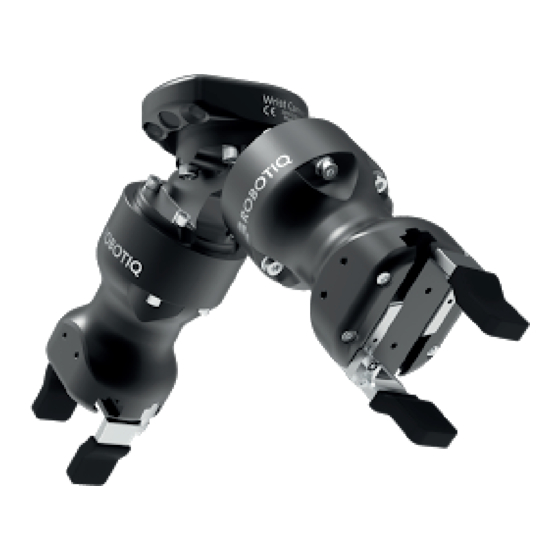
Figure 1. Exploded view of the CNC Machine
Tending Kit, Wrist Camera included.
5.SOFTWARE INSTALLATION
"G
L
").
ET THE
ATEST
sign.
M8 splitter
tool plate
(optional)
(optional)
Advertisement
Table of Contents

Related Manuals for ROBOTIQ CNC-RWC5-ES-UR-KIT


Summary of Contents for ROBOTIQ CNC-RWC5-ES-UR-KIT
- Page 1 (optional) Machine Tending Copilot Kit....OUNTING THE DAPTER LATE AND GRIPPERS Robotiq Wrist Camera Kit (optional)....4. Insert four M6 screws and toothlock washers into the Required hardware robot tool adapter plate, and secure it to the tool flange. connector 5.
- Page 2 To nd out how to set each gripper tool center point, as well as how to specify the overall payload of your Kit, and much more, refer to the instruction manual of the CNC Machine Tending Kit, or to the Robotiq eLearning platform. elearning.robotiq.com robotiq.com/support support@robotiq.com March 2021 T: 1.418.380.2788 ext.
Need help?
Do you have a question about the CNC-RWC5-ES-UR-KIT and is the answer not in the manual?
Questions and answers