Advertisement
Available languages
Available languages
Quick Links
If you have any questions regarding assembly or if parts are missing, DO NOT return this item to the store where
it was purchased. Please call our toll-free customer service number and have your instructions and parts list
ready to provide the model name, part name or factory number:
Or visit our website 24 hours a day, 7 days a week for product assistance at
THIS INSTRUCTION BOOKLET CONTAINS IMPORTANT SAFETY INFORMATION.
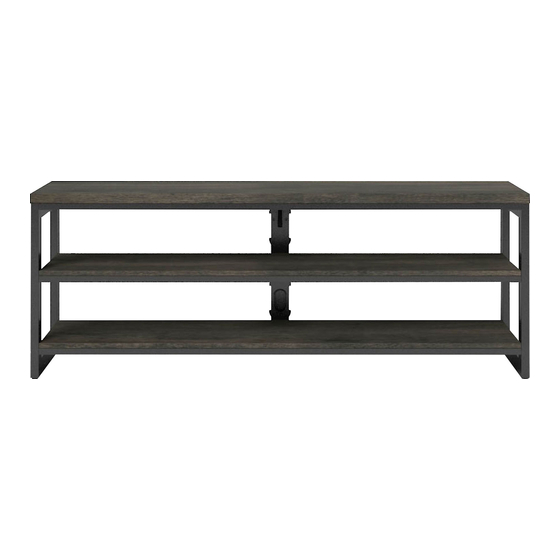
60" TV Stand
Model # BBAVC60-3
ADULT ASSEMBLY REQUIRED
Pacific Standard Time: 8:30 a.m. - 4:30 p.m., Monday to Friday
www.whalenfurniture.com
Or e-mail your request to parts@whalenfurniture.com
PLEASE READ AND KEEP FOR FUTURE REFERENCE.
Date 2021-09-28
1-866-942-5362
Rev. 0001-A
LOT NUMBER:
DATE PURCHASED: / /
Advertisement

Related Manuals for Whalen BBAVC60-3


Summary of Contents for Whalen BBAVC60-3
- Page 1 LOT NUMBER: DATE PURCHASED: / / 60" TV Stand Model # BBAVC60-3 ADULT ASSEMBLY REQUIRED If you have any questions regarding assembly or if parts are missing, DO NOT return this item to the store where it was purchased. Please call our toll-free customer service number and have your instructions and parts list...
-
Page 2: Special Note
G E N E R A L I N F O R M A T I O N , T I P S A N D T R I C K S 1. Please read the Assembly Instructions prior to assembling this product. 2. - Page 3 Parts and Hardware List Please read completely through the instructions and verify that all listed parts and hardware are present before beginning assembly. A- Top Panel (Qty. 1) B- Shelf (Qty. 2) C- Left Leg (Qty. 1) D- Right Leg (Qty. 1) E- Spine (Qty.
- Page 4 Parts and Hardware List Please read completely through the instructions and verify that all listed parts and hardware are present before beginning assembly. (1) 1/4” x 5/8” Bolt (2) 1/4” x 1” Bolt (Qty. 11+1 extra) (Qty. 14+1 extra) (3) Lock Washer (4) Flat Washer (Qty.
- Page 5 Assembly Instructions ② x 2 ③ x 2 ④ x 2 NOTE: Please do not fully tighten all bolts until you finish assembling all parts. Once assembled, go back and fully tighten all bolts. This will make it easier during assembly of unit. 1.
- Page 6 Assembly Instructions ① x 3 ③ x 3 ④ x 3 4. Align and attach the Top Frame Support (F) between the center rail of the top metal frame of Top Panel (A) and the Spine (E) with three 5/8” Bolts (1), three Lock Washer (3) and three Flat Washer (4).
- Page 7 Assembly Instructions The metal frames will face the floor when the unit is turned upright. ② x 4 ③ x 4 ④ x 4 5. Fasten the Shelves (B) to the Spine (E) with two 1” Bolts (2), two Lock Washers (3) and two Flat Washers (4) per shelf.
- Page 8 Assembly Instructions ② x 8 ③ x 8 ④ x 8 6. Align and attach the Left Leg (C) to the previous assembly by inserting four 1” Bolts (2) with Lock Washers (3) and Flat Washers (4) through the side rails of the metal frames and screwing into place. 7.
- Page 9 Assembly Instructions ① x 4 ③ x 4 ④ x 4 8. Ask for assistance to stand the assembled unit upright. 9. Fasten the Shelves (B) to the Legs (C and D) with four 5/8” Bolts (1), four Lock Washers (3) and four Flat Washers (4).
-
Page 10: Back View
Assembly Instructions Back View ① x 4 10. Attach two Cable Wheels (G) to the backside of the Spine (E) with the 5/8” Bolts (1). NOTE: You can use the Cable Wheels to help keep your entertainment center’s cables and cords organized. - Page 11 Assembly Instructions ⑤ x 2 NOTE: To prevent your TV from tipping, you must follow these instructions if you place a TV on top of your console. Otherwise, remove the stopper template directly. 11. Attach the Stopper (5) to the Top Panel (A). a.
- Page 12 Assembly Instructions Wooden stud Wall Pre-attached bolt Wall Floor leveler Metal bracket Nylon strap Long screw Tools required (not included): Phillips screwdriver, stud finder, tape measure, pencil, power drill and 1/8” drill bit. 12. Ask for assistance to position the assembled unit at the desired location against a wall. If necessary, adjust the installed Floor Levelers beneath the Legs (C and D) to correct the tilt.
- Page 13 Care and Maintenance Use a soft, clean cloth that will not scratch the surface when dusting. Use of furniture polishes is not necessary. Should you choose to use polishes, test first in an inconspicuous area. Using solvents of any kind on your furniture may damage the finish. ...
-
Page 14: Quality Guarantee
Should this product be defective in workmanship or materials or fail under normal use, we will repair or replace it for up to one (1) year from date of purchase. Every Whalen Furniture product is designed to meet your highest expectations. We guarantee that you will immediately see the value of our fine furniture. - Page 15 NÚMERO de LOTE: FECHA de COMPRA: / / Consola para TV de 60” Modelo # BBAVC60-3 ENSAMBLE POR ADULTO REQUERIDO Si tienen alguna pregunta acerca del ensamble o si alguna parte está faltante, no retorne esté producto a la tienda donde lo compro. Por favor llame a nuestro departamento de ayuda al cliente teniendo su instructivo y lista de partes para proveer el modelo, nombre de parte o el número de fábrica:...
- Page 16 I N F O R M A C I Ó N G E N E R A L , R E C O M E N D A C I O N E S Y T R U C O S 1.
- Page 17 Lista de partes y material de ferretería Por favor lea completamente las instrucciones y verifique que estén todas las partes y partes de ferretería antes de iniciar el ensamblado. A- Panel superior (Cant. 1) B- Repisa (Cant. 2) C- Pata izquierda (Cant. 1) D- Pata derecha (Cant.
- Page 18 Lista de partes y material de ferretería Por favor lea completamente las instrucciones y verifique que estén todas las partes y partes de ferretería antes de iniciar el ensamblado. (1) Perno de 1/4” x 5/8” (2) Perno de 1/4” x 1” (Cant.
- Page 19 Instructivo de ensamble ② x 2 ③ x 2 ④ x 2 NOTA: Por favor no apriete completamente todos los pernos, hasta que termine con el ensamble de las partes. Después asegúrese de apretar todos los pernos. Esto hará el ensamble más fácil. 1.
- Page 20 Instructivo de ensamble ① x 3 ③ x 3 ④ x 3 4. Alinear y adjuntar el soporte del marco superior (F) entre el riel central del marco de metal superior del panel superior (A) y del soporte central (E) con 3 pernos de 5/8” (1), 3 arandelas de presión (3) y 3 arandelas planas (4).
- Page 21 Instructivo de ensamble Los marcos de metal apuntaran hacia al piso cuando la unidad este en posición vertical ② x 4 ③ x 4 ④ x 4 5. Sujetar las repisas (B) al soporte central (E) con 2 pernos de 1” (2), 2 arandelas de presión (3) y 2 arandelas planas (4) por repisa.
- Page 22 Instructivo de ensamble ② x 8 ③ x 8 ④ x 8 6. Alinear y adjuntar la pata izquierda (C) al ensamble previo insertando 4 pernos de 1” (2) con las arandelas de presión (3) y arandelas planas (4) a través de los rieles laterales de los marcos de metal y atornillar en su lugar.
- Page 23 Instructivo de ensamble ① x 4 ③ x 4 ④ x 4 8. Pedir asistencia para poner la unidad ensamblada en posición vertical. 9. Sujetar las repisas (B) a las patas (C y D) con 4 pernos de 5/8” (1), 4 arandelas de presión (3) y 4 arandelas planas (4).
-
Page 24: Vista Posterior
Instructivo de ensamble Vista posterior ① x 4 10. Adjuntar 2 guías para cables (G) a la parte posterior del soporte central (E) con los pernos de 5/8” (1). NOTA: Usted puede usar los guías para cables para mantener los cables de su centro de entretenimiento organizados. - Page 25 Instructivo de ensamble ⑤ x 2 NOTE: To prevent your TV from tipping, you must follow these instructions if you place a TV on top of your console. Otherwise, remove the stopper template directly. 11. Adjuntar el tope (5) al panel superior (A). a.
- Page 26 Instructivo de ensamble Viga de madera Pared Perno pre-adjuntado Pared Nivelador de Soporte de Correa de Perno largo piso metal Nylon Herramientas requeridas (no incluidas): Desarmador Estrella, buscador de vigas, cinta métrica, lápiz, taladro, y broca de 1/8 de pulgada. 12.
- Page 27 Mantenimiento y Cuidados Use una toalla suave y limpia para evitar daños y rayaduras. Uso de cera para pulir muebles no es necesario. Si desea usar cera, pruébela en un área que no sea visible para revisar su funcionamiento. ...
- Page 28 MUERTE O HERIDAS GRAVES. GARANTÍA DE CALIDAD Nosotros estamos seguros que usted se encontrará feliz con la compra de esté producto de Whalen Furniture. Si esté producto tiene algun defecto de ensamble o material, o si tiene alguna falla en uso normal, nosotros lo repararemos o lo re-emplazaremos hasta por un año a partir de la fecha de compra.
Need help?
Do you have a question about the BBAVC60-3 and is the answer not in the manual?
Questions and answers