
Related Manuals for Wilson Electronics weboost AH100-PRO


Summary of Contents for Wilson Electronics weboost AH100-PRO
- Page 1 A WILSON ELECTRONICS BRAND AH100-PRO Cell Signal Booster Installation Guide NEED HELP? BoltonTechnicalAfrica.com +27796793305...
-
Page 2: Table Of Contents
______ Index Package Contents Preparation Connect Inside Antenna To Booster STEP 1: Mount & Point Outside Antenna Toward Nearest STEP 2: Cell Tower Route & Connect Cable To System STEP 3: Power Up The Booster & Optimize System STEP 4: Measuring Booster Performance Light Patterns Troubleshooting... -
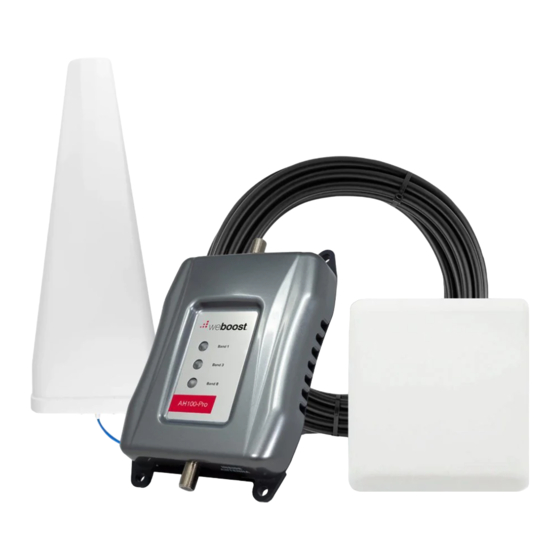
Page 3: Package Contents
______ Package Contents Outside Antenna Options Outside Outside Yagi Antenna Omni Antenna Inside Antenna Options Wall Mount Dome Antenna Panel In All Kits Roof/Pole Wall Mount 2 Coax Cables AM100 Power Bracket Mount (1 x 10m; 1 x 5m) Booster Supply Bracket SINGLE ROOM... -
Page 4: Preparation
______ Preparation You Will Need (tools not included) Make sure the following materials are prepared and ready for your installation. 1 to 2 hours 2 people (a person to help with antenna calibration) Ladder Phillips-head screwdriver 10mm open-end wrench or adjustable wrench Drill (if routing cable through wall) 3-5cm diameter pole existing pole (or order BT512631) Recommended: Power Strip with surge protection... -
Page 5: Step 1: Connect Inside Antenna To Booster
______ Step 1-A & B: Connect Inside Antenna To Booster Connect Inside Antenna cable to the bottom port on AH100-PRO booster labeled ‘INSIDE’ and place Inside Antenna in weak signal area at least 45 Centimeters away from booster. NOTE: Do not connect booster to power until the system is fully installed. Inside Antenna Booster... -
Page 6: Step 2: Mount & Point Outside Antenna Toward Nearest Cell Tower
______ Step 2: Mount & Point Outside Antenna Toward Nearest Cell Tower Locate your cell towers by using apps such as ‘Network Cell Info Lite’ or ‘Open Signal’. This is a critical step of the installation process because it will determine the overall performance of the booster system. Point the Outside Antenna toward the nearest cell phone tower if using a Yagi directional antenna. - Page 7 ______ (STEP 2 cont.) If using an omni-directional antenna, ensure that antenna is placed on highest point on roof for optimal broadcasting and reception. Cell Tower Pole Mounting Option Outside Antenna NOTE: Mounting on existing roof pipe would be a good time-saver option. eg. satellite dish pole. SINGLE ROOM CELL PHONE SIGNAL BOOSTER...
- Page 8 ______ Step 2-B Cont. Installing the indoor wall panel ______ (STEP 2 cont.) Wall Mounting Option Tap anchors in Drill holes using Fasten bracket to back 3/16 inch bit Secure bracket to wall of Outside Antenna mounting Outside Antenna on wall bracket sideview CELL PHONE SIGNAL BOOSTER SINGLE ROOM...
-
Page 9: Step 3: Route & Connect Cable To System
______ Step 3: Route & Connect Cable To System Connect the LMR240 Cable to Outside Antenna and route cable into the home. All connections should be hand tightened only. Outside Inside Antenna Antenna Booster LMR240 Cable A Window Entry Cable is available as an optional extra purchase. Outside Antenna Cell... -
Page 10: Step 4: Power Up The Booster & Optimize System
______ Step 4: Power Up The Booster & Optimize the System Warning: Do Not connect power supply to booster before connecting both outside and indoor antennas Plug the Power Supply into wall outlet then connect to AH100-PRO booster. to power Outside Antenna Booster... - Page 11 ______ (STEP 4 cont.) If using an omni-directional antenna, please skip this step. After powering up your system, you are now ready to optimize your system. If using a Yagi Directional antenna, turn it slowly, wait 30 seconds see if signal on cellular phone has improved by standing close to the indoor broadcasting panel antenna.
-
Page 12: Measuring Booster Performance
______ Measuring Booster Performance How To Get Signal Strength As A Number Dial *3001#12345#* then press Call. iPhone® 1 Hold down power button until you see ‘Slide to Power Off’. 2 Then release the power button. 3 Hold the Home button until your main screen appears. If you want to check 3G/1x but your iPhone is picking up 4G/ LTE signal, go to Settings>Cellular>Cellular Data Options>Enable LTE>Select Off. - Page 13 ______ (MEASURING BOOSTER PERFORMANCE cont.) Signal Strength without Booster Note here: Signal Strength with Booster Note here: Compare Results Having an accurate measurement of signal strength in decibels (dBm) is crucial when installing your system. Decibels accurately measure the signal strength you are receiving. EXCELLENT GOOD FAIR...
-
Page 14: Light Patterns
______ Light Patterns Solid Green This indicates that your booster is functioning properly and there are no issues with installation. Blinking Green, Then Red Band has reduced gain. This indicates that one or more of the booster bands has reduced power due to a feedback loop condition called oscillation. -
Page 15: Troubleshooting
______ Troubleshooting IF YOU ARE HAPPY WITH THE COVERAGE, THESE LIGHT ISSUES DON’T HAVE TO BE RESOLVED. YOUR CARRIER’S BAND HAS NOT BEEN AFFECTED. FIXING ANY RED LIGHT ISSUES This involves Solid Red & Blinking Green/Red lights. Verify Outside Antenna faces away from the Inside Antenna. Un-plug and re- plug in power supply. -
Page 16: Safety Guidelines
______ Safety Guidelines To uphold compliance with network protection standards, all active cellular devices must maintain at least 2 meters of separation distance from Inside Panel and Dome antennas and at least 1.2 meters of separation distance from desktop Antenna. Use only the power supply provided in this package. - Page 17 ______ Other Kit Options The following alternative kit options are available with the weBoost AH100-PRO Booster KIT. DESKTOP KIT RANGE YAGI-DESKTOP AD100_YD KIT: 1 X Outside Yagi Antenna 1 X 10m Bolton240 Cable 1 X Indoor Desktop Antenna 1X AH100-PRO AMPLIFIER...
-
Page 18: Specifications
______ Specifications AM100-Pro Signal Booster Specifications Product weBoost Signal Booster Model Number AH100-PRO Connectors Antenna Impedance OHm Frequency MHz 1920-1980 / 2110-2170 1710-1785 / 1805-1880 880-915 / 925-960 Bands Passband Gain UL/DL 53.9 / 53.7 49.9 / 51.8 49.3 / 50.1 20 dB Bandwidth (MHz) Typical 74.8... - Page 19 Notes SINGLE ROOM CELL PHONE SIGNAL BOOSTER...
-
Page 20: Warranty
1 YEAR WARRANTY weBoost Signal Boosters are warranted for one (1) year against defects in workmanship and/or materials. Warranty cases may be resolved by returning the product directly to the Bolton Technical with a dated proof of purchase. This warranty does not apply to any Signal Boosters determined by Bolton Technical to have been subjected to misuse, abuse, neglect, or mishandling that alters or damages physical or electronic properties.
Need help?
Do you have a question about the weboost AH100-PRO and is the answer not in the manual?
Questions and answers