
Subscribe to Our Youtube Channel
Related Manuals for Leister COMET 700


Summary of Contents for Leister COMET 700
- Page 1 English COMET 700 COMET 500 Leister Technologies AG Galileo-Strasse 10 6056 Kaegiswil/Switzerland Tel. +41 41 662 74 74 +41 41 662 74 16 www.leister.com sales@leister.com...
-
Page 2: Table Of Contents
5.1. Checking the position of the hot wedge 5.2. Contacting system setup 6. Quick Guide COMET 700/500 6.1. Switch on COMET 700/500 (upper line) 6.2. Switch off COMET 700/500 (lower line) 7. Control panel of the COMET 700 7.1. Control panel overview 7.2. - Page 3 12.1. Work environment and safety 12.2. Preparation for welding 12.3. Welding process 13. COMET 500 errors 14. Frequently asked questions, causes, and measures COMET 700/500 15. Assembly of accessories COMET 700/500 15.1. Replacement of the drive/pressure rollers 15.2. Assembling the field kit 15.3.
-
Page 4: Application Comet 700/500
We recommend that you always keep the instruction manual with the device. COMET 700/500 Hot wedge welding machine You can find more information on the COMET 700/500 and the myLeister app at www.leister.com 1. Application COMET 700/500 1.1. Important safety instructions Read through the operating instructions before commissioning for the first time. -
Page 5: Intended Use
1.2. Intended use The COMET 700/500 is intended for overlap welding of thermoplastic films and sealing sheets. Only use original Leister spare parts and accessories; otherwise, any warranty and/or guarantee claims will be invalidated. Welding geometry •... -
Page 6: Technical Data Comet 700/500
2. Technical data COMET 700/500 COMET 700 COMET 700 COMET 500 230 V 120 B 230 V Voltage * V~ Power 2300 1700 2300 Frequency 50/60 °C 80 – 460 Temperature °F 176 – 860 m/min 0.8 – 8.0 Drive ft/min 2.6 –... -
Page 7: Transport Comet 700/500
Comply with applicable national regulations regarding the carrying or lifting of loads. The total weight of your COMET 700/500 including transport box is up to 14.5 kg (depending on the version). To lift the hot wedge welding machine manually, use... -
Page 8: Your Comet 700/500
Example of a name plate for COMET 700 and COMET 500 4.2. Scope of delivery Standard equipment in the storage box: • 1x COMET 700/500 hot wedge welding machine (according to your specification) • 1x Quick Guide (glued into case) • 1x Safety instructions •... -
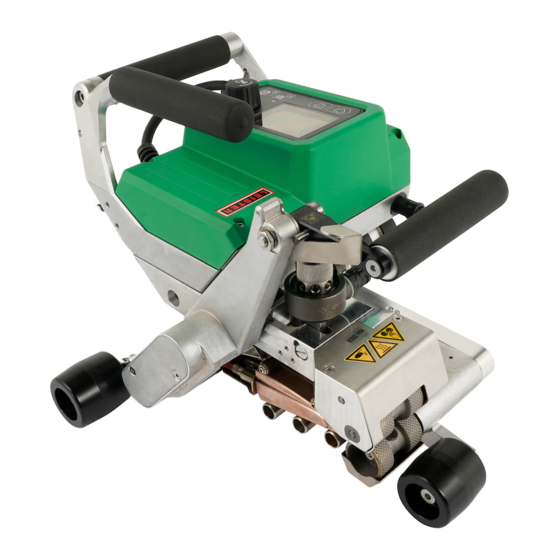
Page 9: Overview Of Device Parts
11. drive/pressure roller bottom 2. for handles 12. roller rear 3. on control panel 13. contacting system bottom (3a COMET 700, 3b COMET 500) 14. contacting system top 4. clamping lever 15. hot wedge 5. for locking clamping lever 16. rollers front (according to your device specification) 6. -
Page 10: Park Position
Condition of device prior to Duration power Condition of device after power supply interruption power supply interruption outage COMET 700 COMET 500 If the BASIC recipe is load- ed: The device continues to run without a restart safeguard with the same... -
Page 11: Settings On Comet 700/500
5. Settings on COMET 700/500 5.1. Checking the position of the hot wedge Before the hot wedge is aligned with the welding machine, the device must be cooled down and the main switch must be switched off. The power cord must have been disconnected from the power supply. -
Page 12: Contacting System Setup
5.2. Contacting system setup Depending on the hot wedge length and the material to be welded, a different setup of the lower contacting system (13) and the upper contacting system (14) is necessary in order to improve contacting on the welding wedge (15). -
Page 13: Quick Guide Comet 700/500
(to use LQS) 2 sec 2 sec QG COMET 700/500 / Art. 172.370 / 08.2021 6.1. Switch on COMET 700/500 (upper line) 1. Connect the power supply cord (1) to the voltage source 2. Switch on the device at the main switch (17) 3. -
Page 14: Control Panel Of The Comet 700
7. COMET 700 control panel 7.1. Control panel overview 22. Up key 23. Down key 24. Heating on/off key 25. Drive on/off key 26. Status LED 27. e-drive 28. Function display 29. Working display 30. Status display area 1 31. Status display area 2 7.2. -
Page 15: Display Of The Status Led
Working display (29), then this will be displayed as followed: Warning and error messages LED flashes red Warning message for the heating COMET 700 [10] Warning and error messages LED lights up red Error message for the heating... -
Page 16: Display Symbols Of The Status Display
7.4. Display symbols of the status display Status display area 1 (30) Welding parameters currently selected Recipe name If names consist of more than 6 characters, the first 6 characters are shown first, followed by the remaining characters. 230 V Current supply voltage at power plug No. -
Page 17: Display Symbols Of The Working Display
An error has occurred. An error code also appears. (The device is no longer ready for operation.) Contact an authorized service center. Warning and error messages COMET 700 [10] Device has a warning Warning and error messages COMET 700 [10] The arrow pointing upward and the progress bar indicate that the setpoint (shown °C... -
Page 18: Comet 700 Control Panel Setup Menu
8. COMET 700 control panel setup menu 8.1. Menu navigation overview Available only in Advanced Mode... -
Page 19: Setting Up, Saving, And Selecting Recipes (Save Recipes)
8.2. Setting up, saving, and selecting recipes (Save recipes) Your COMET 700 has more than 9 freely definable recipes and the BASIC recipe available. Save Recipes saves the currently set target values of the drive and hot-wedge temperature welding parameters under a user-definable name (max. - Page 20 Overwrite existing recipe 1. Set up new target values [Working display (29), e-drive (27)], heating and drive do not have to be switched on 2. Select and confirm symbol Settings [Function display (28), e-drive (27)] 3. Select and confirm menu Recipes [Menu selection, e-drive (27)] 4.
-
Page 21: Entry Of Recipe Names
8.3. Entry of recipe names Names must be defined with a max. 12 characters. Symbol selection (33) Character selection (32) Up (22) Vertical character selection Down (23) Rotate Horizontal character selection Horizontal symbol selection e-drive (27) Press Confirm the selected characters Confirm the selected symbols e-drive (27) Change between upper and lower case... -
Page 22: Standby Mode
8.4. Standby Mode Standby mode is deactivated on delivery from the factory. Enable standby mode 1. Select and confirm symbol Settings [function display (28), e-drive (27)] 2. Select and confirm menu Standby [Menu selection, e-drive (27)] 3. Confirm Standby, turn e-drive (27) clockwise (Standby I) and confirm [Menu selection, e-drive (27)] 4. -
Page 23: Duty Info
8.6. Duty Info Only available with advanced functions Advanced Mode. Under Duty Info you will find information regarding the runtime of your COMET 700. Hours Drive: current running time of the drive Hours Heating: current running time of the heating... -
Page 24: Application Mode
8.10. Application Mode Only available with advanced functions Advanced Mode. Application Mode provides an overview of relevant information such as mains voltage, utilization of heating, etc. Enable display of current values 1. Activate advanced functions [see Advanced functions (Advanced Mode) [8.5]] 2. -
Page 25: Welding Data Recording And Wlan Settings Wlan Settings
Only available with advanced functions Advanced Mode. Your COMET 700 has the Leister Quality System (LQS) and thus the function of welding data recording. Using the LQS and myLeister app, the COMET 700 records the drive speed, the hot-wedge temperature and the joining force during welding over the welding seam length at the specified distance interval. -
Page 26: Key Lock
8.15. Key lock The COMET 700 has a key lock. This locks the four keys (22 to 25) and the e-drive (27) on the control panel (3). The key lock is activated or deactivated by simultaneously pressing the Up and Down keys (22/23) for at least 2... -
Page 27: Commissioning Comet 700
When using mobile power generators with a THD value greater than 6%, damage to electronic components may occur. Leister therefore recommends using portable power generators with inverter technology. The hot wedge welding machine may only be switched on and off when the generator is running, otherwise the electronic components may be damaged. - Page 28 (see Settings on the COMET 700/500 [5]). • After startup, the Start screen will appear briefly in the display with the device designation and the version number of the current firmware release and the device designation.
-
Page 29: Welding Process
Setting the welding parameters for the drive speed and hot-wedge temperature before welding If the drive is switched off, the working temperature and drive speed welding parameters in the working display (29) are set as follows: • Using the Up (22) and Down (23) arrow keys, you can set the cursor to the desired working display (29). •... - Page 30 Setting the welding parameters for the drive speed and hot-wedge temperature before welding If the drive is switched off, the working temperature and drive speed welding parameters in the working display (29) are set as follows: • During welding, the drive speed is locked and the cursor is positioned in the drive speed field. •...
-
Page 31: Warnings And Error Messages Comet 700
(Error) Group 0004'XXXX Hardware Issues e.g. 00040002 Group 0008'XXXX Temperature Sensor Issues e.g. 00080001 Group 0200'XXXX Communication Module Issues e.g. 02000001 Group 0400'XXXX Drive Issues e.g. 04000001 Take a photo of the error message and contact your Leister Service Center. -
Page 32: Comet 500 Control Panel
11. COMET 500 control panel 11.1. Control panel overview 37. Drive on/off key with status LED 38. Heating on/off key with status LED 39. Minus key 40. Confirm key 41. Plus key 42. Display fields The actual values are displayed in large font and the setpoint values in small font. -
Page 33: Display Symbols
11.3. Display symbols Symbol Meaning Key lock active Cool Down Mode Symbol for cooling Error present error messages COMET 500 [13] Service required 11.4. Setting the unit system The units for the hot wedge temperature and drive speed can be adjusted. Temperature: °C °F... -
Page 34: Commissioning Comet 500
When using mobile power generators with a THD value greater than 6%, damage to electronic components may occur. Leister therefore recommends using portable power generators with inverter technology. The hot wedge welding machine may only be switched on and off when the generator is running,... -
Page 35: Preparation For Welding
(17) once you have prepared the working environment and set the hot wedge welding machine according to the description (see Settings on the COMET 700/500 [5]). • After startup, the Start screen will appear briefly in the display with the device designation and the version number of the current firmware release and the device designation. - Page 36 Adjusting the joining force The joining force module (6) on the COMET 500 prevents the setting of excessive joining force when welding material thicknesses of up to 3 mm. A smaller joining force is applied for thinner materials and a greater joining force for thicker materials.
-
Page 37: Welding Process
12.3. Welding process Notes For satisfactory welding quality, the following instructions must be observed. • Before the automatic welder is used, test welds are to be carried out in accordance with the welding instruc- tions of the material manufacturer and with national standards or guidelines. The test welds must be checked. •... -
Page 38: Comet 500 Errors
Group 0400'XXXX Drive Issues e.g. 04000001 Take a photo of the error message and contact your Leister Service Center. 14. Frequently asked questions, causes, and measures COMET 700/500 Deficient welding result quality: • Check drive speed, hot wedge temperature and potentially joining force •... -
Page 39: Assembly Of Accessories Comet 700/500
15.1. Replacement of drive/pressure rollers Depending on the application, you can use different drive/pressure rollers (9/11) for the COMET 700/500. Vari- ous rollers are available. Ask your distributor for further information. -
Page 40: Assembling The Field Kit
15.2. Assembling the field kit If a greater floor clearance or larger track rollers are required for the hot wedge welding machine, the indoor roll- ers can be replaced by the field kit. Depending on the configuration, you have already mounted the field kit. Dismantling the rear track roller (12): Sequence no. -
Page 41: Assembling The Guide Bar
15.3. Assembling the guide bar With the guide bar, you can guide the automatic welder in an upright position. Assembling guide bar (optional accessories): Sequence no. 1 – 5 Disassembling guide bar (optional accessories): Sequence no. 5 – 1 1. Cylinder screw (2x) 2. -
Page 42: Maintenance Comet 700/500
• Repairs must only be carried out by authorized Leister service centers. • Do not use any aggressive cleaning agents or solvents to clean the device. • Leister service centers guarantee a professional and reliable repair service with original spare parts. • You can find more information at www.leister.com. -
Page 43: Disposal Comet 700/500
Bruno von Wyl, CTO Christoph Baumgartner, GM UK Declaration of Conformity Leister Technologies AG, Galileo-Strasse 10, 6056 Kaegiswil, Switzerland confirms that these products, in the versions as brought into circulation through us, fulfil the requirements of the following UK Statutory Instruments. UK Statutory Instruments: 2008 No. - Page 44 Heating elements are excluded from warranty obligations or guarantees. • Guarantee or warranty claims cannot be asserted for devices that have been converted or changed by the purchaser or for which non-original Leister spare parts have been used. Sales and service center Leister Technologies AG...
Need help?
Do you have a question about the COMET 700 and is the answer not in the manual?
Questions and answers