
Related Manuals for Leister UNIDRIVE 500


Summary of Contents for Leister UNIDRIVE 500
- Page 1 ® English UNIDRIVE Leister Technologies AG Galileo-Strasse 10 CH-6056 Kaegiswil, Switzerland Tel. +41 41 662 74 74 +41 41 662 74 16 www.leister.com sales@leister.com...
-
Page 2: Table Of Contents
8.5 Display symbols for the welding temperature (Display 22) 8.6 Display symbols for the air volume (Display 23) 8.7 Status LED display 9. Settings and functions of the UNIDRIVE 500 software 9.1 Setting the parameter units 9.2 Setting the welding parameters 9.3 Cool down mode... -
Page 3: Application
• Swimming pool models • Waterstops for below-grade concrete applications • Circumferential welds 1.2 Improper use Any other use of the UNIDRIVE 500 or any use beyond the type of use described is deemed improper use. 2. Technical data UNIDRIVE 500 UNIDRIVE 500... -
Page 4: Transport
3. Transport Comply with applicable national statutes regarding the carrying or lifting of loads. The weight of your UNIDRIVE 500 including the transport box is 7.5 kg (4.5 kg without trans- port box). Transport the semi-automatic hot air welder only with the transport box included with the... -
Page 5: Your Unidrive 500
The model and serial number are indicated on your device's type plate (12). Please enter this information in your operating instructions and always reference it when addressing queries to our representatives or authorized Leister Service Centers. Model:................................Serial no.: ................................. -
Page 6: Overview Of Device Parts
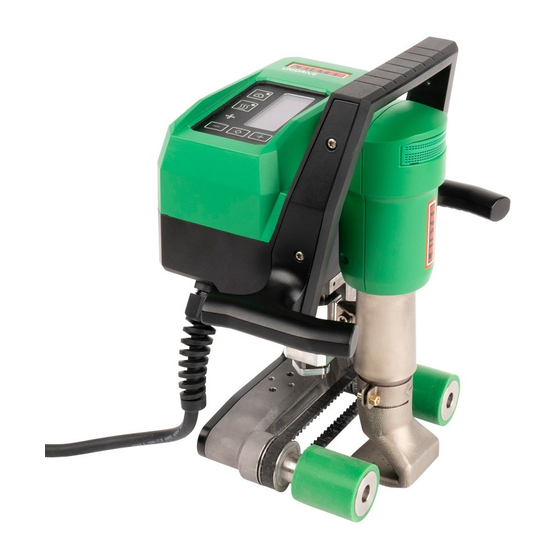
4.3 Overview of device parts 10 9 1. Power cord 2. Housing 3. Operating unit 4. Carrying handle, top 5. Handle, side 6. Hot-air blower 7. Drive/pressure roller 8. Welding nozzle 15-40 mm 9. Drive and pressure belt 10. Undercarriage 11. -
Page 7: Settings On The Unidrive 500
5. Settings on the UNIDRIVE 500 5.1 Adjusting the Welding Nozzle Set welding direction and angle Hexagon socket screw The direction of the arrow on the welding nozzle (8) defines the welding direction. Align the welding nozzle (8) parallel to the drive/pressure roller (7). -
Page 8: Retooling For Different Welding Widths
5.2 Retooling for different welding widths To retool to a different welding width, proceed in accordance with the sequence described below. Step 1: Safety precautions Allow the device to cool down in Cool Down mode. Before beginning with dismantling work, make sure that the power cord (1) is disconnected from the mains. -
Page 9: Commissioning Your Unidrive 500
6. Commissioning your UNIDRIVE 500 6.1 Work environment and safety Step 1: Safety precautions The semi-automatic hot-air welder must only be used in the open or in a well-ventilated area. Never use the semi-automatic hot-air welder in explosive or readily inflammable surroundings and maintain sufficient distance from combustible materials or explosive gases at all times. -
Page 10: Operating Readiness
Caution: The device may fall or drop in an uncontrolled manner due to gravity. The securing point is not designed to withstand the shock-like stress of an abrupt fall. Contact the manufacturer without hesitation if uncertainties arise during installation or operation. Power cord and extension cable •... -
Page 11: Starting The Device
Tool resting position • Place the semi-automatic hot-air welder on a horizontal and fireproof surface. • The semi-automatic hot-air welder is placed on its back for the resting position (heating, cool down mode). 6.4 Starting the device • Once you have prepared the working area and the semi-automatic hot-air welder in accordance with the description, connect the device to the mains voltage. -
Page 12: Welding Sequence
6.5 Welding sequence Preparing for welding As soon as you have switched on the heating, you will see a dynamic display of the cur- rent air temperature (setpoint and actual value). All welding parameters (welding speed, temperature and air volume) can be set. •... -
Page 13: Quick Guide Unidrive 500
• Check the power cord (1) and plug for electrical and/or mechanical damage. • Clean the welding nozzle (8) with a wire brush (available as an option). 7. Quick Guide UNIDRIVE 500 7.1 Switching on/Starting 1. Connect the mains voltage plug 2. -
Page 14: Display
Symbol Designation Function "Motor Switches drive on and off On/Off (15) Heating key Switches heating on and off On/Off (16) Blower symbol No function Setting the required setpoint in Minus / Plus keys (17) increments of 0.1m/min, 10 °C or 5% "Confirm"... -
Page 15: Display Symbols Of The Status Display (Display 20)
Warning and error messages 18 [10]) Indicates service required. Symbol for hardware error message. The device is no longer ready for operation. Contact an authorized Leister Service Center. (Note the respective error code in Chapter Warning and error messages 18 [10]). -
Page 16: Settings And Functions Of The Unidrive 500 Software
If the two LEDs for the Heating «On/Off» (16) key and the Drive «On/Off» (15) key flash simultaneously, an error is pending (see Chapter Error messages). 9. Settings and functions of the UNIDRIVE 500 software 9.1 Setting the parameter units The units for the welding speed and for the temperature can be adjusted. -
Page 17: Cool Down Mode
Hold down the Drive "On/Off" key (15) and the Minus or Plus key (17) for three seconds. • Minus key clockwise • Plus key counterclockwise The direction of the arrow changes in the Welding speed display (21). Quick Guide UNIDRIVE 500 13 [7]... -
Page 18: Warning And Error Messages Unidrive 500
The heating is switched off automatically and the drive is blocked. The corresponding error codes are displayed immediately on the display of the operating unit (3). The first four digits indicate the error group. The second four digits indicate the detailed error. Contact an authorized Leister Service Center. Example:... -
Page 19: Faq, Causes And Measures Unidrive 500
11. FAQ, causes and measures UNIDRIVE 500 The machine switches on automatically after the blowers have been switched on: • If the air temperature is more than 100°C when the device is switched on, the device switches automatically to cool down mode. The cool-down process is finished when the air temperature is less than 100 °C for two minutes. -
Page 20: Declaration Of Conformity
12. Declaration of Conformity EC declaration of conformity (in terms of the EC machinery directive 2006/42/EC; Appendix II A) Leister Technologies AG Galileo-Strasse 10, CH-6056 Kaegiswil/Switzerland hereby declares the machine described below, released by us, fulfills the provisions of the... - Page 21 ® © Copyright by Leister Warranty • The guarantee or warranty rights granted for this device by the direct distribution partner/salesperson apply from the date of purchase. In the event of a guarantee or warranty claim (verification by invoice or delivery note), manufacturing or processing errors will be rectified by the sales partner through replacement delivery or repair.
Need help?
Do you have a question about the UNIDRIVE 500 and is the answer not in the manual?
Questions and answers