Leister VARIANT T1 Manual
Hide thumbs
Also See for VARIANT T1:
- Manual (88 pages) ,
- Operating instructions manual (128 pages) ,
- Operating instructions manual (96 pages)
Table of Contents
Advertisement
Quick Links
See also:
Manual
Advertisement
Table of Contents

Subscribe to Our Youtube Channel
Related Manuals for Leister VARIANT T1


Summary of Contents for Leister VARIANT T1
- Page 1 ® VARIANT T1 Leister Technologies AG Galileo-Strasse 10 CH-6056 Kaegiswil/Switzerland Tel. +41 41 662 74 74 +41 41 662 74 16 www.leister.com sales@leister.com...
-
Page 2: Table Of Contents
You have opted for a first-class hot-air welding machine made of high-quality materials. This device has been developed and manufactured in accordance with the latest welding technologies. Every VARIANT T1 undergoes stringent quality checks before leaving the factory in Switzerland. Table of Contents... - Page 3 (Translation of the original operating instructions) Read the operating instructions carefully before starting the device and keep them for future reference. Leister VARIANT T1 Hot-air welding machine Application • Handheld hot-air welding machine for overlap, hem and piping welding of tarpaulin material (PVC and similar ma- terials).
- Page 4 Conformity Leister Technologies AG, Galileo-Strasse 10, CH-6056 Kaegiswil/Switzerland confirms that this product in the version put into circulation by us, fulfils the requirements of the following EU directives. Directives: 2006/42, 2004/108, 2006/95, 2011/65 Harmonised standards: EN 12100-1, EN 12100-2, EN 14121-1,...
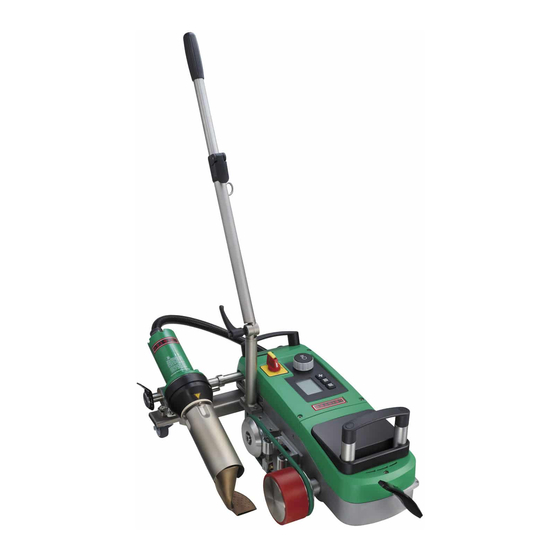
- Page 5 23 Round belt 11 Pressure roller 24 Screw lever for guide bar bottom Main switch (3) For switching the hot-air welding machine VARIANT T1 On / Off Controls (4) e-Drive Drive The e-Drive serves as a navigator. Sets the drive speed...
- Page 6 7. Carry out a test weld according to the welding instructions of the material manufacturer and national standards or directives. Check test weld. 8. Welding How do I switch off the hot-air welding machine VARIANT T1? 1. Press e-Drive (Fig. 1). 2. Press «Cool down OK» e-Drive and allow to cool approx.
- Page 7 Operational Availability • Before putting into operation, check power supply cord (1) and connector as well as extension cable for electrical and mechanical damage. • The default setting for the welding nozzle (9) is made at the factory. • Check the default setting of the welding nozzle (9). –...
- Page 8 Welding Workflow • Preparation Carry out a test weld according to the welding instruction of the material manufacturer and national standards or guidelines. Check test weld. – Set welding parameters for drive, heating and blower (see Section 1, Work Mode). –...
- Page 9 Transport Readiness • Swivel guide roller (15) upwards. • Push hot-air blower (8) to the right until the locking cam (10) latches into the recess of the holding handle (28). The hot-air blower (8) is in the parked position. • Lower the transport rollers (26) by swivelling the handle (27). The pressure roller (11) and diverting roller (12) are relieved for transport in this way.
-
Page 10: Setpoint Value Display
100 %, the symbol will be displayed flashing with the measured undervoltage /overvoltage (Fig. 7). (Only possible with VARIANT T1 230 V~). Undervoltage/Overvoltage can affect the welding results! Profile Profile • If no button is pressed after a definite time (welding nozzle (9) (Fig. -
Page 11: Setting The Drive Speed
3 seconds, the mains voltage will appear below the drive speed. This call-up is only possible from the Work display (Section 1.2). (Only possible with VARIANT T1 230 V~). • You can change to the relevant menu by pressing the Drive or Blower button. -
Page 12: Setting The Air Volume
1. Work Mode 1.5 Setting the air volume • The air volume can be changed with the Blower button. The air volume can be set in 5% increments from 40% to 100% by turning the e-Drive . .The setting is accepted after 3 seconds, as long as no button is pressed within these 3 seconds. -
Page 13: Selecting Profiles
1. Work Mode 1.7 Selecting Profiles • If the display at the right bottom of the display (5) is activated, profiles can Profile be loaded by pressing the e-Drive . The display «Select Profile» then appears. A profile can be selected by turning the e-Drive . -
Page 14: Standby
Triac defective (one or both Triacs are defective) Err08 Blower motor defective Err40 Undervoltage 25% (mains voltage 75%) only VARIANT T1 230 V~ 2. Profile Setup 2.1 Profile Setup Button Combination Keep Drive and Heating buttons pressed with main switch ON at the same time. -
Page 15: Creating Profiles
2. Profile Setup 2.2 Creating Profiles • The Profile Setup allows you to create 3 individual profiles for which the name, and all three parameters Drive , Heating Blower can be freely set and then saved by pressing the e-Drive (Fig. - Page 16 Error – Cause – Remedy • Machine switches off automatically – The machine is automatically switched off after a set time with Standby mode (factory setting 40 minutes). If needed, increase standby time (Page 33, 2. Profile Setup, 2.3 Standby Setup). •...
- Page 17 Error – Cause – Remedy • Weld seam width is not constant – Carry out fine adjustment of the guide roller as follows: – Allow welding nozzle (9) to cool (Page 31, 1. Work Mode, 1.8 Cooling) – Move welding nozzle (9) into welding position –...
- Page 18 Welding Applications...
- Page 19 Article no. 141.892 VARIANT T1, 230 V / 20 mm welding nozzle / with European plug Article no. 141.893 VARIANT T1, 400 V / 40 mm welding nozzle / with CEE plug (3LNPE) Article no. 141.894 VARIANT T1, 400 V / 20 mm welding nozzle / with CEE plug (3LNPE) Article no.
- Page 20 ® © Copyright by Leister Your authorised Service Centre is: Leister Technologies AG Galileo-Strasse 10 CH-6056 Kaegiswil/Switzerland Tel. +41 41 662 74 74 Fax +41 41 662 74 16 www.leister.com sales@leister.com...
Need help?
Do you have a question about the VARIANT T1 and is the answer not in the manual?
Questions and answers