Table of Contents
Advertisement
Quick Links
Version: V1.00.000
Revised date: 05-11-2021
Statement:
We reserve the rights to make any change to product designs and specifications without notice. The actual
object may differ a little from the descriptions in the manual in physical appearance, color and configuration.
We have tried our best to make the descriptions and illustrations in the manual as accurate as possible, and
defects are inevitable, if you have any question, please contact local dealer or after-sale service center, we
shall not bear any responsibility arising from misunderstandings.
Advertisement
Table of Contents

Related Manuals for Thinkcar ADAS


Summary of Contents for Thinkcar ADAS
- Page 1 Version: V1.00.000 Revised date: 05-11-2021 Statement: We reserve the rights to make any change to product designs and specifications without notice. The actual object may differ a little from the descriptions in the manual in physical appearance, color and configuration. We have tried our best to make the descriptions and illustrations in the manual as accurate as possible, and defects are inevitable, if you have any question, please contact local dealer or after-sale service center, we shall not bear any responsibility arising from misunderstandings.
- Page 2 On Using THINKCAR ADAS Calibration Tool In order to avoid incorrect handling and injury to the user or destruction of the THINKCAR ADAS calibration tool arising from this, pay attention to the following: •...
- Page 3 Do not use this tool outside of the designed intent. Never modify the tool for any other purpose or use. PRODUCT INFORMATION • As a flexible and portable ADAS calibration tool, it enables you to effectively and accurately calibrate a wide range of camera-based driving assistance systems.
-
Page 4: Table Of Contents
2.3.2.2 Determine the placement location of the THINKCAR ADAS ..........27 2.3.2.3 Place the THINKCAR ADAS ....................28 2.3.2.4 Adjust the THINKCAR ADAS in parallel with the vehicle ............28 2.3.2.5 Select the desired target / pattern board .................29 2.3.2.6 Set the height ..........................33 3 Start Calibration ............................34... - Page 5 THINKCAR ADAS Calibration Tool 3.2.2 Operation Notes ..........................46 3.2.3 Start calibration ..........................48 4 Target Pattern Kit (Optional) ........................54 5 Care & Maintenance ..........................56 VIII...
-
Page 6: Product Profile
To perform the ADAS calibration, the following two components are required: • THINKCAR ADAS Calibration Tool – It is designed to calibrate the position of the vehicle sensor and target. It consists of a calibration frame (with cross member), five-line laser device, cross laser module, laser reflector, auxiliary mirror, L -shaped positioning bracket, leader hammer and calibration panel (available in... - Page 7 THINKCAR ADAS Calibration Tool • Diagnostic Tool (sold separately) – The calibration tool is exclusively operated in conjunction with a specific diagnostic tool. Diagnostic tools from other manufacturers will not be supported.
-
Page 8: Packing List
THINKCAR ADAS Calibration Tool 1.2.2 Packing List Please check the packing list upon receiving your tool so that potential complaints can be issued immediately regarding potential damage or missing parts. For different destinations, the accessories may vary. For details, please consult from the local dealers or check the included packing list. - Page 9 THINKCAR ADAS Calibration Tool Plumb line (LAM09-06) Target storage bracket (LAM09-07) Target extension rod for Toyota (LAM09-08) Target extension rod for Honda (LAM09-09) Laser range finder Cross sticker...
- Page 10 Target boards and patterns for Lane Departure Warning System are included with this tool. Other Calibration target / pattern boards boards and patterns for other ADAS systems need to be purchased separately. For detailed packages, refer to Chapter Target Pattern Kit.)
- Page 11 THINKCAR ADAS Calibration Tool LAM01-06-2 Toyota-LDW LAM01-06-3 Toyota-LDW LAM01-07-L Nissan-LDW LAM01-07-R Nissan-LDW LAM01-09 Hyundai/Kia-LDW LAM01-10 Mazda-LDW LAM01-12-L Nissan/Renault-LDW LAM01-12-R Nissan/Renault-LDW...
- Page 12 THINKCAR ADAS Calibration Tool LAC01-13 Hyundai-LDW LAM01-15 Subaru-LDW LAM01-16-L Mazda-LDW LAM01-16-R Mazda-LDW LAM01-17 Honda-LDW LAM01-18-L Suzuki-LDW LAM01-18-R Suzuki-LDW...
- Page 13 THINKCAR ADAS Calibration Tool LAM01-19-L Mitsubishi-LDW LAM01-19-R Mitsubishi-LDW LAM01-20 Honda-LDW LAM05-02 ACC Reflector LAC05-03 CORNER REFLECTOR LAC05-04 Doppler Simulator...
-
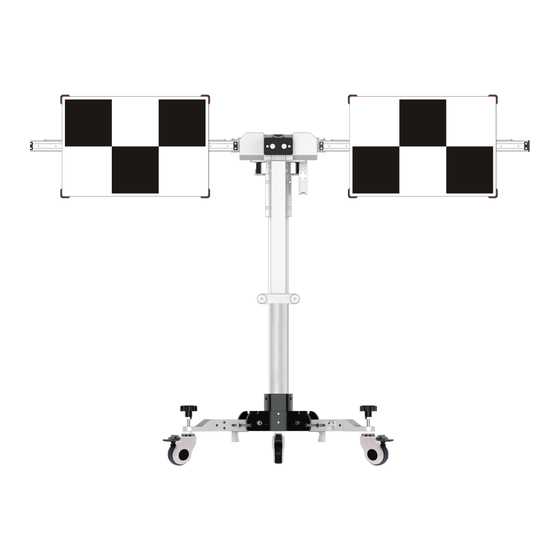
Page 14: Components & Controls
THINKCAR ADAS Calibration Tool 1.3 Components & Controls The THINKCAR ADAS calibration tool mainly includes the following items and components: 1.3.1 Calibration frame The calibration frame consists of the following components: A - Right crossbar Loaded with a scale ruler, a positioning plate for securing the target boards. - Page 15 THINKCAR ADAS Calibration Tool Front View 1. Right crossbar 2. Scale ruler* 3. Set screw* For securing the positioning plate. When released, the positioning plate (7) can be moved along the sliding rail freely. When unfolding the right / left crossbar, please tighten the set screw to prevent the positioning plate (7) from sliding, as this could result in injury.
- Page 16 THINKCAR ADAS Calibration Tool it should be lifted up to ensure a proper installation of the pattern board. 9. Laser range finder For measuring the height of the center of the pattern board from the ground. A right tolerance is adjusted for the calibration height of every vehicle on the diagnostic tool.
-
Page 17: Five-Line Laser Device (Lam09-01)
THINKCAR ADAS Calibration Tool 18. Hand crank For adjusting the height of the lifter. 19. Handle 1.3.2 Five-line laser device (LAM09-01) The five-line laser device is used for aiming laser beams in five directions to position the calibration frame and vehicle. - Page 18 THINKCAR ADAS Calibration Tool Installation of the lithium-ion battery pack 1. Press down the latch of the cover and pull the battery cover. Lithium battery 2. Insert the lithium-ion battery pack with the contact terminal towards the 2 small pins in the battery compartment.
- Page 19 THINKCAR ADAS Calibration Tool Warning: Batteries can deteriorate, leak or explode, and can cause injury or fire. 1. Do not shorten the battery terminals. 2. Do not charge Alkaline batteries. 3. Do not mix old and new batteries. 4. Do not dispose of batteries into household waste.
-
Page 20: Cross Laser Module (Lam09-02)
THINKCAR ADAS Calibration Tool 1.3.3 Cross laser module (LAM09-02) While adjusting the calibration frame in parallel with the vehicle, the laser module can be used. Generally it should be attracted onto the magnetic laser fix-plate (8) of the calibration frame. -
Page 21: Auxiliary Laser Mirror (Lam09-04)
MDADASADAPT THINKCAR ADAS Calibration Tool 1.3.5 Auxiliary laser mirror (LAM09-04) The auxiliary laser mirror is used to position the center line by ensuring the front and rear center points of the vehicle are on the same line. 1.3.6 L -shaped positioning bracket (LAM09-05) The L-shaped positioning bracket aids in locating the center of the front wheels to correctly position the calibration frame. -
Page 22: Target Extension Rod For Toyota (Lam09-08)
THINKCAR ADAS Calibration Tool 1.3.9 Target extension rod for Toyota (LAM09-08) Generally the height of the calibration frame is specially designed to meet the calibration requirement of most vehicles, but for some vehicles with lower calibration height, the target extension rod is required. -
Page 23: Laser Range Finder
Since the laser range finder is not on the same level as the target board/pattern board, a precise tolerance value is preset in the ADAS calibration software for all vehicles and no more settings and calculations are required by users. When measuring the height, just follow the onscreen prompt height value to perform the calibration. - Page 24 THINKCAR ADAS Calibration Tool Laser class Laser type 635-650mm, power < 1mW Battery 2 AAA batteries or Lithium battery Dimensions 4 x 1.4 x 0.7 inch (100 x 35 x 18mm) Operating Temperature 14°F ~ 104°F / -10℃ ~ 40℃...
-
Page 25: Initial Use
THINKCAR ADAS Calibration Tool 2 Initial Use 2.1 Place the calibration frame By default, it is folded for easier shipment. Follow the steps below to unfold it. The heavy tool may tilt down and cause injuries, remember to always unfold the tool with the aid of a second person. - Page 26 THINKCAR ADAS Calibration Tool 5. Pull the right crossbar (1) up until it fully attaches to the positioning bracket (B), then use the safety snap hook (5) to fix it. Beware of pinching hands while performing this step. 6. Repeat step 5 to unfold the left crossbar.
-
Page 27: Activate Adas Function
(sold separately) first. Follow the steps below to activate it. Different diagnostic tools have different accesses to the ADAS function. For details, please refer to the user manual of individual scanner. -
Page 28: General Calibration Operations For Ldw System
• Prepare calibration reference pattern. • A diagnostic tool supporting ADAS system calibrating is required (sold separately). • Front & rear axle track is properly adjusted. • To calibrate accurately, please make sure the following workstation requirements are met (See Chapter 2.4.1.1 ~ Chapter 2.4.1.3). -
Page 29: Workstation Ground
THINKCAR ADAS Calibration Tool 2.3.1.2 Workstation ground Make sure the vehicle is parked with all wheels on an even floor surface. Correct: Wrong: ... -
Page 30: Workstation Lighting
For some vehicle models, calibration pattern and calibration tool are not mandatory. But for some camera-based ADAS, the calibration cannot be done without the help of calibration tool and calibration pattern. In this case, for the positioning of the calibration tool and vehicle, it is necessary for the user to manually finish it. - Page 31 THINKCAR ADAS Calibration Tool 2. Place five-line laser instrument LAM09-01 at point A (the side of the laser instrument embedded with the logo opposite to the driving direction) to ensure that the red dot on the case aligns with the point A.
-
Page 32: Determine The Placement Location Of The Thinkcar Adas
THINKCAR ADAS Calibration Tool 2.3.2.2 Determine the placement location of the THINKCAR ADAS The placement location of the THINKCAR ADAS varies with the vehicles being serviced. Please strictly follow the on-screen prompts to determine it. In general, it includes the following possible options: A. -
Page 33: Place The Thinkcar Adas
2. Turn the cross laser instrument LAM09-02 on, and then place the THINKCAR ADAS to make the laser cross point of cross laser instrument LAM09-02 overlap point C. -
Page 34: Select The Desired Target / Pattern Board
THINKCAR ADAS Calibration Tool crossbar is parallel to the vehicle. 2. Turn off the cross laser instrument LAM09-02 and detach it from the center positioning plate. 3. Step the parking safety mechanism (12) down to fix the calibration frame to prevent it from moving. - Page 35 THINKCAR ADAS Calibration Tool 3). Place the mounting holes on the pattern board holder. 4). Slide the positioning plates at both ends until they firmly secure the pattern board.
- Page 36 firmly secured on the plate. 2). According to the on-screen ADAS calibration instructions on the diagnostic tool, • If the target board (e.g. LAM01-06-2) is installed on the left or right positioning plate, slide the positioning plate along the crossbar to the desired position (a red scale indicator (4) on the top of the bracket points at the scale ruler (2) on the crossbar).
- Page 37 • If the target board extension rod (e.g. LAM09-08 / LAM09-09) is required (in the condition that the height or width of the THINKCAR ADAS cannot meet the specified value), first attach the extension rod on the positioning plate, and then install the target board on the extension rod.
-
Page 38: Set The Height
THINKCAR ADAS Calibration Tool 2.3.2.6 Set the height Use the hand crank (18) to adjust the height until the value displayed on the laser range finder matches the value specified in the on-screen instructions. Since the laser range finder is not on the same level as the target board/pattern board, a precise tolerance value is adjusted for the calibration height of each vehicle on the diagnostic tool and no more settings and calculations are required by users. -
Page 39: Start Calibration
THINKCAR ADAS Calibration Tool 3 Start Calibration 3.1 Calibrating the front camera This chapter describes a general operation procedure of front camera calibration. For example, here we take the 2017 Audi Q5 USA/Canada to demonstrate how to make calibration. 3.1.1 When to calibrate? 1). - Page 40 • ADAS calibration pattern is placed in parallel in front of the vehicle. • ADAS calibration pattern is placed in the center of the front of the vehicle. • The distance from calibration pattern to the center point of the front wheel hub is 1.5m (59inch).
-
Page 41: Start Calibration
3.1.3 Start calibration Follow the steps below to proceed: 1. Tap “Toolbox” -> “ADAS” on the diagnostic tool. 2. The diagnostic tool starts communicating with the VCI and reading VIN. After the VIN is successfully decoded, a screen similar to the following appears:... - Page 42 THINKCAR ADAS Calibration Tool (Select 2018 (J)) (Select SUV) (Select Engine - Dfva 2.0l Tdi/140kw) 4. Double check your selections and tap Confirm to go to the next step.
- Page 43 THINKCAR ADAS Calibration Tool 5. Select the system to be calibrated. (Select A5 Front Sensors Driver Assistance System) (Select A5 - Front Camera) (Select A5 - Calibrate Control Module) 6. Select A5 - Calibrate Control Module to continue.
- Page 44 If yes, tap Complete/Continue. 8. Check if the following steps have been done or not. 1). Determine the center line of the vehicle being tested. (Tap Next Step) (Tap Next Step) 2). Determine the placement location of the THINKCAR ADAS.
- Page 45 THINKCAR ADAS Calibration Tool (Tap Next Step) 3). Place the THINKCAR ADAS. (Tap Next Step) 4). Adjust the THINKCAR ADAS in parallel with the vehicle. (Tap Next Step) 5). Set the height.
- Page 46 THINKCAR ADAS Calibration Tool (Tap Next Step) 6). Select the LAM01-02 pattern board. (Tap Next Step) 9. The following dialog box displays on the screen. Before calibrating, make sure that all DTCs that are not related to the calibration have been erased. If yes, tap Yes to go to the next step.
- Page 47 THINKCAR ADAS Calibration Tool (Tap Yes) 10. Select 74 - Suspension Control to choose how to set the vehicle level system to normal level. (Select -2-) 11. Tap -2- (Vehicle has level control system and should be set to normal level automatically). Set the drive select function of the vehicle to COMFORT to set the suspension system to normal level and lock it.
- Page 48 THINKCAR ADAS Calibration Tool millimeter). 13. Double check whether all values are correct or not. Tap Yes to write the adaption values into the driver assistance systems. 14. Tap Complete/Continue to set the calibration mode, start calibration and read calibration values.
- Page 49 THINKCAR ADAS Calibration Tool 17 . Tap Complete/Continue to finish the calibration of front camera. Next the diagnostic tool will clear the previously existed diagnostic trouble codes. 18. Tap Complete/Continue to wait the diagnostic tool to automatically erase the DTCs related to the calibration.
-
Page 50: Calibrating The Rear Camera
THINKCAR ADAS Calibration Tool 3.2 Calibrating the rear camera This chapter describes a general operation procedure of rear camera calibration on AUDI A4 USA/Canada 2016 (Model Year 2018). 3.2.1 When to calibrate? 1). The following diagnostic trouble code is found on the vehicle: B201000 - Rear view system has not been calibrated. -
Page 51: Operation Notes
THINKCAR ADAS Calibration Tool 3.2.2 Operation Notes Make sure the following conditions are met: WorkStation Size For calibrating the rear & AVM camera, the whole workstation size depends on the vehicle size and the calibration reference pattern. The following illustration describes the maximum workstation size for reference only. - Page 52 THINKCAR ADAS Calibration Tool Distance C at least 0.5m at least 0.5m at least 0.5m (19.7inch) (19.7inch) (19.7inch) (a lane for technician to walk through) Distance D about 0.8m (the width of the calibration reference about 1.7m (67inch) about 1.6m (63inch) (31.5inch)
-
Page 53: Start Calibration
THINKCAR ADAS Calibration Tool 3.2.3 Start calibration Follow the steps below to proceed: 1. Choose AUDI on the diagnostic software selection screen. 2. Tap OK to enter the following diagnostic menu screen. 3. Choose Guided Functions to enter vehicle model selection screen. - Page 54 THINKCAR ADAS Calibration Tool 3. Select Audi A4 Usa/Cdn 2016>. (Select 2018 (J)) (Select Sedan)
- Page 55 THINKCAR ADAS Calibration Tool (Select Engine - Dfva 2.0l/140kw) 4. Double check your selections and tap Confirm to go to the next step. 5. Select System Selection from the Guided functions list. (Select System Selection)
- Page 56 THINKCAR ADAS Calibration Tool (Select 6C Camera System Rear View) (Select 6c - Rear View Camera System) (Select 6c - Calibration) 6. Swipe the screen from the bottom to scroll and carefully read all instructions and notes on calibration operation. Tap Complete/Continue to continue.
- Page 57 THINKCAR ADAS Calibration Tool 7. Input the measured height distance of the calibration pattern to the floor in millimeter (for example: 80mm), and tap OK to confirm. 8. Input the measured distance of the calibration pattern to the rear axle in millimeter (for example: 1300mm), and tap OK to confirm.
- Page 58 THINKCAR ADAS Calibration Tool example: 865mm), and tap OK to confirm. 11. The rear view camera system starts calibrating. Follow the on-screen instructions until the calibration is successfully finished.
-
Page 59: Target Pattern Kit (Optional)
4 Target Pattern Kit (Optional) Due to continuous development, more vehicle manufacturer-specific calibration panels will be individually available for the THINKCAR ADAS, further extending its coverage. Please check the packing list upon receiving your tool so that complaints can be issued immediately regarding potential damage or missing parts. - Page 60 THINKCAR ADAS Calibration Tool MERCEDES-RFK (LAC04-08-01) VW-RC MERCEDES-RC (LAC02-03) (LAC02-02) (LAC04-08-02) RENAULT-AVM VW-AVM (LAC04-10-01) (LAC04-10-02) (LAC04-14) VW-AVM (LAC04-04) Romeo-LDW (LAM01-11)
-
Page 61: Care & Maintenance
• Do not store the calibration tool in humid or dirty areas. • Regularly lubricate moving parts with acid-free and resin-free grease or oil. • Clean the ADAS calibration tool with non-aggressive cleaning agents on a regular basis. • Use commercial household cleaning detergents and a moistened, soft cleaning cloth.
Need help?
Do you have a question about the ADAS and is the answer not in the manual?
Questions and answers