Advertisement
Available languages
Available languages
Quick Links
Thank you for choosing Richell's product. Please read this Instruction Manual carefully
before use, and use the product properly. Please also keep this manual intact and in a
convenient location for all to see and read. The figures used in this manual are to show
operation method or structure, and may look different from the actual product. If you give
this product to someone else, please also give this Instruction Manual to the new owner.
●
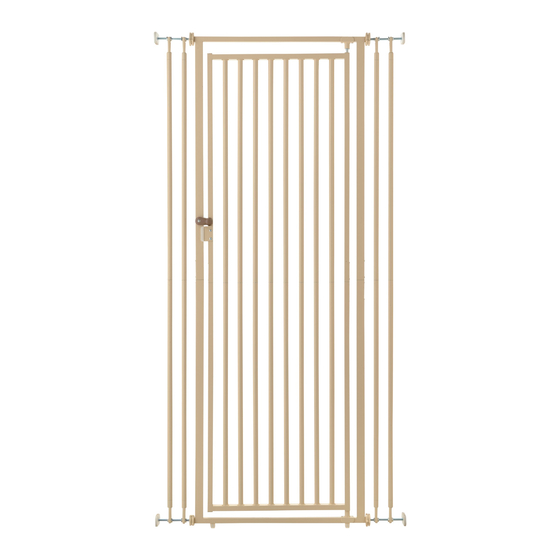
The door on this product will only swing one way and is designed to install in areas,
such as hallways, to keep cats (up to 11 lbs.) from escaping.
Please refer to Before Installation on page 6 for door opening directions.
●
The height of the product makes it harder for cats to jump over even with their strong feet.
●
This gate has no horizontal bars for cats to hook their feet.
●
Door feature allows users to pass through easily.
Before assembling this product, make sure the following parts are included:
Top Outer Frame
Top Outer Frame
Top Outer Frame
Bottom Door Frame
Bottom Door Frame
Bottom Door Frame
Bottom Outer Frame
Bottom Outer Frame
Bottom Outer Frame
① Openings with a height of 71.3" or more and width between 28.3" and 37.4". Extension set (sold separately) is available
to expand the Gate to 42.1".
② The area for Door to swing on the side where cats are contained must be level with no step or slope.
※ As the product is a tension-mount gate, please choose a wood pillar or a studs of a wall. The installation surface must be
3.9" or more in width, straight, strong and flat.
※ Do not install the product in a location that does not have studs, such as veneer or drywall to prevent walls from being
damaged.
28.5" - 37.5"
①
②
Instruction Manual
Top Door Frame
Top Door Frame
Top Door Frame
Top Door Slat
Top Door Slat
Top Door Slat
Bottom Door Slat
Bottom Door Slat
Bottom Door Slat
71.5" or more
①
Wood Pillars
Wood Pillars
(3.9" or more in width)
(3.9" or more in width)
※ Use blueprint, stud finder, or contact your builder to find location of Studs.
Bolt
Bolt
Bolt
(16)
(16)
(16)
(8)
(8)
(8)
Screw
Screw
Screw
(2)
(2)
(2)
Plate
Plate
Plate
Locking Member
Locking Member
Locking Member
(8)
(8)
(8)
Wall with Studs
Wall with Studs
1
Top Extension
Top Extension
Top Extension
Adjuster Bolt
Adjuster Bolt
Adjuster Bolt
(4)
(4)
(4)
Adjuster Knob
Adjuster Knob
Adjuster Knob
(8)
(8)
(8)
Nut
Nut
Nut
(16)
(16)
(16)
Bottom Extension
Bottom Extension
Bottom Extension
Wall without Studs
Wall without Studs
94951
(4)
(4)
(4)
(4)
(4)
(4)
0.6" or less
0.6" or less
in depth
in depth
2.0" or more
2.0" or more
in height
in height
Baseboard
Baseboard
Advertisement

Related Manuals for Richell 94951


Summary of Contents for Richell 94951
- Page 1 Instruction Manual 94951 Thank you for choosing Richell's product. Please read this Instruction Manual carefully before use, and use the product properly. Please also keep this manual intact and in a convenient location for all to see and read. The figures used in this manual are to show operation method or structure, and may look different from the actual product.
- Page 2 ○ Explanation of Symbols The following symbols are used in this Instruction Manual to indicate matters essential to safe use of the product. Please read and understand the meaning of the symbols before using this product. Warning : This symbol is used to alert you that misuse of the product may cause serious personal injury or property damage. Caution : This symbol is used to alert you that misuse of the product may cause minor personal injury or property damage.
- Page 3 ※ Use a Phillips-head screwdriver for assembly. ● Always assemble it with 2 or more people. Top Door Frame Top Door Frame Top Door Frame Bottom Door Frame Bottom Door Frame Bottom Door Frame Assemble the Door Frame Rivet Rivet Rivet Hole Hole Hole...
- Page 4 ⑤ Secure the Top Door Frame and the Bottom Door Frame with the Bolts at 8 locations. Assemble the Outer Frame Top Outer Frame Top Outer Frame Top Outer Frame Bottom Outer Frame Bottom Outer Frame Bottom Outer Frame ① Lay the Outer Frame flat as shown in the figure below. Hole Hole Hole...
- Page 5 The number of parts will vary depending on the width of installation location. Prepare the parts by referring to the chart below. Please keep any unused parts out of reach of children. Combination A Adjuster Bolt Adjuster Knob Combination B Adjuster Bolt Adjuster Knob Extension...
- Page 6 Top View Set the Gate with the Door opening to the right as seen from the side where cats are contained. Place shafts located on the Top and the Bottom of Frame Shaft on the right as seen from the side where cats are contained. ※...
- Page 7 Secure the Extension Less than 1.8" Adjust Nuts to have space between each Extensions less than Secure with Nuts 1.8" and tighten them to secure. Caution ● If the space between Extensions is 1.8" or more, a cat may pass through or be caught in the space.
- Page 8 ● Do not use harsh chemicals such as thinner, benzene or alcohol as these may cause discoloration or abrasion to the finish. 803840 94951 1 Dimension 28.5" - 37.5"W x 3"D x 71.5"H Outer Frame, Door Frame: Steel / End Cap: Polyacetal / Adjuster Cap: Polypropylene...
- Page 9 Mode d'emploi Merci d'avoir choisi le produit Richell. Il faut lire attentivement ce Mode d'emploi avant toute utilisation. Ce produit ne doit être utilisé que pour son usage défini. Il est recommandé de conserver ce Mode d'emploi pour vous y reporter ultérieurement. Les schémas qui figurent dans ce mode d'emploi servent à...
- Page 10 ● En franchissant la barrière, veiller à ne pas trébucher. ● N'utiliser que les pièces détachées d'origine Richell et ne pas modifier la conception de la barrière afin d'éviter tout accident et/ou mauvais fonctionnement. ● Pour l'installation, maintenir le haut de la barrière pour l'empêcher de tomber.
- Page 11 Utiliser un tournevis Phillips pour le montage. ※ Toujours assembler le produit avec une autre personne au moins. Assembler le cadre de la porte Cadre haut de porte Cadre haut de porte Cadre haut de porte Cadre bas de porte Cadre bas de porte Cadre bas de porte Rivet...
- Page 12 ⑤ Serrer le cadre du haut et le cadre du bas de porte en posant les boulons sur les 8 emplacements. Assembler le cadre extrieur Cadre extérieur du haut Cadre extérieur du haut Cadre extérieur du haut Cadre extérieur du bas Cadre extérieur du bas Cadre extérieur du bas ①...
- Page 13 Le nombre de pièces va varier en fonction de la largeur de l'emplacement d'installation. Préparer les pièces en vous aidant du shéma ci-dessous. Conserver les pièces inutilisées hors de portée des enfants. Combinaison A Boulon d'ajustement Coupelle d'ajustement Écrou Écrou Combinaison B Boulon d'ajustement Coupelle d'ajustement...
- Page 14 Vue de dessus Placer la barrière avec la porte ouvrant vers la droite en regardant depuis l'espace où se trouvent les chats. Placer les axes situés sur le haut et le bas du cadre sur la droite en regardant depuis l'espace où se trouvent les chats. ※...
- Page 15 Inférieur à Serrer la rallonge Serrer avec 4.5 cm (1.8") Adapter les écrous pour avoir un espace entre chaque les écrous rallonge inférieur à 4.5 cm et les serrer pour fixer. Attention ● Si l'espace entre les rallonges est de 4.5 cm ou plus, un chat peut y passer ou se retrouver coincé...
- Page 16 Ne pas utiliser de produit chimique corrosif comme un diluant, du benzène ou de l'alcool qui pourraient entraîner des dégâts ou la décoloration de la finition. 803840 94951 1 Dimensions Largeur 72 - 95cm x profondeur 8cm x hauteur 181cm(28.5-37.5"W x 3"D x 71.5"H) Cadre extérieur, Cadre de porte: Acier / Embout: Polyacétal / Coupelle d'ajustement: Polypropylène /...
Need help?
Do you have a question about the 94951 and is the answer not in the manual?
Questions and answers