Table of Contents
Advertisement
Quick Links
Advertisement
Table of Contents

Subscribe to Our Youtube Channel
Related Manuals for Quantum StorNext G300 R510

Summary of Contents for Quantum StorNext G300 R510
- Page 1 Hardware Guide StorNext G300 R510 Gateway Appliance...
- Page 2 Quantum Corporation is prohibited by law and constitutes a punishable violation of the law. TRADEMARK STATEMENT Quantum, the Quantum Logo, Backup. Recovery. Archive. It's What We Do., Be Certain, Be Quantum Certain, DLT, the DLT Logo, DLTSage, DLTtape, the DLTtape Logo, DXi, DXi Accent, Dynamic Powerdown, FastSense, FlexLink, GoProtect, GoVault, iLayer, Lattus, MediaShield, Optyon, Pocket-sized., Well-armored., Preserving the World's Most Important Data.
-
Page 3: Table Of Contents
Contents Chapter 1 Introduction What's New in the G300 R510 Hardware Guide ....1 Revision E updates ........1 How this Guide is Organized . - Page 4 Adding or Removing File Systems After Initial Configuration ..40 Chapter 4 Contacting Quantum StorNext Appliance Upgrades ......43 Contacts .
-
Page 5: Introduction
Chapter 1 Introduction What's New in the G300 R510 Hardware Guide Revision E updates The following information is provided in this revision: • Since the firmware upgrade procedure will be updated more frequently in G300 Release Notes, updated the firmware upgrade section to point to the G300 Release Notes. -
Page 6: Guide Contents
Chapter 3, Basic System Operations provides basic operating instructions for the StorNext system. • Chapter 4, Contacting Quantum - provides contact information for the Quantum Technical Assistance Center. – Chapter Contents • Navigating This Document With Adobe Reader explains how to navigate this document with Adobe Reader. -
Page 7: About The Stornext G300 Hardware
About the StorNext The StorNext G300 Gateway Appliance combines industry-proven G300 Gateway Quantum hardware and StorNext software into one convenient, out-of- the-box solution. The G300 Gateway Appliance operates as a SAN Client Appliance in a StorNext Metadata Network, providing LAN client access to the StorNext disk SAN. -
Page 8: Network Connectivity
Chapter 1: Introduction About the StorNext G300 Hardware • The R520 server contains the serial number format CKE, for example, CX1313CKE22333. Network Connectivity Here are the quantity and type of network cards and ports available on the different system models: •... -
Page 9: The Gateway Metrics Report
, or view the video that describes the features and functions of the Gateway Metrics Report at http://www.quantum.com/sngatewayhowtos About StorNext Separate licenses are required for various StorNext features, as well as to StorNext Licensing perform an upgrade to a new release. -
Page 10: Writing Conventions
Chapter 1: Introduction About the StorNext G300 Hardware Caution Caution: Indicates potential hazards to equipment or data. Consequences if not followed: Failure to take or avoid this action could result in loss of data or harm to equipment. Warning WARNING: Indicates potential hazards to personal safety. Consequences if not followed: Failure to take or avoid this action could result in physical harm to the user or hardware. - Page 11 Chapter 1: Introduction About the StorNext G300 Hardware Software Conventions Conventions Examples TSM_control stop For all UNIX-based commands, the # prompt is is the same as implied, although it is not # TSM_control stop shown. For all UNIX-based cvaffinity filename italic commands, words in filename...
-
Page 12: Stornext Documents
StorNext. Product Safety Statements Quantum will not be held liable for damage arising from unauthorized use of the product. The user assumes all risk in this aspect. This unit is engineered and manufactured to meet all safety and regulatory requirements. - Page 13 Chapter 1: Introduction Product Safety Statements StorNext G300 Gateway Appliance Hardware Guide...
- Page 14 Chapter 1: Introduction Product Safety Statements StorNext G300 Gateway Appliance Hardware Guide...
-
Page 15: Hardware Overview
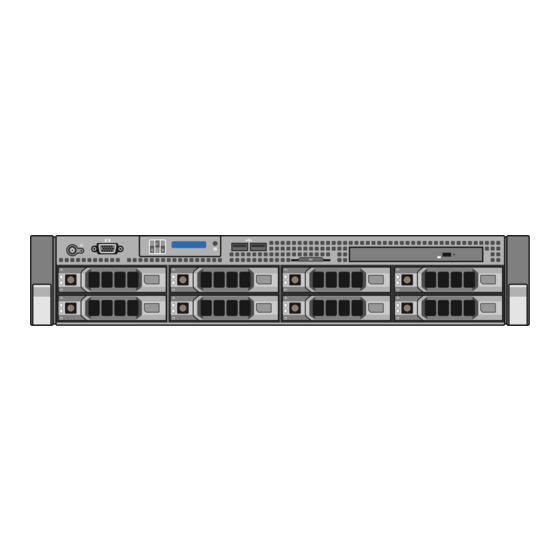
Chapter 2 Hardware Overview This chapter contains the following sections: • The StorNext G300 System • StorNext G300 Connectivity on page 21 • Relocating the System on page 28 The StorNext G300 System Figure 1 shows the StorNext G300 System. Figure 1 StorNext G300 System - (Front) StorNext G300 Gateway Appliance Hardware Guide... -
Page 16: Stornext G300 System
Chapter 2: Hardware Overview The StorNext G300 System StorNext G300 System The StorNext G300 provides SAN access to StorNext LAN Clients. The MDC Nodes contain redundant hard drives in a RAID 1 configuration, ensuring high availability of the system software. System Front View Figure 2 shows, and... - Page 17 Chapter 2: Hardware Overview The StorNext G300 System Table 1 StorNext G300 – Front View Indicators and Buttons Indicators, Button, or Item Connector Icon Description Power-on indicator/ The power-on indicator lights when the system power is on. power button The power button controls the power supply output to the system.
- Page 18 The two hard drives located on the front of the system (in drive bays 0 and 1) are used to store the (operating system and StorNext software). Drive bays 2 through 7 are empty, and reserved for Quantum use. Unlabeled indicators, connectors, and buttons are reserved for Quantum Service.
- Page 19 System Rear View The back of each StorNext G300 systemhas a series of indicators, connectors, and buttons. Unlabeled indicators, connectors, and buttons are reserved for Quantum Service. The rear indicators, connectors, and buttons of the system are shown in Figure...
- Page 20 Chapter 2: Hardware Overview The StorNext G300 System Figure 4 StorNext G301 – Rear View Figure 5 shows the rear indicators, connectors and buttons of the StorNext G302system. See Table 3 for information on the labeled components. Figure 5 StorNext G302 – Rear View StorNext G300 Gateway Appliance Hardware Guide...
- Page 21 Panel Features and Indicators Item Indicator, Button, or Icon Description Connector iDRAC Enterprise port Reserved for Quantum Service USB ports (2) Connect USB devices to the system (ports are USB 2.0- compliant) Service Port (Eth0) Reserved for Quantum Service G301...
- Page 22 Chapter 2: Hardware Overview The StorNext G300 System NIC Indicator Codes Figure 6 shows the StorNext G300 NIC indicator codes. Figure 6 NIC Indicators 1 Link indicator 2 Activity indicator Indicator Status Indicator Code Link and activity indicators are off. The NIC is not connected to the network.
- Page 23 Chapter 2: Hardware Overview The StorNext G300 System Power Supply Indicator Codes This section describes the StorNext G300 power supply indicator codes (see Figure 7). The power supply indicators show if power is present, or if a power fault has occurred. Figure 7 Power Supply Indicator Table 4 Power Supply Status...
- Page 24 Chapter 2: Hardware Overview The StorNext G300 System Indicator Status Indicator Code Green The handle displays green which indicates that a valid power source is connected to the power supply and that the power supply is operational.In standby mode, a green light indicates that a valid AC source is connected to the power supply, and that the power supply is operational.
-
Page 25: Stornext G300 Connectivity
Note: Quantum recommends attaching the primary and secondary power connections to alternate power sources for resiliency. Quantum also recommends that one of these power sources is a UPS (uninterruptible power source), such as battery backup or generator, or be connected to redundant AC power supplies to avoid system interruption in the case of a power failure. -
Page 26: Lan/Nas Cable Connections
Chapter 2: Hardware Overview StorNext G300 Connectivity Figure 8 Power Connections Primary Power Source Secondary Power Source LAN/NAS Cable The system also contains an iDRAC port and a dedicated service port. By Connections default, each StorNext G300 ships with bonded network interface: Bond 0. - Page 27 Chapter 2: Hardware Overview StorNext G300 Connectivity storage including Lattus and Q-Cloud. NAS requires StorNext 5 Release 5.2.0.2 or later and a 10 GbE NIC in each Node. NAS is enabled via the appliance Service Menu. Use of the NAS CLI is StorNext Appliances NAS Configuration Guide documented in the (P/N 6-68284).
- Page 28 Number Number Location Port Function Network Bonds eth0 Embedded Reserved for Port 1 Quantum Service eth1 Embedded LAN Client Network Bond 1 – This port can be Port 2 (1 GbE) bonded alongside the other LAN client ports (Eth6 - Eth11) or configured as a standalone port.
- Page 29 Chapter 2: Hardware Overview StorNext G300 Connectivity G302 Network Ports The default StorNext G302 network interface configuration is as follows: • For the G302, the MDC network is always a bonded (Bond 0) network. Physical ports 3 and 4 are dedicated to the MDC network. •...
-
Page 30: Fibre Channel Cable Connections For San Access
Chapter 2: Hardware Overview StorNext G300 Connectivity Physical Ethernet Logical Port Ethernet Port Port Physical Number Number Location Port Function Network Bonds eth0 Embedded Port Service Port 1 eth1 Embedded Port Unused/ The OS does not recognize Unavailable this port as in use, so it is Port 2 unused and cannot be configured nor bonded to... - Page 31 Chapter 2: Hardware Overview StorNext G300 Connectivity Connect the FC host ports to your SAN as shown in Figure 11 page 27. Figure 11 StorNext G300 SAN Cabling StorNext DISK SAN RAID Primary Storage StorNext G300 Gateway Appliance Hardware Guide...
-
Page 32: Relocating The System
Relocating the System If you ever need to relocate the system to a different location, please contact Quantum Customer Support for additional information. The system must be relocated by a qualified Quantum field service engineer. StorNext G300 Gateway Appliance Hardware Guide... -
Page 33: Basic System Operations
Chapter 3 Basic System Operations This chapter is divided into the following sections: • Power On the StorNext G300 on page 29 • Shutting Down the G300 on page 30 • Upgrade G300 Firmware on page 32 • Obtain and Install StorNext Licenses on page 32 •... -
Page 34: Shutting Down The G300
Chapter 3: Basic System Operations Shutting Down the G300 Figure 12 Turning On SystemPower 2 On each LAN client, mount the file systems on clients. 3 Restart I/O access to all LAN clients. Shutting Down the G300 Prerequisites Before shutting down the system: 1 Halt I/O access to all LAN clients. - Page 35 Chapter 3: Basic System Operations Shutting Down the G300 To shut down the system: 1 Open an SSH connection to the system using IP address 10.17.21.1 on either the MDC/Metadata or LAN Clientnetwork. Note: Use the IP address assigned if different from the default used here.
-
Page 36: Upgrade G300 Firmware
OS (if applicable) and StorNext software. Release Notes See the current for your system for instructions on how to apply the firmware upgrade to the system: www.quantum.com/sngatewaydocs Obtain and Install StorNext Licenses Obtain StorNext Some StorNext feature licenses are pre-installed on your system, and Licenses others must be purchased and then enabled by installing a license file on the system. - Page 37 • A list of purchased StorNext add-on features for which you wish to enable licenses. After you request licenses for the system, your Quantum representative will send you a license.dat file (which contains license keys for the products/features to be enabled on the system).
-
Page 38: How To Configure The Laptop Network Settings
Chapter 3: Basic System Operations Obtain and Install StorNext Licenses How to Configure the In order to access the system from the Service Port, you will need to Laptop Network configure the network settings on a laptop as follows: Settings Note: This procedure assumes you are running Windows 7 on the laptop. - Page 39 Chapter 3: Basic System Operations Obtain and Install StorNext Licenses 3 Select Internet Protocol Version 4 (TCP/IPv4) in the list of connections, and then click Properties. The Internet Protocol Version 4 (TCP/IPv4) Properties dialog displays: 4 Click the radio button next to “Use the following IP address” and enter the following: Note: It’s a good idea to copy down the settings in this dialog before you change them, so that you can set them back to their...
-
Page 40: Access The Service Menu Via The Service Port
Chapter 3: Basic System Operations Obtain and Install StorNext Licenses • Subnet mask - 255.255.255.0 5 Click OK. 6 Click Close. 7 Wait at least two minutes for the laptop to enable the network connection. Access the Service About the Service Port Menu via the Service The system contains an integrated 1GbE Ethernet port that is dedicated Port... -
Page 41: Install Stornext Licenses
In order to install license files on the G300: Licenses 1 When you receive the new file from Quantum, copy license.dat the file to a USB thumb drive or CD or DVD. 2 Insert the USB thumb drive, CD or DVD with the license.dat file into the USB slot or DVD drive on the G300. -
Page 42: Install And Configure Stornext Nas
Service Menu, and is enabled by default. To learn how to install and configure StorNext NAS on your G300 system, including required StorNext software upgrades, see Software Compatibility and Upgrades for NAS www.quantum.com/sngatewaydocs StorNext G300 Gateway Appliance Hardware Guide... -
Page 43: System Serial Numbers And Service Tag
System Serial Numbers and Service Tag System Serial Numbers and Service Tag The StorNext G300 Gateway Appliance system serial number and the service tag number may be needed when contacting Quantum Support. Locating the System The System Serial Number is located in the following locations: Serial Number •... -
Page 44: Adding Or Removing File Systems After Initial Configuration
Chapter 3: Basic System Operations Adding or Removing File Systems After Initial Configuration Adding or Removing File Systems After Initial Configuration If you need to add or remove file systems after the initial configuration of your StorNext G300 Gateway Appliance, a wizard in the Service Menu will step you through the process. - Page 45 Chapter 3: Basic System Operations Adding or Removing File Systems After Initial Configuration 7 Select the file system you want to configure in StorNext. Note: An * (asterisk) denotes that a file system is selected. You can toggle to select or delete any file system. *** Select Available Filesystems *** NOTE: If an item has '{*}' next to it, then it is currently selected 0) carnage_FS1...
- Page 46 Chapter 3: Basic System Operations Adding or Removing File Systems After Initial Configuration StorNext G300 Gateway Appliance Hardware Guide...
-
Page 47: Contacting Quantum
Chapter 4 Contacting Quantum More information about StorNext is available on the Quantum Service and Support website at http://www.quantum.com/ServiceandSupport. The Quantum Service and Support website contains a collection of information, including answers to frequently asked questions (FAQs). StorNext Appliance To request a StorNext software upgrade for StorNext Appliances, open a Upgrades support ticket at: https://onlineservice.quantum.com/. -
Page 48: Getting More Information Or Help
Quantum’s Knowledge Base, a comprehensive repository of product support information. Sign up today at: https://onlineservice.quantum.com/ For further assistance, or if training is desired, contact the Quantum Customer Support Center: United States 1-800-284-5101 (toll free) +1-720-249-5700... -
Page 49: Worldwide End-User Product Warranty
Chapter 4: Contacting Quantum Worldwide End-User For more information on the Quantum Worldwide End-User Standard Product Warranty Limited Product Warranty: http://www.quantum.com/serviceandsupport/warrantyinformation/ index.aspx StorNext G300 Gateway Appliance Hardware Guide... - Page 50 Chapter 4: Contacting Quantum StorNext G300 Gateway Appliance Hardware Guide...
Need help?
Do you have a question about the StorNext G300 R510 and is the answer not in the manual?
Questions and answers