
Related Manuals for Ingenico group EX8000


Summary of Contents for Ingenico group EX8000
- Page 1 Model:AXIUM EX8000 WWW.ingenico.com 28-32,Boulevard de Grenelle, 75015 PARIS - FRANCE/ (T)+33(0)1 58 01 80 00 / (F)+33 (0)1 58 01 91 35 Ingenico-SA au capital de 47 656 332 / 317 218 758 RCS Nanterre...
-
Page 2: Table Of Contents
Contents Introduction ........................3 Presentation ........................4 Content of the box ....................4 Overview of AXIUM EX8000..................5 Keypad Functions ...................... 7 Touch Panel ....................... 7 Use of the terminal ......................8 Power on/Power off the terminal ................8 Reading cards ......................8 Usage of Front scanner ..................... -
Page 3: Introduction
1. Introduction We hope that you will be fully satisfied with your new AXIUM EX8000 terminal. Read thisguide to understand and make the best use of your terminal. It presents you the necessary information about use,installation,maintenance,safety security recommendations. WARRANTY/SECURITY /GARANTIE/SÉCURITÉ... -
Page 4: Presentation
WARNING/ATTENTION The power supply unit provided with your equipment is specially designed for ingenico AXIUM EX8000 terminal. Do not use any other power supply. The use of a power supply with apparently similar voltage/current characteristics may damage your terminal. Le bloc d’alimentation fournit avec votre équipement est spécialement conçu pour les terminaux de paiment Ingenico. -
Page 5: Overview Of Axium Ex8000
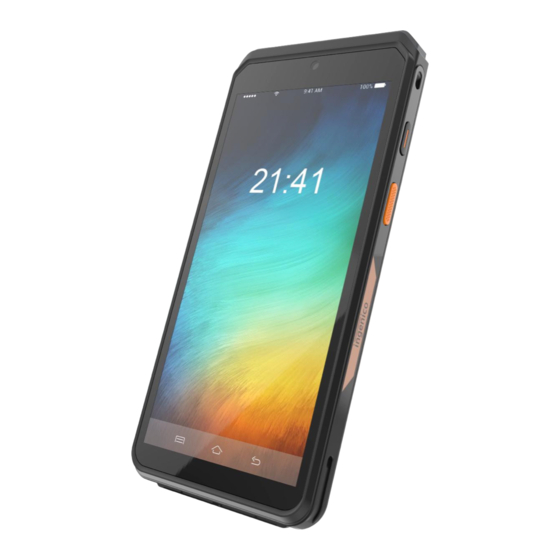
2.2 Overview of AXIUM EX8000 1. Front camera 2. Volume Keys 3. Scan Key 4. LCD and touch screen 5.USB Type-C connector 6.Smart card reader 7. Magnetic card reader 8. Illuminate lamp of front scanner 9. Front scanner 10.Indicate LED of front scanner 11.Contactless landing zone... - Page 6 14. LEDs for Contactless Card 15. Speaker 16. Micro SD slot 17. Battery compartment 18. Battery socket19. SIM 2 card slot 20. SIM 1 card slot21. Base Charging interface- 22. Rear camera23.Flash 24.SAM cards slots25.Lanyard hole 26. Base Charging interface+ Weight 290g (including battery) Dimension (L x W x H)
-
Page 7: Keypad Functions
Back keys. Volume Powerbutton Scan Key Scan Key Menu Back Home 2.4 Touch Panel The AXIUM EX8000 is equipped with touch panel that allows you capture functions and menus by your finger or use a stylus. 7 / 24... -
Page 8: Use Of The Terminal
3. Use of the terminal 3.1 Power on/Power off the terminal To power on: Make sure the terminal battery is correctly installed and Press <Power> button for about 1s until the display is turned up. To power off: Press <Power> button for more than 2s until the display show the following figure, then press <Power off>. -
Page 9: Usage Of Front Scanner
Magnetic stripe card The card can be read bi-directionally, with the stripe facing the terminal. Use a regular movement in order to ensure a reliable card reading. Contactless card Bring the card firmly up to the active zone. Keep the card close to the reader during the transaction. -
Page 10: Usb Type-C
Press the scan button to start scanning. After starting the barcode scanning, a red laser beam will be emitted from the window in front of the terminal. Align the red light beam with the bar code you want to scan ... -
Page 11: Installing Modules
(*)Excluding battery charging Battery charging conditions Ambient temperature From 0℃ to +40℃ Storage conditions Ambient temperature From -20℃to +70℃ Max relative humidity From 5% to 90%, Non-condensing 4.2 Installing modules 4.2.1 SAM1/SAM2/SIM1/SIM2 WARNING/ATTENTION Switch off the terminal before opening the trapdoor. Mettre hors tension le terminal avant d’ouvrir la trappe. - Page 12 Close the trapdoor. ADVICE AXIUM EX8000 is equipped with a dual SAM slot. When using two SAM cards,it is recommended to insert the bottom one first,then the top one. When using only one SAM card, it is recommended to insert SAM1 slot (bottom).
-
Page 13: Battery
Mettre hors tension le terminal avant d’ouvrir la trappe. MicroSD connector is located inside the terminal, in a closed compartment. Turn the terminal and remove the trapdoor. MicroSD are identified by the engraved marks on the lower housing. ... -
Page 14: Visual Impaired Accessory
4.4 Visual Impaired Accessory 5. Install the VI accessory on the screen. 6. Take out the VI accessory. 7. Recommendations 14 / 24... -
Page 15: Safety
Powering down the AXIUM EX8000 Disconnect the AXIUM EX8000 power supply block adapter from the electrical mainsnetwork. Lithium cell The AXIUM EX8000 is fitted with an internal lithium cell which should only be accessed by a qualified technician. Battery ... - Page 16 The power supply label contains seventeen symbols: CCC (China Compulsory Certificate) Mark The RegulatoryCompliance Mark(RCM) International Efficiency MarkingProtocol (Energy Star Level 6) In door use only “Conformite Europe enne” or CE Mark Double insulation symbol 5 Years China RoHS symbol 10 Years China RoHS symbol BSMI(Taiwan) PSE Mark(Japan)
- Page 17 Recycle in accordance with the waste electronic & electrical equipment directive Underwriters Laboratories Inc (US Compliance) Made from recyclable material Low density version of Polyethylene (LDPE) Chlorinated Polyethylene ( CPE) Risk of explosion if the battery is incorrectly replaced or is placed in a fire Dispose of batteries at a hazardous waste collection site or recycling facility...
-
Page 18: Security Of Your Terminal
The trapdoor for battery, SAM1/SAM2/SIM1/SIM2, readers located underneath the terminal, must be in place during the normal operation of the terminal.See sections “Installing modules” and “Installing the battery”. On airplanes Your terminal must be switched off by removing the battery pack. Remove the battery from the terminal when on an airplane. -
Page 19: Fixed Installation
to staff that have been independently verified as being trustworthy.The terminal must never be put in or left at a location where it could be stolen or replaced by another device. 7.3 Fixed installation If the device is to be used in a situation where it is not possible for the cardholder to pick up and shield their PIN entry themselves, the device may be used, but it must be installed in the following manner:... -
Page 20: Transport And Storage
Unplug all the wires from terminal. Good rules for proper cleaning of the terminal are: Use a soft cloth that is very slightly soaked with soapy water to clean the outside of terminal. Do not clean the electricalconnections. ... - Page 21 radio or television reception, which can be determined by turning the equipment off and on, the user is encouraged to try to correct the interference by one or more of the following measures: —Reorient or relocate the receiving antenna. —Increase the separation between the equipment and receiver. —Connect the equipment into an outlet on a circuit different from that to which the receiver is connected.
- Page 22 Environment (WEEE, Batteries and packaging) This product is labeled in accordance with European Directives 2012/19/EU concerning Waste Electrical and Electronic Equipment (WEEE) and 2013/56/EC concerning Batteries and Accumulators. Those provisions are requiring producers and manufacturers to become liable for take-back, treatment and recycling upon end of life of equipment and batteries.
-
Page 23: Troubleshooting
9. Troubleshooting Q:The terminal cannot be started. A: The device might be under low energy status or the program may be damaged. Please make sure the power is enough and thenrestart your device.If it still fails, please contact our customer service department for help. Q: Transaction Processing Failure A: Following reasons are likely to cause transaction failure: damaged magnetic card or smartcard SAM card, damaged card reader, improper operation of card... - Page 24 This Document is Copyright © 2020 by ingenico Group. ingenico retains full copyright ownership, rights and protection in all material contained in this document. The recipient can receive this document on the condition that he will keep the document confidential and will not use its contents in any form or by any means, except as agreed beforehand, without the prior written permission of ingenico.
Need help?
Do you have a question about the EX8000 and is the answer not in the manual?
Questions and answers