Autel Robotics Dragonfish Lite Quick Start Manual
Hide thumbs
Also See for Dragonfish Lite:
- Quick start manual (6 pages) ,
- User manual (51 pages) ,
- Flight manual (251 pages)
Table of Contents
Advertisement
Quick Links
Advertisement
Table of Contents

Subscribe to Our Youtube Channel
Related Manuals for Autel Robotics Dragonfish Lite


Summary of Contents for Autel Robotics Dragonfish Lite
- Page 1 Dragonfish Lite Quick Start Guide...
-
Page 3: Table Of Contents
· · · · · · · · · · · · · · · · · · · · · · · · · · · · · · · · · · · · · · · · · · · · · · · · · · · · · · · · · · · · · · �� Using the Dragonfish Lite aircraft ·... -
Page 4: Item List
Item list Aircraft body 9.7 inch ground station Base station 4pcs (the actual quantity is subject Battery to the purchased set) Charger + AC line Propeller blades 2pairs Base station antenna 2pcs Base station feeder 2pcs Airspeed indicator cover Base station tray ��... - Page 5 USB Type-C cable Repair tool kit (The gimbal model is subject Gimbal Camera to the actual set purchased) Wing set 1pairs Ground station lanyard Tail TF card 5set (includes Dragonfish Lite, Documentation Base station, Charger, Battery quick guide, Disclaimer) ��...
-
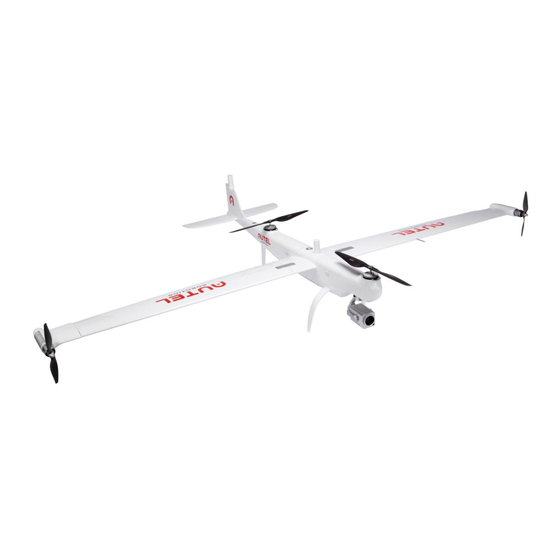
Page 6: Getting To Know The Aircraft
The Dragonfish Lite offers a maximum flight time of up to 75 minutes and a video transmission range of 30 km. It comes built in with a range of intelligent features such as automatic take-off and landing, intelligent tracking, terrain follow and more. -
Page 7: Getting To Know The Base Station
Getting to know the portable ground station The Dragonfish Lite is equipped with a 9.7-inch TFT-LCD touch screen (2048*1536). It offers a brightness of 1000 cd/m2, making it almost twice as bright as typical mobile devices. The screen can display images clearly even in direct sunlight, and a built-in 256G memory makes it convenient for storing all your critical data. -
Page 8: Using The Dragonfish Lite Aircraft
➄ Charging port ➈ Antenna interface ➁ Linking indicator ➅ Frequency button ➉ Tripod interface ➂ RTK indicator ➆ Power button ➃ Power indicator ➇ Port cover Using the Dragonfish Lite Charging 1.Charging the Intelligent flight battery 2.Charging the ground station ��... -
Page 9: Setting Up The Base Station
3.Charging the base station Setting up the base station 1.Unfold the tripod, install the base station tray, and lock the tray. 2.Install the base station body to the tray and 3.Install the antenna on the tripod and connect tighten the lock on the tray nut. Ensure that the the antenna feeder to the base station antenna base station is level and stable. -
Page 10: Assembling The Aircraft
Assembling the aircraft 1.Install the left and right wings Align and fasten Align and fasten 2.Install the tail Align and fasten ��... - Page 11 3.Install the wingtip propeller ▶ ▶ Locking direction: Press and Rotate in the The marked propeller is to be mounted indicated direction to lock the propeller. on the marked motor Unlocking direction: Press and Rotate the Unmarked propeller is to be mounted on propeller in the opposite direction to unlock it.
-
Page 12: Powering On | Activating The Aircraft
6.Installing the intelligent Flight Battery When installing or removing the aircraft battery, be sure to power off the aircraft. Align the battery to the battery interface on the fuselage and install it. Powering on | Activating the aircraft 1. Powering on the base station 2. -
Page 13: Flight
Flight Enter the Autel Voyager safe flight interface. Before taking off, please place the aircraft on a flat surface with the tail facing towards you. Manual takeoff 2. Check the aircraft system status. 1. Switch the ground station gear to M gear. �. -
Page 14: Specifications
3. Aircraft system status check 4. Flight interface display Specifications Aircraft Size 1.6*0.965*0.35 m Weight (including two batteries, 4.5 kg without gimbal) Single battery weight 0.75 kg Maximum take-off weight 5.5 kg Maximum load 1.0 kg Working frequency 902-928 MHz; 2.4000-2.4835 GHz; 5.725-5.755GHz EIRP (Equivalent radiated power) 900MHz FCC:... - Page 15 Maximum pitch angle 20° Maximum roll angle 35° Maximum angular velocity Pitch: 180° /s Yaw: 60° /s Working temperature -20° C to 50° C Supported Payloads DG-Z2,T3,T3H Supported Gimbal Configurations Fast Disassembly Ingress Protection Rating IP43 GNSS GPS+GLONASS+BeiDou+Galileo Hovering accuracy (P-GPS) Vertical:...
- Page 16 Wi-Fi parameters: Protocol Wi-Fi Direct, Wi-Fi Display, 802.11a/g/n/ac Supports 2 x 2 MIMO Wi-Fi Working efficiency 2.400 - 2.4835 GHz 5.150 - 5.250GHz 5.650 - 5.755GHz 5.725 - 5.850 GHz Other parameters: Battery Name: Lithium polymer Battery Capacity: 8200mAh Voltage: 11.4 V Battery type: Li-Po Energy: 93 Wh Charging time: 120 minutes...
- Page 17 GNSS receiver Satellite receiving frequency Simultaneously receive: GPS: L1, L2, L5 BeiDou: B1, B2, B3 GLONASS: F1, F2 Galileo: E1, E5A, E5B Positioning accuracy Single Point Horizontal: 1.5 m (RMS) Vertical: 3.0 m (RMS) Horizontal: 1 cm+1 ppm (RMS) Vertical: 1.5 cm+ 1 ppm (RMS) 1 ppm:...
- Page 18 Physical properties Dimensions (base station body + 193 mm×177 mm×73 mm extension rod) Weigt 1275g Ingress protection IP64 Working temperature -20℃to 50℃ Image transmission parameters Working efficiency 2.4000-2.4835 GHz; 902-928 MHz EIRP (Equivalent radiated power) 902-928 MHz FCC: < 30 dBm 2.400-2.4835 GHz FCC:...
- Page 20 ©2021-2022 Autel Robotics Co., Ltd. All Rights Reserved...
Need help?
Do you have a question about the Dragonfish Lite and is the answer not in the manual?
Questions and answers