Advertisement
Quick Links
AU: 1800 029 701
NZ: 0800 466 444
This kit is applicable to the following sheds:
15151GK
15151SK
15141RK
The addition of this frame kit will increase the
wind rating of the specified sheds to
Wind rating: N3/C1 as per AS4055-2012.
Suitable for specific cyclonic regions
DOWNLOAD
OUR APP FOR
ASSEMBLY
VIDEOS
Absco Industries
Assembly Instruction Manual
N3/C1 FRAME KIT
FOR 1.5m WIDE TO
1.5m DEEP MODELS
admin@absco.com.au
www.abscosheds.com.au
Where information conflicts with the original
non-cyclonic
instruction
document is to be referenced.
WARNING: This shed must be anchored to a
100mm thick concrete slab with the concrete
anchors supplied.
Failure to do so will result in the shed not
having the structural integrity required to
endure a severe storms or cyclonic event.
WARNING: Doors must remain closed with
all padbolts properly secured during severe
storms or cyclonic event.
LEAVE A REVIEW
Tell us about your experience and
receive a $20 Coles Gift Card.
Visit www.abscosheds.com.au/review
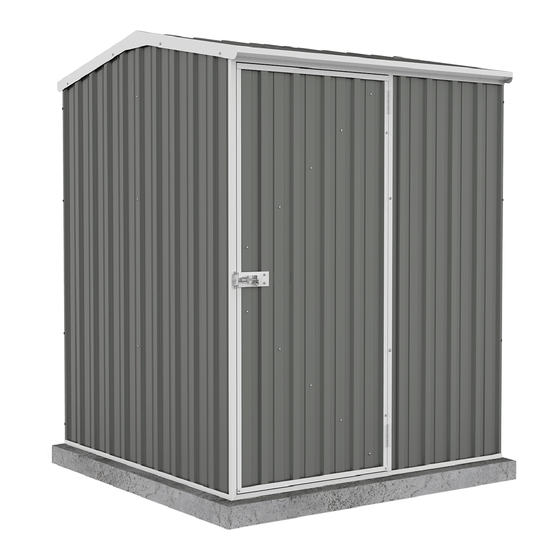
Model: CYC15
View of frame kit
applied to
15151GK
manual,
this
02/03/2021
1.0
1
Advertisement

Related Manuals for ABSCO SHEDS CYC15


Summary of Contents for ABSCO SHEDS CYC15
- Page 1 Suitable for specific cyclonic regions storms or cyclonic event. LEAVE A REVIEW DOWNLOAD OUR APP FOR Tell us about your experience and ASSEMBLY receive a $20 Coles Gift Card. VIDEOS Visit www.abscosheds.com.au/review Absco Industries Assembly Instruction Manual Model: CYC15 02/03/2021...
- Page 2 Sensible shoes are highly recommended. • Do not erect your shed in windy conditions. • It is highly recommended to erect the shed with two or more people. RECOMMENDED Absco Industries Assembly Instruction Manual Model: CYC15 02/03/2021...
- Page 3 20mm Tab notch + 45mm Lip notch 20mm Tab notch + 45mm Lip notch on both ends 45mm Lip One end: 20mm Tab notch + 45mm Lip notch notch SPECIAL NOTCHING, not noted above. Absco Industries Assembly Instruction Manual Model: CYC15 02/03/2021...
-
Page 4: Fittings And Accessories
PADBOLT BKT10 FAST007 BRACKET HASP M10 DYNABOLT PHILLIPS HEAD ANCHOR M10 NUT & BOLT FAST038 DRIVER BIT BRACKET (12 PACK) HEX HD 3MM DRILL TEK SCREW W/ NEO FAST033 DRILL WASHER 10-16x16mm Absco Industries Assembly Instruction Manual Model: CYC15 02/03/2021... - Page 5 1.5m DEEP MODELS INSTALL EXTRA FASTENERS Absco sheds sheets have punched holes typically spaced at 592mm from centre to centre. To achieve a cyclonic wind rating additional screws will need to be installed to reduce these distances. The fastener intended at these positions is FAST001, a 10mm self tapping screw.
- Page 6 Pre-drill from inside the shed through the inside face of the top channel and into the wall sheet at 148mm centres, (every pan) and then fix with a screw. Do this on the front and back walls only. Additional FAST001 for front wall. Additional FAST001 for rear wall Absco Industries Assembly Instruction Manual Model: CYC15 02/03/2021...
- Page 7 - Do not screw any boxed sections until they have been correctly sized as the specific step instructs. - Roof section, door frames and upright door studs are singular pieces. - Use self drilling tek screws for all assembly and installation of these sections. Absco Industries Assembly Instruction Manual Model: CYC15 02/03/2021...
- Page 8 Start slowly, begin to drill the tek screw into the metal. Once the tek screw has stabilised while drilling increase the speed until the tek screw threads ‘bite’ into the metal. Absco Industries Assembly Instruction Manual Model: CYC15 02/03/2021...
- Page 9 - If shed is on a rebated slab S1785 will need to be cut-to-suit rebate height. 15141RK: - Roof brace orientation will be perpendicular to what is shown. - Roof braces will be trimmed to 2900mm. 15151SK: - One central roof brace is required. Absco Industries Assembly Instruction Manual Model: CYC15 02/03/2021...
- Page 10 3. Make sure the frame is square and fi x with and level surface and use one tek screw at a second tek screw at each join. each join. 4. Turn frame over and repeat last step. Absco Industries Assembly Instruction Manual Model: CYC15 02/03/2021...
- Page 11 - 6x Self tapping screws FAST001 9. Drill 10mm holes in the jamb above the door and the channel below the door as shown on the left. These are to align with the vertical padbolt shafts. Absco Industries Assembly Instruction Manual Model: CYC15 02/03/2021...
- Page 12 TIP 2: Take a single piece of wood at 890mm. This will act as a height template to mark the drilling positions when outside the shed to fix the internal bracing. Absco Industries Assembly Instruction Manual Model: CYC15 02/03/2021...
- Page 13 C1220 Previously installed back wall bracing and new The other end of the same side wall brace side wall bracing on the right. butting up against the previously installed front wall brace. Absco Industries Assembly Instruction Manual Model: CYC15 02/03/2021...
- Page 14 Use corner brackets (BKT10) to secure the rear, side and front wall braces together. Position as shown and fix using four tek screws. Pre-drilling the bracket with a 3mm drill bit will make this easier. Absco Industries Assembly Instruction Manual Model: CYC15 02/03/2021...
- Page 15 5. Repeat to stud on adjacent wall. HEX HD TEK SCREW W/ NEO WASHER 10-16x16mm BKT17 fixed to roof sheet with 9 hex hd tek screws with neoprene washers from outside. Absco Industries Assembly Instruction Manual Model: CYC15 02/03/2021...
- Page 16 8 tek screws as shown to the right. The roof lip may need to be removed in order Two multipurpose to fit the four tek screws from the outside of the brackets, BKT17, are shed. used per roof brace. Absco Industries Assembly Instruction Manual Model: CYC15 02/03/2021...
-
Page 17: Anchoring Methods
Inside view of typical anchor. Outside view of typical anchor Door stud have a single anchor through a 12 anchors in total. BKT17. Fixed by four tek screws. 3 per wall, spaced evenly. Absco Industries Assembly Instruction Manual Model: CYC15 02/03/2021... - Page 18 Absco Sheds Storage Guidelines • Absco Sheds are designed to be weatherproof for normal weather conditions. In the event of extreme weather conditions such as heavy rain, combined with high wind gusts, the ridge capping, sheeting joins, screw fi xings etc., may exhibit minor deformations which may allow some water entry. These areas should be checked regularly to ensure that maximum strength and protection is maintained.
- Page 19 Lifetime Warranty Statement This warranty against defects is given by: Absco Industries (ABN: 77 869 708 678) Address: PO Box 119 Acacia Ridge QLD 4110 Ph: 1800 029 701 Fax: 07 3344 1191 Email: admin@absco.com.au Date of issue: 19 December 2018 Details of Manufacturer’s Warranty This product comes with a Lifetime structural warranty from the date of purchase.
- Page 20 IMPORTANT 1. Manufacturer’s Disclosure This warranty against defects shall not apply in the following situations: A) Where the product is not assembled in accordance with the instructions provided in the product kit; B) Where the product is used to store corrosive materials such as fertilizer, chlorine etc; C) The warranty does NOT cover damage caused by storms, wind, rain, snow or poor foundations;...
Need help?
Do you have a question about the CYC15 and is the answer not in the manual?
Questions and answers