
Related Manuals for Humanscale M/Connect 2 MC2-AXY


Summary of Contents for Humanscale M/Connect 2 MC2-AXY
- Page 1 User Guide North America: +1 800 400 0625 Europe: +353 (0)1 858 0910 Asia Pacific: +852 2581 0570...
- Page 2 Upstream Cable Retainer USB-C Upstream Cable with USB-A adapter Installation Guidelines This product is intended to be used with Humanscale’s Monitor Arm product line and the following office desk styles placed on a non-skid surface: 1. Systems Furniture with panel hung surfaces 2.
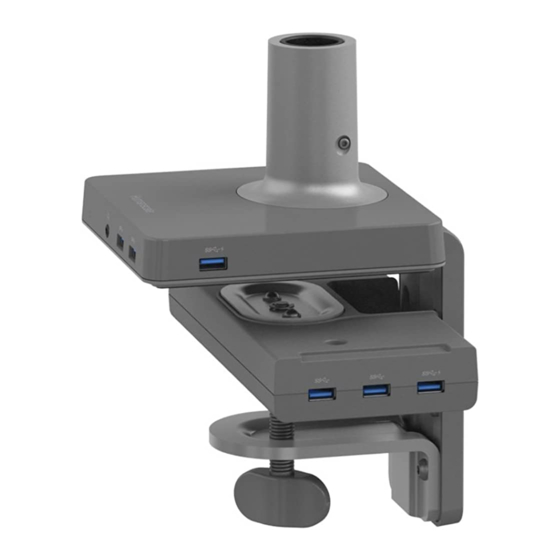
- Page 3 Identifying Ports ① ② Ⓐ Front Panel Component Description ➀ ① USB A port Supports USB 3.1 Gen 1 USB A port Supports USB 3.1 Gen 1 ② 3.5 mm TRRS jack To connect combined headphone and microphone headset...
- Page 4 Identifying Ports ② ③ ① ⑤ ⑦ ⑥ ⑨ ④ ⑪ ⑩ ⑧ Ⓑ Ⓒ Left Panel Right Panel Component Description ① DC in DC to M/Connect ② Power Button Powers unit on and off ③ USB-C Upstream Port Connects full featured USB-C cable to laptop, Supports PD charging at (60W version) 60W max.
- Page 5 Assembly Instruction Installing M/Connect onto Edge of Table Caution: Maximum weight load of M/Connect is as follows: M2.1: 15.5 lbs. M8.1: 28 lbs. M10: 40 lbs. M/Flex: 60 lbs.Total. M10 is not to be used on M/Flex when mounted to MConnect2 Do NOT exceed maximum weight limits.
- Page 6 Place into Grommet Hole or System Furniture Gap ① Place the L Bracket of the M/Connect through the grommet hole and to the desired position NOTE: Minimum hole diameter is 3” (76 mm) ② Reattach Clamps Secure the lower bracket to the larger bracket reusing the two screws ③...
- Page 7 Attach M/Connect onto table edge Slide unit with loosely mounted bracket against work surface edge Tighten both set screws evenly into bracket to a snug fit (fig. E) ① ② Attaching and Removing Dock To attach dock, slide onto the clamp bracket (fig. F) until it snaps in place To remove dock, pull away from clamp while applying a downward force near front (Fig.
- Page 8 Attaching a Monitor Arm to M/Connect ① M2.1/M8.1/m10 Monitor Arm Insert Arm into M/Connect Base Refer to monitor arm instructions to setup smart stop ring Insert Monitor Arm into the Base stem (fig. K) until it clicks into place Refer to monitor arm instructions to continue installation M/Flex Monitor Arm Insert M/Flex Post into M/Connect Base Back out the two set screws installed in stem (fig.
- Page 9 Bolt-Through Mount Installing on a work surface with no clamp system Drill half inch hole in desired location To ensure M/Connect makes full contact with desk, locate hole at least two inches from back edge of desk Lower M/Connect onto desk aligning bolt with hole Slide the bolt-through plate (fig.
- Page 10 Connect upstream cable from source to hub Remove screw (fig. P) from cable retaining clip Remove plastic insert (fig. Q) from retaining clip and insert USB-C upstream cable Snap plastic insert back into retaining clip and secure with screw When attaching USB - A-to-C adapter, make sure to properly align connector head with adapter upon insertion ①...
- Page 11 Mounting The M/Connect Dock Horizontal Alignment Screw bracket (fig. R) into desk underside and slide dock in Attach screw (fig. S) through bracket into dock to fully secure ③ ① ② Vertical Alignment Screw bracket (fig. T) into desk underside and slide dock in Attach screw (fig.
- Page 12 ① Securing the Dock Using a K-Lock into Dock Use K-Slot opening on dock to attach K-Lock device (fig.V) ② Using a K-Lock cable pass-through dock To secure with cable pass through, orient dock bracket to enclose gap (fig. W) Pass lock cable through gap in dock and loop around table leg or fixed object (fig.
- Page 13 Installing M/Connect Software M/Connect Driver Installation Instructions YOU MUST INSTALL THE NECESSARY DRIVERS ONTO YOUR COMPUTER BEFORE USING M/CONNECT. THIS WILL ENSURE PROPER OPERATION. NOTE: For proper installation of the DisplayLink drivers, it is important to make sure your USB 3.0 Host Controller Driver and Graphics Adapter Driver are up to date Go to http://www.displaylink.com/downloads/ Choose your operating system Download and install the latest driver...
-
Page 14: Table Of Contents
Electrical Specifications Base Hub - 60W USB ports USB-C full feature with PD charging 60W Support PD2.0 version 1.2 (BC protocol devices not supported) USB ports 2x USB-A 3.1 Gen1 with charging (5V, 2.4A) USB-C (5V, 3.0A max) USB Ports – charging only, no data communication USB-A (5V, 2.4A max) 3.5mm combo jack... - Page 15 The FCC requires the user be cautioned that any changes or modifications made to this device that are not expressly approved by Humanscale may void the user’s authority to operate the equipment. Connections to this device must be made with shielded cables in order to maintain compliance with the Class B limits in the FCC Rules and Regulations.
- Page 16 Allume et éteint l’unité d’alimentation Ce produit est destiné à être utilisé avec la ligne de ③ bras supports-écran de Humanscale et les styles de Port USB-C amont Connecte un câble USB-C complet bureaux suivants; il doit être placé sur une surface non (version 60 W) à...
- Page 17 Instructions d’assemblage Rattacher les supports Fixer le support inférieur au support le plus grand à Installation de M/Power sur le bord l’aide des deux vis Consultez la page 6, ② d’une table AVERTISSEMENT : le poids maximal supporté par M/ Installer M/Connect sur un bureau Connect est : M2.1 : 15,5 lb.
- Page 18 Placer le capuchon de protection en plastique sur la Attacher un bras support-écran au M/ partie inférieure du boulon (fig. J) Consultez la page 9, ①, ② et ③ Connect Bras support-écran M2.1/M8.1/m10 Connexion des câbles au M/Connect Insérer le bras dans la base du Brancher le cordon d’alimentation M/Connect Insérer le cordon d’alimentation (fig.
- Page 19 Dépannage Alignement vertical Nous vous recommandons de suivre ces directives à titre Visser le support (fig. T) dans la partie inférieure du de meilleure pratique. bureau et faire glisser la station d’accueil Consultez la page 11, ④ Assurez-vous que l’installation n’est pas bloquée par un pare-feu d’entreprise.
- Page 20 DP1.2 Este producto está diseñado para su uso con la Gigabit Ethernet Réseau línea de brazos para monitor de Humanscale y los Taux de transfert 10Mbit/100Mbit/1Gbit siguientes tipos de escritorios instalados en superficies Ports USB 2x USB-A 3.1 Gen1 (5 V, 0,9 A) 1x USB-A 3.1 Gen1 avec charge (5 V, 2,4 A)
- Page 21 Identificación de los Instrucciones de montaje puertos Instalación de M/Power en el borde de la mesa Ⓐ Panel frontal PRECAUCIÓN: la carga máxima de la estación M/Connect Componente Descripción es la siguiente: M2.1: 15,5 lbs. M8.1: 28 lbs. M10: 40 lbs. M/Flex: 60 lbs. Puerto USB A Admite USB 3.1 Gen 1 ①...
- Page 22 Vuelva a colocar las abrazaderas Montaje de un brazo de monitor en la M/Connect Sujete el soporte inferior en el soporte más grande volviendo a utilizar los dos tornillos Brazo de monitor M2.1/M8.1/M10 Véase la página 6, ② Inserte el brazo en la base de la M/ Instalación de la M/Connect en un Connect escritorio deslizante...
- Page 23 Coloque la tapa protectora de plástico en la parte Alineación vertical inferior del perno (fig. J) Véase la página 9, ①, ② y ③ Atornille el soporte (fig. T) en la parte inferior del escritorio y deslice la base de conexión Véase la página 11, ④...
- Page 24 Kaveri A10-7400P o mejor Vaya a http://www.displaylink.com/downloads/ Memoria: 8 GB Elija su sistema operativo Tarjeta de vídeo: Intel HD 4000, ATI Radeon HD 8650, NVidia GeForce 7xxM o mejor, con controladores lanzados Descargue e instale el controlador más reciente específicamente para la versión de Windows. USB: USB 3.0 ¡Ya puede utilizarlo! Disco: 7200 RPM o SSD...
- Page 25 Questo prodotto è destinato all'utilizzo con la linea 35 °C) funcionamiento di bracci per monitor di Humanscale e con i seguenti Humedad relativa: De 5 a 90 % (sin modelli di scrivanie da ufficio posizionate su una condensación entre -20 y cuando no está...
- Page 26 Capovolgere M/Connect per accedere al Componente Descrizione ① foro della vite Ingresso CC CC a M/Connect ② Pulsante di Accende e spegne l'unità Avvitare la graffetta fermacavo nella base in lamiera accensione ③ Vedere pagina 5, ① Porta a monte Collega il cavo USB-C completo con USB-C il laptop, supporta la ricarica PD a...
- Page 27 il cavo a ponte passi senza ostacoli sul lato destro del Braccio per monitor M/Flex morsetto Inserire l'asta M/Flex nella base di M/ Installare le viti dei morsetti senza serrarle Vedere pagina 6, ④ e ⑤ Connect Allentare le due coppie di viti installate nell'asta (fig. L) Montaggio di M/Connect sul bordo del tavolo Inserire l'asta M/Flex (fig.
- Page 28 ATTENZIONE: M/Connect 2 da 60 W necessita di un'alimentazione da 150 W. M/Connect 2 da 100 W Sistema di bloccaggio per il dock necessita di un'alimentazione da 180 W. Se si collega l'alimentazione da 150 W con M/Connect 2 da 100 W, Con un lucchetto Kensington inserito l'unità...
-
Page 29: Video 1 Output
standard (MSI Installer), disponibili per il download dal sito Microfono/ Jack combo da 3,5 mm web di DisplayLink. auricolari Hub di base Porte USB USB-C completo di tutte le funzioni con ricarica Gli utenti individuali devono seguire i consigli relativi - 100 W PD da 100 W all'aggiornamento degli altri driver. - Page 30 Kabel. Andere Kabel können zum Erlöschen der Produktgarantie Dieses Produkt ist für die Verwendung mit der führen ④ Monitorarm-Produktlinie von Humanscale und den Vorgelagerter USB- Verbindet ein vollwertiges USB-C- folgenden Bürotischmodellen auf einer rutschfesten C-Anschluss Kabel mit einem Laptop, unterstützt Oberfläche vorgesehen:...
- Page 31 Installationsanleitung Wiederanbringen der Klemmen Befestigen Sie die untere Halterung mit den beiden Installation von M/Power an der Schrauben an der größeren Halterung Siehe Seite 6, ② Tischkante ACHTUNG: Die maximale Gewichtsbelastung von M/ Installation von M/Connect auf der Connect ist nachfolgend aufgeführt: M2.1: 7 ,03 kg (15,5 lbs.) - M8.1: 12,7 kg (28 lbs.) - M10: 18 Schiebeplatte kg (40 lbs.) - M/Flex: 27 ,2 kg (60 lbs.) insgesamt.
- Page 32 Setzen Sie die Kunststoffschutzkappe auf die Anbringen eines Monitorarms an M/ Unterseite des Bolzens (Abb. J) Siehe Seite 9, ①, ② und ③ Connect M2.1/M8.1/m10 Monitorarm Anschluss von Kabeln an M/Connect Arm in den M/Connect Fuß einsetzen Anschluss des Netzkabels Zur Einrichtung des Rings mit Smart Stop, siehe Stecken Sie das Netzkabel (Abb.
- Page 33 Vertikale Ausrichtung Fehlerbehebung Wir empfehlen, diese Leitlinien als beste Praxis zu befolgen. Schrauben Sie die Halterung (Abb. T) in die Unterseite des Tisches und schieben Sie das Dock hinein. Stellen Sie sicher, dass die Installation nicht durch eine Siehe Seite 11, ④ Unternehmensfirewall blockiert wird Falls Ihre Firewall die Installation dieses Treibers blockiert, Befestigen Sie die Schraube (Abb.
- Page 34 (Zweifachmodus DP1.2) Dit product is bedoeld voor gebruik met monitorarmen Netzwerk Gigabit-Ethernet uit de productlijn van Humanscale en de volgende Übertragungsrate 10 Mbit/100 Mbit/1 Gbit bureaustijlen geplaatst op een anti-slipondergrond. 2x USB-A 3.1 Gen1 (5V, 0,9A) USB-Anschlüsse 1x USB-A 3.1 Gen1 mit Ladefunktion (5V, 2.4A) 1.
- Page 35 gemonteerd op de MConnect2 Poorten identificeren Overschrijd de maximale gewichtslimiet NIET. Indien gebruikt in combinatie met de M/Connect 2, moet Ⓐ➀Voorpaneel de M/Flex beperkt worden tot 61 cm. Onderdeel Beschrijving Optioneel: De bevestigingsklem van de USB-C-kabel installeren USB-A-poort Ondersteunt USB 3.1 Gen 1 ①...
- Page 36 stopring te installeren De M/Connect op een verstelbaar Plaats de monitorarm in de onderstelstandaard bureau installeren (afbeelding K) tot deze op zijn plek klikt Verwijder de schroeven Zie de instructies voor de monitorarm om door te gaan met de installatie Verwijder de schroeven van de klem Zie pagina 8, ①...
- Page 37 K-vergrendelingsapparaat (afbeelding V) te bevestigen PAS OP: De M/Connect 2 van 60 W vereist de voeding van Zie pagina 12, ① 150 W. De M/Connect 2 van 100 W vereist de voeding van 180 W. Als de voeding van 150 W aangesloten wordt op de M/Connect 2 van 100 W, wordt de unit uitgeschakeld.
- Page 38 dit handmatig bijwerken. Zie http://support.displaylink.com Video 1-uitgang Ondersteunt (1) voor meer details. Voor Windows 8 of hoger worden drivers DP++ (Dual mode 5K monitor DP1.2) voor laptops door Microsoft geleverd en bijgewerkt in het Video 2-uitgang systeem via Windows-update. DP++ (Dual mode DP1.2 Voor de beste gebruikerservaring raden we aan de Netwerk...
- Page 39 ⑨ يتصل بمنفذ العرض للشاشة )2( منفذ الشاشة ⑩ وتصاميمHumanscale ص ُ مم هذا المنتج ليستخدم مع خط إنتاج ذراع شاشة 2.4 ،، يدعم الشحن بجهد 5 فولتUSB 3.1 Gen1 USB-A منفذ أمبير :المكاتب التالية الموضوعة على سطح غير قابل لالنزالق...
- Page 40 قم بفك المسمارين (الشكل ب) باستخدام المفتاح السداسي (الشكل د) وافصل M/Connect ربط ذراع الشاشة بـ حامل القامط األصغر (الشكل ج) من الحامل األكبر ③ ،5 أنظر الصفحة M2.1/M8.1/m10 ذراع الشاشة طرازات وضعه في فتحة حائطية (جروميت) أو فجوة أثاث النظام M/Connect ثبت...
- Page 41 الـ 06 وات مصدر كهرباء بقوة 051 وات. بينماM/Connect2 تنبيه: يحتاج ا(لشكل ذ) حتى يثبت تما م ً اM/Connect بمحورK-Lock اربط ⑤ ،12 أنظر الصفحة الـ 001 وات مصدر كهرباء بقوة 081 وات. يؤديM/Connect2 يحتاج 100 التي تعمل بقوةM/Connect2 توصيل مصدر طاقة بقوة 051 وات إلى الـ .وات...
-
Page 42: 5120X2880 P60
Richland A10-575x / AMD %01 إلى %08 (بدون تكثف الرطوبة النسبية - أثناء التشغيل بين 5 درجة مئوية إلى 53 درجة أو أفضلKaveri A10-7400P )مئوية الذاكرة: 8 جيجابايت %5 إلى %09 (بدون تكثف - بين الرطوبة النسبية - أثناء 02 درجة... - Page 44 © 2021 Humanscale Corporation. The text and artwork are copyrighted materials. All rights reserved. The Humanscale mark and logo are trademarks of Humanscale Corporation and are registered in the United States and certain other countries. The MConnect 2 trademark is owned by Humanscale Corporation. humanscale.com...
Need help?
Do you have a question about the M/Connect 2 MC2-AXY and is the answer not in the manual?
Questions and answers