Table of Contents
Advertisement
Quick Links
AIG-300 Series
Quick Installation Guide
Advanced IIoT Gateways with Arm® Cortex™-A7 dual-core 1
GHz processor, 1 CAN port, 4 DIs, 4 DOs, ThingsPro Edge
software, -40 to 70°C operating temperature
Version 1.2, December 2021
Technical Support Contact Information
www.moxa.com/support
2021 Moxa Inc. All rights reserved.
P/N: 1802003015012
*1802003015012*
Advertisement
Table of Contents

Related Manuals for Moxa Technologies AIG-300 Series


Summary of Contents for Moxa Technologies AIG-300 Series
- Page 1 AIG-300 Series Quick Installation Guide Advanced IIoT Gateways with Arm® Cortex™-A7 dual-core 1 GHz processor, 1 CAN port, 4 DIs, 4 DOs, ThingsPro Edge software, -40 to 70°C operating temperature Version 1.2, December 2021 Technical Support Contact Information www.moxa.com/support 2021 Moxa Inc. All rights reserved.
-
Page 2: Package Checklist
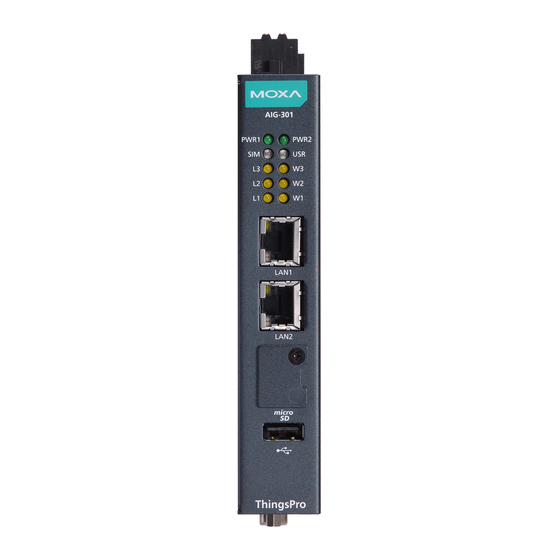
The console cable is not included in the package; you need to purchase it separately. Notify your sales representative if any of the above items are missing or damaged. Panel Views The following figures show the panel layouts of the AIG-300 Series: AIG-301-T-AZU-LX Top Panel - 2 -... - Page 3 Front Panel Bottom Panel AIG-301 US, EU, AP, and CN Models NOTE The CN model does not come preinstalled with the LTE module. Contact Moxa’s distributor in China for more information. Top Panel - 3 -...
- Page 4 Front Panel Bottom Panel View LED Indicators LED Name Status Function PWR1/PWR2 Green Power is on No power is supplied Green SIM2 in use Yellow SIM1 in use Green/Yellow Green: System is operating normally Yellow: System is initializing and running the initial boot-up process L1/L2/L3 Yellow...
-
Page 5: Mounting Instructions
Mounting Instructions DIN-rail Mounting The aluminum DIN-rail attachment plate is already attached to the product’s casing. To mount the device on to a DIN rail, make sure that the stiff metal spring is facing upwards and follow these steps. 1. Pull down the bottom slider of the DIN-rail bracket located at the back of the unit 2. -
Page 6: Wiring Requirements
IMPORTANT! The diameter of the screw heads should be greater than 7 mm and less than 14 mm; the diameter of the shafts should be less than 3 mm. The length of the screws should be greater than 6 NOTE • Test the screw head and shank size by inserting the screws into one of the keyhole shaped apertures of the wall- mounting plates before attaching the plate to the wall. - Page 7 The wire size of the power input and the earthing conductor should be the same. Remove 8 to 9 mm of the DC wires’ protective cover and use a torque of 4.5lb-in/0.51Nm to connect the wire. The max. wire temperature should not exceed 100°C. The terminal blocks do not accommodate more than one conductor wire per clamping point.
-
Page 8: Communication Connections
Communication Connections Connecting to the Network The two 10/100/1000 Mbps Ethernet ports (LAN 1 and LAN 2) use RJ45 connectors. Refer to the figure to the 10/100 Mbps 1000 Mbps TRD(0)+ TRD(0)- TRD(1)+ – TRD(2)+ – TRD(2)- TRD(1)- – TRD(3)+ –... - Page 9 Signal Connecting a USB Device The device comes with a USB port located on the lower part of the front panel, allowing users to connect to a device with an USB interface. The USB port uses a type-A connector. Connecting a CAN Device A CAN port with a DB9 interface is located on the bottom panel.
-
Page 10: Connecting The Device To A Pc
Wi-Fi module for the device. Connecting the Device to a PC You can use a PC to access the AIG-300 Series by one of the following methods: Access the web console of ThingsPro Edge via LAN 2 by https://192.168.4.127:8443/. -
Page 11: Product Specifications
of a Moxa support engineer. If you need to change the battery, contact the Moxa RMA service team. ATTENTION There is a risk of explosion if the battery is replaced with an incorrect type of battery. ATTENTION • These devices are open-type devices that are to be installed in an enclosure with tool removable cover or door, suitable for the environment. -
Page 12: Special Conditions Of Use
Storage Temperature -40 to 85°C (-40 to 185°F) (package included) The latest specifications for Moxa's products can be found at https://www.moxa.com. ATEX and C1D2 Specifications UC-8210-T-LX, UC-8210-T-LX-S, UC-8220-T-LX Model UC-8210-LX, UC-8210-LX-S, UC-8220-LX Rating Input: 12 to 48 VDC; 1.0 to 0.25 A ATEX Information II 3 G Certificate Number: DEMKO 19 ATEX 2302X...
Need help?
Do you have a question about the AIG-300 Series and is the answer not in the manual?
Questions and answers