Table of Contents
Advertisement
Quick Links
Advertisement
Table of Contents

Related Manuals for SoundMax SM-CDM1052


Summary of Contents for SoundMax SM-CDM1052
- Page 1 SM-CDM1052 CD/MP3 RECEIVER CD/MP3- Instruction manual...
-
Page 2: Table Of Contents
Dear customer! Thank you for purchasing our product. For safety, it is strongly recommended to read this manual carefully before connecting, operating and/or adjusting the product and keep the manual for reference in the future. Table of contents Table of contents ......................2 Important safeguards .......................3 Accessories........................5 Installation/Connections ....................6... -
Page 3: Important Safeguards
Important safeguards Read carefully through this manual to familiarize yourself with this high-quality sound system. Disconnect the vehicle's negative battery terminal while mounting and connecting the unit. When replacing the fuse, be sure to use one with an identical amperage rating. Using a fuse with a higher amperage rating may cause serious damage to the unit. - Page 4 Do not install the detachable panel before connecting the wire. Notes: In addition to normal audio CD, this unit can play CD-R and CD-R/W disc that contain audio tracks as well; however, depending on the conditions of the recording equipment, recording program or the CD-R as well as CD-R/W disc itself, some CD-R or CD-R/W may not play.
-
Page 5: Accessories
Accessories Receiver 1 pc Front panel 1 pc Installation parts: Mounting bracket (half sleeve) 1 pc Release key 2 pcs Flat washer 2 pcs Spring washer 1 pc 1 pc Screw 1 pc Metal strap 1 pc ISO connector 1 pc Protective case 1 pc Customer information... -
Page 6: Installation/Connections
Installation/Connections First complete the electrical connections, and then check them for correctness. Installation way The chassis wear a metal sliding housing. Please have the wiring connection of the power supply, speakers and antenna as for the requirement of the manual, and then install the metal sliding housing into the car according to the diagram. - Page 8 onnection diagram Notes: In spite of having any kinds of speaker system, must use 4 ohms impedance of speaker to reduce the distortion during high volume level. Prohibit to make the conductors of auto antenna and ground touch with each other.
-
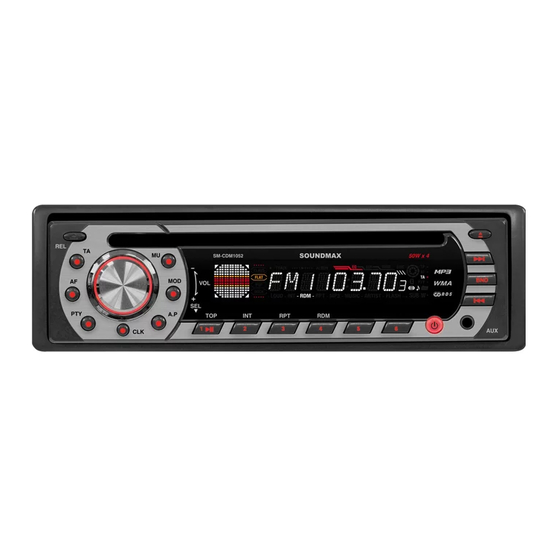
Page 9: Panel Controls
Panel controls 1. RELEASE button 2. VOLUME knob/SEL button 3. MUTE button 4. CD slot 5. PREVIOUS/NEXT button 6. EJECT button 7. BAND button 8. AUX in 9. POWER button 10. 10 UP/6 button 11. 10 DN/5 button 12. 4/RDM button 13. -
Page 10: Lcd Layout
LCD layout 1. Equalizer mode indicators 2. Track playback indicator 3. Album name ON 4. Equalizer on indicator 5. EON function indicator 6. Mute function indicator 7. Disc playback indicator 8. TP function indicator 9. AF function indicator 10. TA function indicator 11. -
Page 11: General Operations
General operations Reset the unit Operating the unit for the first time or after replacing the car battery, you must reset the unit. Press RELEASE button and remove the front panel, then press RESET button on the inner panel to restore the unit to the original factory settings. - Page 12 Setting the clock To show the time: In Radio mode when RDS data is received press CLOCK button to select the mode: CLOCK => FREQUENCY => PTY => PS NAME. In Radio mode when RDS data is not received press CLOCK button to select the item: CLOCK =>...
- Page 13 RADIO mode), DSP (FLAT/CLAS/ROCK/POP), LOUD OFF/LOUD ON, STEREO/MONO (in RADIO mode), DX/LOCAL (in RADIO mode), VOL LAST/VOL ADJUST, ESP6/ESP25. Rotate VOLUME knob to set the parameter. Press SEL button to confirm the setting. TA SEEK/TA ALARM: TA seek: when newly tuned station does not receive TP information for 60 seconds, the radio retunes to next station which has not the same station (PI) as the last station, but has the TP information.
- Page 14 Retune S: selected as 60 seconds. MASK: Mask DPI: Only the AF, which has different PI is masked. Mask ALL: The AF, which has different program identification and no RDS signal with a high field strength is masked. BEEP 2ND/BEEP ALL/BEEP OFF: Beep 2nd: a beep is only generated when an allotted double key is pressed long (1 second).
- Page 15 This function allows to set the volume level of the unit after it was turned off and then turned on again. Vol last: If you want the volume level to be the same as it was before turning off. Vol adjust: allows to choose volume level. The minimal level you can set is 10. ESP6/ESP25: Select the needed ESP value.
-
Page 16: Digital Tuner Operations
Digital tuner operations Note: RDS (Radio Data System) service availability varies with areas. Please understand if RDS service is not available in your area, the following service is not available, either. Band selection Press BAND button to select a band: FM1, FM2, FM3, AM1 (MW1), AM2 (MW2). Display will show the wave band and frequency. - Page 17 - Press a preset button (1-6) briefly to recall the stored station. Preset scan function Press A.P button to scan all preset stations in the memory of the current band and stay on each memory stations for about 5 seconds. To stop preset scan, press this button again. Auto memory store function Press and hold for 2 seconds A.P button to enter auto store mode.
- Page 18 TA (Traffic Announcement) function Press TA button briefly to select the TA mode on/off. When TA mode is on (“TA” is displayed on the LCD), it will begin to seek TA station and TA SEEK will be displayed on the LCD for a while. Traffic announcement interrupts CD playback or radio listening when broadcasted.
- Page 19 Icon flashing: AF switching mode on, but RDS information is not received yet. When AF switching mode is selected, the radio checks the signal strength of AF all the time. The interval of checking time of each AF depends on the signal strength of current station, from a few minute for a strong station to a few seconds for a weak station.
- Page 20 JAZZ, COUNTRY WEATHER, FINANCE, CHILDREN NATION, OLDIES SOCIAL, RELIGION, PHONE IN FOLK TRAVEL, LEISURE, DOCUMENT When PTY MUSIC or PTY SPEECH is on, the previous PTY program and PTY word is displayed on LCD. If there are no keys entered for 2 seconds, previously selected PTY is searched. During 1 loop, if desired PTY is not found, NO PTY is flashed, then return to previous normal radio and PTY word disappear.
-
Page 21: Disc Operations
Disc operations Loading a disc Turn the power on. Insert the disc with the printed side facing upward into the slot. To eject the disc, press EJECT button. Play/pause To ensure good system performance, wait until the unit finishes reading the disc information before proceeding. - Page 22 Press again to cancel. During MP3/WMA playback press it and hold for 2 seconds to start repeat playback of tracks in current folder. Press again to cancel. Random playback During CD playback press 4/RDM button to start random playback. Press again to cancel. During MP3/WMA playback press it and hold for 2 seconds to start random playback of tracks in current folder.
- Page 23 number of the flashing digit. After finishing selecting the number of all flashing digits, press SEL button to play the track of the selected number. First character search: the LCD will display “A--.…” If there are file names with the first character “A”, the name of the first of them will be displayed;...
-
Page 24: Mp3 Overview
MP3 overview MP3 is short for MPEG Audio Layer 3 and refers to an audio compression technology standard. This product allows playback of MP3 files on CD-ROM, CD-R or CD-RW discs. The unit can read MP3 files written in the format compliant with ISO 9660. However it does not support the MP3 data written by the method of packet write. - Page 25 Notes on creating your own CD-R or CD-RW containing MP3 files: To enjoy high quality sound, we recommend converting to MP3 files with a sampling frequency of 44.1 kHz and a fixed bit rate o f 128 kbps. DO NOT store more than 448 MP3 files per disc. For ISO 9660 - compliant format, the maximum allowable depth of nested folders is 8, including the root directory (folder).
-
Page 26: Anti-Theft System
Anti-Theft System The front panel of this unit can be detached and taken with you, helping to deter theft. Removing the panel 1. Press POWER button to switch off the power of the unit. 2. Press RELEASE button to detach the panel. 3. -
Page 27: Handling Discs
Handling discs Dirty, scratched or warped discs may cause skip ping or noise. Handle the disc only by the edges. To keep clean do not touch its surface. Discs should be stored in their cases after use to avoid scratches. Do not expose discs to direct sunlight, high humidity, high temperature or dust. - Page 28 and macroscopic dirt, so gently wiping them with a soft cloth should remove must panicles. Wipe in a straight motion from the center to the edge. Never use thinner benzine, record cleaner or anti static spray on a compact disc. Such chemicals can damage its plastic surface.
-
Page 29: Troubleshooting Guide
Troubleshooting guide Symptom Cause Solution No power The car ignition is not on. If the power supply is properly connected to the car accessory switch the ignition key to “ACC”. The fuse is blown. Replace the fuse. Disc cannot be loaded. Presence of disc inside the player. -
Page 30: Specification
Specification General Power supply: 12 V DC Current consumption max. 10A Maximum power output: 50Wx4 channels Fuse: 10 A/0.5 A Dimensions (W x H x D) 178 x 50 x 165 mm 40 CD/ 120c MP3/ 300c WMA FM Stereo Radio Memory 18 stations Frequency range:... - Page 31 Frequency characteristics: 20-100 Hz 5 dB 10-20 kHz 5 dB Signal to noise CD: 50 dB (1kHz) Number of channels: 2 stereo Line out Output: 2 channel RCA line out (2V) Specifications are subject to change without notice. Dimensions are approximate.
- Page 32 ........................32 ....................33 ......................35 ....................36 ....................39 ....................40 .......................41 ......................46 ......................52 3 ........................56 ....................58 ....................59 .......................59 ..............61 ..................63...
- Page 34 CD-R CD-R/W CD-R CD-R/W CD-R CD-R/W.
- Page 39 RELEASE VOLUME/ MUTE PREVIOUS/NEXT EJECT BAND POWER 6/10 UP 5/10 DN 4/RDM 3/RPT 2/INT 1/PLAY/PAUSE/TOP MODE CLOCK...
- Page 40 USB/SD/MMC...
- Page 41 RELEASE, RESET, RELEASE EJECT, POWER, MODE, : RADIO ( ) => CD ) => AUX. VOLUME VOLUME MUTE,...
- Page 42 CLOCK, => => => CLOCK, => => PTY NONE. CLOCK, CLOCK, VOLUME VOLUME CLOCK, SEL, : VOL ( ) => BASS ) => TRE LE ( ) => BALANCE ( ) => FADER ( VOLUME,...
- Page 43 SEL, SEL, : TA SEEK/TA ALARM, PI SOUND/PI MUTE, RETUNE L/RETUNE S, MASK DPI/MASK ALL, BEEP 2ND/BEEP ALL/BEEP OFF, SEEK1/SEEK2 ), DSP (FLAT/CLAS/ROCK/POP), LOUD OFF/LOUD ON, STEREO/MONO ( ), DX/LOCAL ( ), VOL LAST/VOL ADJUST, ESP6/ESP25. VOLUME, SEL. SEEK/TA ALARM ( TP ( VOLUME, : TA SEEK...
- Page 44 PI mute: RETUNE L/RETUNE S: Retune L: Retune S: MASK: Mask DPI: RDS, PI ( Mask ALL: RDS. BEEP 2ND/BEEP ALL/BEEP OFF: Beep 2nd: Beep all: POWER RELEASE). Beep off: SEEK1/SEEK2: Seek 1: SEEK. Seek 2: SEEK SEEK, DSP: VOLUME, : OFF ( ), FLAT,...
- Page 45 POP, CLASSIC, ROCK. LOUD ON/LOUD OFF: Loud ON: Loud OFF: STEREO/MONO: Stereo: Mono: LOCAL/DX: Local: VOL LAST/VOL ADJUST: Vol last: Vol adjust: – 10. ESP6/ESP25: MODE (AUX). VOLUME.
- Page 46 RDS ( BAND, : FM1, FM2, FM3, AM1 (MW1), AM2 (MW2). PREVIOUS/NEXT, PREVIOUS/NEXT, (18 FM, 12 AM (MW)). PREVIOUS/NEXT. 1-6,...
- Page 47 1-6, A. , A. , A. . : PI, PS, AF, TP, TA, EON, PTY PI (Program Identification Code): PS (Program Service Name): AF (Alternative Frequencies): TP (Traffic Program Identification):...
- Page 48 TA (Traffic Announcement Identification): EON (Enhanced Other Networks Information): PI, AF, TP, PTY (Program Type Code): CT (Clock Time): TA ( «TA»), «TA SEEK». EON ( EON TA LOCAL ( EON TA DISTANCE ( (EON TA), EON TA...
- Page 49 (EON), EON TA LOCAL ( EON TA LOCAL, «EON TA LO». EON TA DISTANCE ( (EON TA), EON TA DISTANCE, «EON TA DX». AF (...
- Page 50 REGIONAL REGION. REG ON ( REG OFF ( ): PI- PTY (Program Type) function PTY, PTY: – - PTY POP, ROCK NEWS, AFFAIRS, INFO EASY, LIGHT SPORT, EDUCATE, DRAMA CLASSIC, OTHERS CULTURE, SCIENCE, VARIED JAZZ, COUNTRY WEATHER, FINANCE, CHILDREN NATION, OLDIES SOCIAL, RELIGION, PHONE IN FOLK TRAVEL, LEISURE, DOCUMENT...
- Page 51 «NO PTY»,...
- Page 52 EJECT. 1/PLAY/PAUSE/TOP, PREVIOUS, NEXT, PREVIOUS/NEXT...
- Page 53 3/RPT, MP3/WMA 3/RPT, 4/RDM, MP3/WMA 4/RDM, Intro 2/INT. 2/INT MP3/WMA 2/INT; 2/INT...
- Page 54 MP3/WMA 10 UP/6 10 UP/5, MP3/WMA “TRK T 000”, VOLUME, “A--.…” “A”, “..NONE” (« »). VOLUME, PREVIOUS NEXT VOLUME, PREVIOUS NEXT...
- Page 55 ID3- MP3/WMA BAND CD/MP3/WMA, BAND MP3/WMA. Windows.
- Page 56 MPEG 3 CD-ROM/CD-R/CD-RW. ISO 9660. “.mp3”. “.mp3”, “ MP3” “ ”, PC “ ” “ ” 256. VBR, . VBR: WMA (Windows Media Audio) – Microsoft...
- Page 57 Corporation. , 64 CD-R CD-RW, MP3: 44,1 ISO 9660, CD-R MP3 CD-R CD-RW CD-R CD-RW CD-R CD-RW 1. ID3TAG.
- Page 58 POWER RELEASE,...
- Page 61 “ ”. (reset).
- Page 63 10 /0.5A 40 CD/ 120c MP3/ 300c WMA 87.5 - 108.0 10.7 522-1620 CD/CD-R/CD-RW CDDA/MP3/WMA...
- Page 64 20-100 10-20 RCA- (2V)
Need help?
Do you have a question about the SM-CDM1052 and is the answer not in the manual?
Questions and answers