Table of Contents
Advertisement
Quick Links
Network Attached Storage
TeraStation WSS 5000R2 and 5000N2
User Manual
Please make sure to read this manual before using and follow the procedures. If you have any inquiries about
the product, contact the number on the warranty statement or the packing box. Do not discard this manual, the
warranty statement, or the packing box.
Americas: www.buffaloamericas.com
Europe: www.buffalo-technology.com
Asia Pacific: www.buffalo-asia.com
35020333-13
2016.12
Advertisement
Table of Contents

Related Manuals for Buffalo TeraStation WSS5000N2


Summary of Contents for Buffalo TeraStation WSS5000N2
- Page 1 Please make sure to read this manual before using and follow the procedures. If you have any inquiries about the product, contact the number on the warranty statement or the packing box. Do not discard this manual, the warranty statement, or the packing box. Americas: www.buffaloamericas.com Europe: www.buffalo-technology.com Asia Pacific: www.buffalo-asia.com 35020333-13 2016.12...
-
Page 2: Table Of Contents
Chapter 3 Windows Update ...........9 Windows Update ................9 Chapter 4 Preinstalled Software ........ 10 RAID Builder .................. 10 Buffalo Dashboard ................ 11 Email Notification ................. 12 Buffalo Replication ............... 13 TeraStation Backup and Replication Folder Settings ....14 Display Settings ................15 Chapter 5 Managing Storage........ - Page 3 Back Up in Windows Storage Server ..........36 Preparing a Backup Destination .............36 Recovering Backup Data .................43 Replication ..................47 Buffalo Replication ..................47 DFS Replication ..................49 Chapter 7 Settings ............73 Date and Time ................73 Server Name, Workgroups, and Domains ........73 Changing the Password ..............
- Page 4 Chapter 8 Utilities ............92 NAS Navigator2 for Windows ............92 Changing the IP Address .................94 NAS Navigator2 for macOS ............95 Changing the IP Address .................97 NovaBACKUP ................. 97 Chapter 9 Appendix ............ 99 LCD Panel ..................99 Modes .......................99 Errors and Status ..................99 Default Settings ................
-
Page 5: Chapter 1 Getting Started
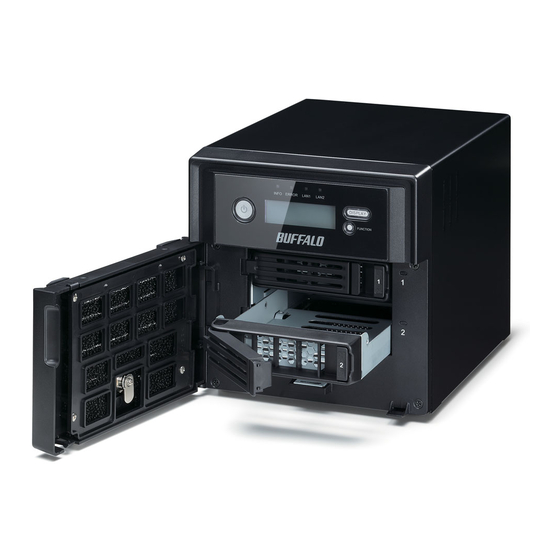
Chapter 1 Getting Started Diagrams WS5600DN2, WS5600DR2 WS5400DN2, WS5400DR2... - Page 6 WS5200DN2, WS5200DR2 WS5400RN2, WS5400RR2 Power Button To power on, connect the power cable and wait for 10 seconds, then press the power button. To power off, press the power button. Info LED If there is a status message, the amber info LED will light up. Check the LCD panel to see the status message. Error LED If there is an error, the red error LED will light up.
- Page 7 UPS Port Connect to a UPS. USB 3.0 Port Compatible Buffalo USB 3.0 hard drives, USB memory devices, digital cameras, and USB UPSs can be connected. USB hubs are not supported. USB 2.0 Port Compatible Buffalo USB hard drives, USB memory devices, digital cameras, and USB UPSs can be connected.
-
Page 8: Turning The Terastation On And Off
Glows amber when the unit is connected to a network. Act LED This LED shows network activity. It blinks amber when the TeraStation is accessed over the network. Turning the TeraStation On and Off Press the power button on the TeraStation to turn it on and off. Or you can turn off your TeraStation by following the procedure below. -
Page 9: Chapter 2 Remote Desktop
Chapter 2 Remote Desktop Opening Windows Storage Server Note: If using macOS, download and install "Microsoft Remote Desktop" from the Mac App Store. Double-click the icon to start NAS Navigator2. Right-click on your TeraStation's icon and choose Open Remote Desktop. For macOS, click the TeraStation's icon while holding down the control key, then click Open Remote Desktop. -
Page 10: Chapter 3 Windows Update
Chapter 3 Windows Update Windows Update For best results, Windows Storage Server should be updated regularly. Use Windows Update as described below. Note: The TeraStation must be connected to the Internet to use Windows Update. From the Windows Storage Server Start menu, click Control Panel - System and Security - Windows Update. Click Check for updates. -
Page 11: Chapter 4 Preinstalled Software
Chapter 4 Preinstalled Software RAID Builder RAID Builder is used to create RAID arrays. See the "Managing Storage" section in chapter 5 for more details. To launch RAID Builder, you must be logged in as a member of the Administrators group in Windows Storage Server. Note: This software cannot be accessed by multiple users at the same time. -
Page 12: Buffalo Dashboard
Buffalo Dashboard Buffalo Dashboard displays system information and dismounts hard drives. To launch it, double-click the Buffalo Dashboard icon in the system tray. Note: This software cannot be accessed by multiple users at the same time. Before launching it, make sure that it is not being used by another user. -
Page 13: Email Notification
Items Descriptions I'm here! Causes your TeraStation to beep. Displays the status, drive numbers, names, capacity, and physical sector sizes of each drive. Refresh: Updates the displayed drive information. Dismount Drive: Dismounts a drive for safe removal. Select the drive to dismount and click OK. -
Page 14: Buffalo Replication
Your TeraStation can be synchronized with another TeraStation, replicating most data. See the "Replication" section in chapter 6 for more details. To launch Buffalo Replication, you must be logged in as a member of the Administrators group in Windows Storage Server. -
Page 15: Terastation Backup And Replication Folder Settings
TeraStation Backup and Replication Folder Settings Before using it as a backup device on the network, configure your TeraStation in "TeraStation Backup and Replication Folder Settings". To launch TeraStation Backup and Replication Folder Settings, you must be logged in as a member of the Administrators group in Windows Storage Server. -
Page 16: Display Settings
Items Descriptions To remove a folder from the list of available backup targets, select the folder and click this button. Display Settings TeraStation's LCD panel settings can be changed using this software. See the "LCD Display Settings" section in chapter 7 for more details. To launch Display Settings, you must be logged in as a member of the Administrators group in Windows Storage Server. -
Page 17: Chapter 5 Managing Storage
Chapter 5 Managing Storage Creating Volumes Volume Types The features of each volume type are explained below. Notes: • Use RAID Builder to create a volume, not the Disk Management options in Windows Storage Server. • When volumes are deleted or formatted, or the RAID mode is changed, all data stored in that volume is erased. Before executing these operations, back up any important data. -
Page 18: Creating A Raid 5 Volume
Simple Volumes (JBOD) The internal hard drives of the TeraStation are each used as individual drives. If a hard drive fails, the data on the failed hard drive cannot be recovered. Creating a RAID 5 Volume From the Windows Storage Server Start menu, click RAID Builder. Select "Create RAID array"... -
Page 19: Creating A Mirrored Volume (Raid 1)
Capacity Example: If configuring with drive 1 (50 GB), drive 2 (80 GB), drive 3 (58 GB), and drive 4 (100 GB), the usable space on the RAID volume will be (50 GB x 4 drives) ÷ 3/4 = 150 GB. A RAID 5 volume will be created. -
Page 20: Creating A Striped Volume (Raid 0)
A mirrored volume will be created. Next, create a shared folder on the volume as described in chapter 7. Creating a Striped Volume (RAID 0) From the Windows Storage Server Start menu, click RAID Builder. Select "Create RAID array" from the drop-down menu and "Striped (RAID 0)" under "RAID Mode". Select at least two drives to create a RAID 0 array. -
Page 21: Creating A Spanned Volume
Creating a Spanned Volume From the Windows Storage Server Start menu, click RAID Builder. Select "Create RAID array" from the drop-down menu and "Spanned" under "RAID Mode". Select at least two drives to create a spanned array. Click OK. Capacity Example: If configuring with drive 1 (50 GB), drive 2 (80 GB), drive 3 (58 GB), and drive 4 (100 GB), the usable space on the RAID volume will be 50 GB + 80 GB + 58 GB + 100 GB = 288 GB. -
Page 22: Creating Simple Volumes (Jbod)
Creating Simple Volumes (JBOD) From the Windows Storage Server Start menu, open Administrative Tools, then double-click Computer Management. Click Disk Management. Right-click the unallocated area and select New Simple Volume. - Page 23 Click Next. Enter the volume size that you want to create and click Next.
- Page 24 Select Assign the following drive letter and click Next. Select Format this volume with the following settings and Perform a quick format and click Next. A simple volume will be created. Next, create a shared folder on the volume as described in chapter 7.
-
Page 25: Deleting Volumes
Deleting Volumes An unallocated area on a drive is required to create a volume. If there are no unallocated areas, create one by deleting an existing volume. From the Windows Storage Server Start menu, open Administrative Tools, then double-click Computer Management. - Page 26 Click Disk Management. Right-click the volume that you want to format and select Format.
-
Page 27: Hard Drive Replacement Procedure
TeraStation may malfunction. • For the replacement drive, use a Buffalo OP-HDWR series drive for WS5000N2 series and a OP-HDS series drive for WS5000R2 series. The new drive should be the same size (or larger) as the replacement drive. If a larger drive is used, the extra space will not be usable in a RAID array. -
Page 28: Hard Drive Replacement Examples
Hard Drive Replacement Examples A Drive Failure Occurs in Drive 1 or 2 Notes: • If one of the drives in the boot drive fails, repair the mirrored volume of the system area first after replacing the drive. Repairing the volume for the data area first may not always succeed. • If you used Disk Management to mirror the boot drive, the TeraStation will not boot when the drive fails. - Page 29 Pull out the drive cartridge and remove it from the TeraStation. Insert the new drive in the empty slot. Slide the drive in with the locking mechanism open.
- Page 30 Swing the lock back down until it clicks into place. Close the front cover with the included key. Press the power button on the TeraStation to turn it on. Note: If drive 1 is being replaced, the red error LED will light up and "POST ERR: 00D9 Boot from HDD x" will be displayed on the LCD panel.
- Page 31 Enter the username and password and press the Enter key. Windows Storage Server opens in the remote desktop. Note: The default username and password are "Administrator" and "password". Click RAID Builder from the Start menu of Windows Storage Server. Select Create or repair a mirrored volume of the system area, check replaced hard drive, and click OK. When "When Drive x will be initialized.
- Page 32 If a Mirrored Volume Failed to Restore If a mirrored volume doesn't restore the first time, try the steps above a second time. If the mirrored volume still cannot be restored, contact Buffalo technical support for assistance. A Drive Failure Occurs among Drives 3–6 Double-click the icon to start NAS Navigator2.
- Page 33 Note: The default username and password are "Administrator" and "password". The error message (E30) will be displayed in Buffalo Dashboard. Click Dismount Drive X (where "X" is the number of the failed drive). When the message "Drive dismount finished." is displayed, click OK.
- Page 34 Close the front cover with the included key. If the hard drive was replaced while the TeraStation was off, power it on now. Buffalo Dashboard will show the drive status "Getting...". After the drive status changes to "Normal", open Administrative Tools and double-click Computer Management in Windows Storage Server.
- Page 35 Right-click the new drive and select Initialize Disk. Right-click the initialized hard drive and select Convert to Dynamic Disk. A RAID array cannot be built unless the hard drive is converted to a dynamic disk. Select the step depending on your reason for a created volume. To create a new volume (except for a RAID 5 or mirrored volume): (1) Right-click the new dynamic disk and select New Volume.
- Page 36 To restore a mirrored volume (RAID resynchronization): (1) Right-click the volume labeled "Failed Redundancy" and click Remove Mirror. (2) When "Remove Mirror" is displayed, select the drive with its status missing and click Remove Mirror. (3) When "Are you sure you want to remove the mirror?" is displayed, click OK. Perform steps (1) to (3) for each volume that requires RAID resynchronization.
-
Page 37: Chapter 6 Backup
Chapter 6 Backup To avoid losing data accidentally, back up your data regularly. Back Up in Windows Storage Server You can back up TeraStation folders in Windows Storage Server. Preparing a Backup Destination In Server Manager, click Tools - Windows Server Backup. Windows Server Backup will start. - Page 38 Click Local Backup. If "Reading data; please wait..." is displayed, please wait until these messages disappear. Right-click on "Local Backup" and select Backup Schedule..The Backup Schedule Wizard will start.
- Page 39 Click Next.
- Page 40 Select "Custom" and click Next.
- Page 41 Click Add Items. Select the backup source folders or drives and click OK.
- Page 42 Click Next.
- Page 43 Specify the schedule to run the backup and click Next.
-
Page 44: Recovering Backup Data
Select the backup destination and click Next. Step through the wizard to finish. Recovering Backup Data Recover the backup data to the TeraStation. - Page 45 In Server Manager, click Tools - Windows Server Backup. Windows Server Backup will start. Click Local Backup. If "Reading data; please wait..." is displayed, please wait until these messages disappear.
- Page 46 Right-click on "Local Backup" and click Recover..The recovery wizard will start. Click Next.
- Page 47 Select the date when backing up the data and click OK.
-
Page 48: Replication
If you use Buffalo WS5000N2, WS5000R2, or WS5000 series TeraStations for the replication source and target, start from step 1. If you use a different TeraStation as the replication target, refer to that TeraStation's user manual to configure as a replication target. - Page 49 If you enter a backup password, the new folder will not be listed as a target folder for backup. Click OK when finished. Click Buffalo Replication in the Start menu on Windows Storage Server. Click the blank space under "Replication Target" and click .
-
Page 50: Dfs Replication
Replication is configured. Note: The following files and folders will not be replicated: • Files with periods (.) or underscores (_) as the first character in their name. • Folders with periods (.) or underscores (_) as the first character in their name. • .AppleDesktop/ • Network Trash Folder/ • TheVolumeSeHngsFolder/... - Page 51 Click Change. Select "Domain", enter a domain name, and click OK.
- Page 52 Enter a administrator username and password for the Active Directory domain controller. Click OK when the following message is displayed. Click OK again. Click Close. Click Restart Now and restart your computer to apply settings.
- Page 53 Installing DFS In Server Manager, click Dashboard - Add roles and features. Click Next.
- Page 54 Select "Role-based or feature-based installation" and click Next. Click Next.
- Page 55 Select "DFS Namespaces" and "DFS Replication" in "File and Storage Services" - "File and iSCSI Services". Select "Include management tools (if applicable)" and click Add Features.
- Page 56 Click Next. Click Install. Click Close to finish.
- Page 57 Creating Namespaces In Server Manager, click Tools - DFS Management. Click Namespaces - New Namespace.
- Page 58 Enter a hostname for the namespace server and click Next.
- Page 59 Enter a name for the namespace and click Next.
- Page 60 Select Domain-based namespace and click Next. Click Create. Click Close when the New Namespace Wizard finishes.
- Page 61 In DFS Management, click Namespaces and the name you created through the wizard. Then click New Folder. Enter a folder name and click OK.
- Page 62 Enter a path to the folder or select from the list by clicking Browse. Click OK. Configuring DFS Replication In Server Manager, click Tools - DFS Management.
- Page 63 Click Replication - New Replication Group.
- Page 64 Select the type of replication group and click Next.
- Page 65 Enter a name for the replication group and click Next.
- Page 66 Enter the hostname of the file server for the replication source and click Next.
- Page 67 Click Add.
- Page 68 Enter the path of the replication source and click OK.
- Page 69 Click Next.
- Page 70 Enter the hostname of the file server for the replication target and click Next.
- Page 71 Enter the path of the replication target. Alternatively, click Browse and select the folder from the list. Click Next.
- Page 72 Click Next again. Note: You have options to specify the network band and the date and time. To configure bandwidth, select Replicate continuously using the specified bandwidth and the bit rate from the drop-down list. To configure the schedule time, select Replicate during the specified days and times and click Edit Schedule. You can select the date and time in the displayed window.
- Page 73 Click Create. Click Close when finished. DFS replication is now configured. Note: It may take some time before actual replication is caught up.
-
Page 74: Chapter 7 Settings
Chapter 7 Settings Date and Time Click the time in the system tray of Windows Storage Server. Click Change date and time settings - Change date and time, select the current date and time, and click OK. Note: In the Internet Time tab, click Change settings, then select Synchronize with an Internet time server. The date and time can be obtained automatically. - Page 75 Click Change settings under Computer name, domain, and workgroup settings. In the Computer Name tab, click Change.
-
Page 76: Changing The Password
Enter the computer name, choose domain or workgroup, and click OK. Note: The computer name should have 16 characters or less. If more than 16 characters are entered, all characters from the 17th character on are ignored. Changing the Password The default password for the TeraStation's administrator account is "password". - Page 77 Right-click the user whose password will be changed and click Set Password. Click Proceed.
-
Page 78: Adding A User
Enter a new password (twice). Adding a User From the Windows Storage Server Start menu, open Administrative Tools, then double-click Computer Management. Click Local Users and Groups. Right-click Users and click New User. -
Page 79: Adding A Group
Enter the desired settings and click Create. Click Close. Note: Accounts not belonging to the Administrators group cannot be connected by the remote desktop. Adding a Group From the Windows Storage Server Start menu, open Administrative Tools, then double-click Computer Management. - Page 80 Right-click Groups and choose New Group. Enter a group name and click Add.
- Page 81 Click Advanced. Click Find Now.
- Page 82 Select the users to be registered to the group, then click OK. Click OK.
-
Page 83: Creating A Shared Folder
Click Create. Click Close. Creating a Shared Folder No shared folders are configured by default. Before using the TeraStation, follow the procedure below to create one or more shared folders. This is an example to create a shared folder, named "Share" in drive D, which anyone can access. From the Windows Storage Server Start menu, open Administrative Tools, then double-click Computer Management. - Page 84 Click Next. Enter the path of an existing folder or a new folder, then click Next. Notes: • Enter "D:\Share" in folder path to create the shared folder for the first time. • If the message "The system cannot find the specified path. Do you want to create it?" is displayed, click Yes.
- Page 85 Enter a name for the share and a description (optional), then click Next. Check Customize permissions, then click Custom.
- Page 86 Choose Everyone and check Allow for "Change".
- Page 87 In the Security tab, click Edit - Add. Enter "Everyone" under "Enter the object names to select", then click OK.
- Page 88 Choose "Everyone", then check Allow for Modify. Click OK - OK - Finish - Finish. Click Local Users and Groups in Computer Management. Double-click Users - Guest. In the General tab, uncheck Account is disabled, then click OK. Notes: Enable a guest account: (1) From the Windows Storage Server Start menu, open Administrative Tools, then double-click Computer Manage- ment.
-
Page 89: Email Notification
Email Notification Your TeraStation can send you email reports daily, or when settings are changed or an error occurs. Notification emails may be triggered by any of the following events: • Hard drive status at scheduled time • Hard drive read error • TeraStation booted • Fan error • Temperature exceeded... - Page 90 Check "Enable email notification". Click New and enter an email address. You may enter up to five email addresses to receive notifications. Enter your mail server settings and choose what events will trigger notification. Click Apply to finish the email notification settings.
-
Page 91: Lcd Panel Settings
Items Descriptions Adds a new receiver for the notification email. Click New to add a new email address. Click Edit to change the receiver settings or Delete to Send to remove an address from the list. Note: Up to 5 email address may be added. Enter your email SMTP server's address and port number. - Page 92 Configure the desired settings and click OK. Items Descriptions Show Select the item(s) to be displayed on the LCD panel. Scroll Display If enabled, the LCD scrolls through display items at a regular interval. Change the brightness of the LCD panel from level 1 (darkest) to 5 LCD Brightness (brightest).
-
Page 93: Chapter 8 Utilities
Chapter 8 Utilities NAS Navigator2 for Windows NAS Navigator2 is a utility program that makes it easy to display Windows Storage Server, change the IP address, or check its hard drive in remote desktop. If you installed the TeraStation with the TeraNavigator, NAS Navigator2 was installed automatically. - Page 94 Name Description Assigns all the LinkStations' and TeraStations' shared Map All Remote Shares to Drive folders as network drives. This is available only when a Letters shared folder has been created. Creates a desktop shortcut to the selected LinkStation's Create Desktop Shortcut or TeraStation's shared folders.
-
Page 95: Changing The Ip Address
Name Description Opens the selected LinkStation's or TeraStation's Browse Shares shared folders. Open Remote Desktop Opens Windows Storage Server in remote desktop. Opens the selected LinkStation's or TeraStation's NAS Name Properties properties page. Creates a desktop shortcut to the selected Create Shortcut LinkStation's or TeraStation's shared folders. -
Page 96: Nas Navigator2 For Macos
Right-click on your TeraStation's icon and choose Properties - IP Address. Clear the "Use DHCP" checkbox, enter the IP address and subnet mask, and click OK. If the username and password prompts appears, enter the admin username and password. NAS Navigator2 for macOS NAS Navigator2 is a utility program that makes it easy to display Windows Storage Server, change the IP address, or check its hard drive in remote desktop. - Page 97 Click on a TeraStation's icon to display: • Total capacity • Used capacity • Workgroup • IP address • Subnet mask • Default gateway • MAC address • Firmware version Double-click it to open a share on the TeraStation. Name Description Opens the default shared folder for a selected LinkStation Open...
-
Page 98: Changing The Ip Address
The NovaBACKUP installer is available from either http://d.buffalo.jp/WS5000R2/ for the WS5000R2 series and http://d.buffalo.jp/WS5000N2/ for the WS5000N2 series. Select the region and model to go to your specific model's d.buffalo website. Download the NovaBACKUP installer and install it onto your computer. - Page 99 To download the installer, you will need the serial number of your TeraStation. The serial number is printed on the label on the back or top of the unit.
-
Page 100: Chapter 9 Appendix
An error occurred in the fan speed. Fan Failure duster, or other tool to remove them. If the error is displayed again, contact Buffalo technical support for assistance. Do not place objects in the area around A rise in the system temperature SYSTEM Error E12 the TeraStation. -
Page 101: Default Settings
X Drive Rebuilding per terabyte for a mirrored volume. This during the rebuilding process. message will disappear when the RAID resynchronization finishes. From Buffalo Replication, click Sync to Replication I33 An error occurred during execute resynchronization. If the error is Replicate Failure replication. -
Page 102: Specifications
UPS Port Compatible UPS are manufactured by Omron or APC. If a hard drive in the TeraStation malfunctions, replace it with a Buffalo drive of the same capacity. Use a Buffalo OP-HDWR series drive for WS5000N2 series and a OP- Internal Hard Drive HDS series drive for WS5000R2 series. -
Page 103: Data Backup
While using the TeraStation, you may lose your important data due to sudden accidents, hard disk failure, or accidental misoperation. Back up your data regularly! For best results, back up your data to Buffalo drives like the TeraStation, LinkStation, or DriveStation series. -
Page 104: Windows Storage Server Recovery Procedure
When TeraStation shared folders suddenly do not open If the TeraStation shared folder is assigned and used as a network drive, access to the TeraStation may suddenly fail if network settings such as IP addresses or groups are changed. If this happens, follow the procedure in chapter 2 to open the TeraStation's shared folder with NAS Navigator2. -
Page 105: Notes
Note: The data on the drives can be viewed by right-clicking the area displayed as "Foreign" in "Disk Management" and then selecting Import Foreign Disks. Notes Using an Omron UPS The TeraStation's LCD panel will not display information correctly when an Omron UPS is first connected. This is be- cause the LCD panel control and the Omron UPS both use COM port 2. -
Page 106: Chapter 10 Regulatory Compliance Information
Chapter 10 Regulatory Compliance Information For Customers in the United States FCC Statement This equipment has been tested and found to comply with the limits for a Class A digital device, pursuant to part 15 of the FCC Rules. These limits are designed to provide reasonable protection against harmful interference when the equipment is operated in a commercial environment. - Page 107 Svenska Utrustning som är kopplad till skyddsjord via jordat vägguttag och/eller via annan utrustning och samtidigt är kopplad till kabel-TV nät kan i vissa fall medföra risk för brand. För att undvika detta skall vid anslutning av utrustningen till kabel-TV nät galvanisk isolator finnas mellan utrusningen och kabel-TV nätet. EU Declaration of Conformity Dansk Dette er et Klasse A-produkt.
-
Page 108: For Customers In Russia
For Customers in Russia TR-CU Country of Origin Made in China or Made in Japan Buffalo Inc. Manufacturer Akamondori Bldg., 30-20, Ohsu 3-chome, Naka-ku, Nagoya 460-8315, Japan For manufacturing date and country, refer to the product package. Дату изготовления и страну-производителя см. на упаковке. -
Page 109: For Customers In China
For Customers in China 插座应当装在设备的附近,而且应当便于触及到 警 告 此为A级产品,在生活环境中,该产品可能会造成无线电干扰。在这种情况下,可能需要用户对其干扰采取切 实可行的措施。 For Customers in Taiwan BSMI 警告使用者 : 此為甲類資訊技術設備,於居住環境中使用時,可能會造成射頻擾動,在此種情況下,使用者會被要求採取某 些適當的對策。 For Customers in Korea 이 기기는 업무용(A급) 전자파적합기기로서 판매자 또는 사용자는 이 점을 주의하시기 바라며, 가정외의 지역에서 사용하는 것을 목적으로 합니다.
Need help?
Do you have a question about the TeraStation WSS5000N2 and is the answer not in the manual?
Questions and answers