Table of Contents
Advertisement
Quick Links
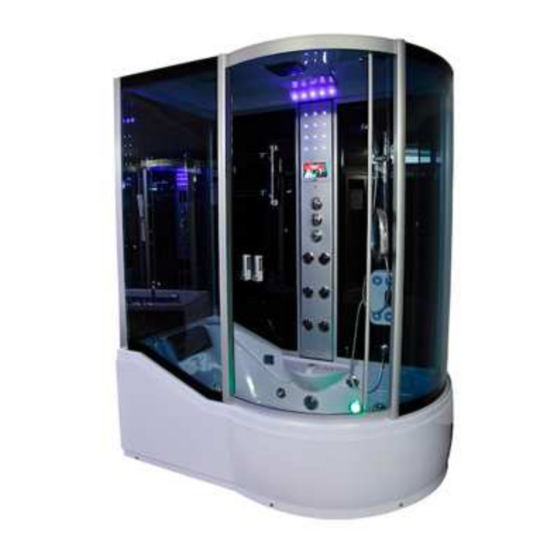
Model: MY810L/R & 8058/9
Please see the amendment at the back of the booklet for
the 8085/9 model-DO NOT a empt the build un l
reading the amendment first!
Assembly & Fi ng Instruc ons
For the latest fi ng instruc ons please visit www.insigniarange.co.uk
Contents
Introduc on
Staring the Installa on
Connec ng The Shower Accessories
Connec on to the mains
Product Tes ng
Tes ng for Leaks
Frequently asked Ques ons
8058/9 Amendment-Important
3
5
6
7
12
18
27
29
31
32
35
38
39
40
43
44
52
Advertisement
Table of Contents

Related Manuals for Insignia MY810L


Summary of Contents for Insignia MY810L
-
Page 1: Table Of Contents
Contents Introduc on Electrical Requirements Tools Required Model: MY810L/R & 8058/9 What’s in the boxes Please see the amendment at the back of the booklet for Staring the Installa on the 8085/9 model—DO NOT a empt the build un l Connec ng The Shower Accessories reading the amendment first! - Page 2 Thank you for your recent purchase of an Insignia steam shower. ASSEMBLY AND SIMPLE PLUMBING Please read this booklet with great care to ensure you get the best out of your build and have a shower that will last for many...
-
Page 3: Electrical Requirements
UNDER NO CIRCUMSTANCES UNDERTAKE THIS YOURSELF!!! REMEMBER: These showers are designed to be free standing and movable Note for electrician. This product comes with 13 amp plug(s) fi ed from their loca on should you have need to replace anything. AL- with RCD unit. -
Page 4: What's In The Boxes
Whilst the next steps show you how to assemble your shower we 18) Roof sec on including ozone (if fi ed) light extractor fan and want to make sure you have a correct build to ensure you get a speaker trouble free shower. - Page 5 BOX 2 BOX 3 Column box Glass back wall box 2 x front supports (one with magnet) 1 x end black panel Note TV screen has protec ve film 2 x back wall panels 1 x Door magnet 1 x rubber hose 1 x End door seal 4 x jets fi...
- Page 6 TO START. VERY IMPORTANT Make sure you have a clear space, remember when finished and in Have you got everything? If not please contact your supplying deal- place you need access to check your build and able to pull the er now.
- Page 7 Tighten ALL connec ons to steam generator and add a flexi hose Taking the centre column with TV etc fi ed. Place this against the supplied if you purchased the fi ng kit, which will now go to cold other end of the back panel you have just been working on. Repeat water feed.
- Page 8 Now taking the upright in picture screw the angled bracket to it. Please skip this sec on for the 8058/9 Now take the three angled as this has already been pre installed The upright varies both ends. You need the end that is shaped to frame parts and assemble as for you.
- Page 9 Looking at the picture below you will now see you need to secure the top rail. This will now screw into each upright at the corners the same as the lower supports fi ed (no ce tape outside) Tape Back Rest Pad The following instruc ons are op onal as to when you would like Shampoo Dispensers undertake the fixing of accessories.
- Page 10 If you fi ed the accessories as above your shower should now look like picture below. Please note this model comes in both le and right hand we have used examples of both which has no effect on the instruc ons but aids the owner of either to recognise parts Having got to this stage the roof is next for fi...
- Page 11 Why are you doing this? We recommend this process although Now fit the none magnet column upright repeat sealing procedure longer, because it is the only way to avoid smearing silicone, frac- and firmly and press into place. turing silicone seal and avoid poten al leaks. More importantly by building dry first you now have the glass in the correct posi on on Non magnet upright support in place? Good! Now you need to se- the tub and you will know everything will align as it should.
- Page 12 Take the upright magnet column and glass, repeat sealing proce- dure on corner upright channel in the pillar, remove s cky back tape and again with shiny black finish outside, press the glass firmly home. S ck glass to tape. Repeat sealing in the magne c column pillar channel press onto the glass Now screw the top of column and bo om in place using holes provided.
- Page 13 NOTE: You will now have 4 x rubber seals le over. Our p, dispose Top wheel in place with mag- of these! Why? Because by using silicone as a seal it has allowed ne c trim you more scope for adjustment of glass, it will flex in the future very important while shower cools a er use and avoids poten al Top wheels loose holding door sha ering should you have not aligned feet correctly on tub or a...
-
Page 14: Electric Connec Ons
Electric Connec ons. Middle connec on in picture is the temperature sensor which pushes into hole found in centre column below just above tele- At this stage you will need to connect the following. These are all phone mike. (top chrome cover) 12V and considered “safe”... -
Page 15: Water Connec Ons
Shower Water Connec ons Now connect the massage jets linked through seat back. Earlier you posi oned these to fit the back rest, make sure they are ght You have five features fi ed within the shower, all are connected and will not leak. -
Page 16: Sealing Your Shower
Sealing your shower What Should I Know About Steam Room Safety? Please visit the following link: h p://www.insigniarange.co.uk/instruc ons/ You will now need to apply a final sealing of panels built and joints Steam_Safety_Please_Read.pdf made to ensure integrity while in use. We recommend ver cal and horizontal joints be sealed very neatly, also the three piece joint Whirlpool bath opera on. - Page 17 Pressure Requirements from your house supply. with a washing machine or dishwasher, it is highly recommended accessible water valve taps are installed to turn off the shower We recommend a bar pressure between 2 and 3 bar. If you have a when not In use.
- Page 18 TESTING PRODUCT. On off. Touch screen once for on again for off. If system on longer than 60 mins (steam or ozone) the system will automa cally close With the shower s ll not fully posi oned as you will require it. down Complete the following tests: Light.
- Page 19 Menu. When TV is in use this bu on to adjust contrast brightness TESTING FOR WATER LEAKS sharpness. When Radio func on is on use this bu on to store up to 8 radio LEAVING SHOWER 24 HOURS AFTER BUILD ALLOWING SEALENT TO sta ons.
-
Page 20: Safety
28 days from the day this product was delivered to you. For Always be aware of the steam outlet pod posi on. Never use in cost and enabling kindly contact Insignia on 0844 800 3069. close proximity to the person using it. - Page 21 And for the smaller items Please note you are not covered for consequen al or incidental just contact Insignia on 0844 800 3069 for on the spot advice and damage however caused rela ng to any product part failure. This help.
-
Page 22: Spare Part
Returned Goods FAQs What water pressure is required to operate you showers correctly and what Your a en on is drawn to the terms and condi ons. Any returned about your baths and basin taps? Item must be accompanied by a return form. Using our customer 2.5 bar is what we consider op mum pressure for all. - Page 23 A er build check 100% for leaks and cure at the me. When high failure rate, we could go on. With Insignia we guarantee only the latest cured he should never have needed to come back. Sorry for bad news! technology is used, even if a customer has ordered from our adver sing some- thing we have deleted, we upgrade free of charge before delivery.
- Page 24 I am a big guy, will the shower trays or baths you sell support my weight. cleaning, use a mild non abrasive cleaner and avoid No problem unless you are massive in which case you would probably not fit in detergents, disinfectants or cleaning products that come in an aerosol can.
- Page 25 delivery. If out of warranty you will be contacted and advised of cost first. Pay- Only a ma er of minutes, no need to take taps off the bath or shower and cost is ment can be made instantly over the telephone to avoid delay. minimal.
- Page 26 Whatever is missing has been sucked into the system, if small it would get fired Amendment for 8058/9 out of the jets but if a large sec on it will jam the pump. This is what has hap- pened to you. You now need a tradesman to remove the cover of the pump and Due to model upgrade please read the following pages if you have the 8058/9 the remove the offending item from the impeller.
- Page 27 Box 3 Box 5: 1 x End Panel 2 x back panels Due to the product being upgraded it has now been designed in a “click clack” style which means you will need to build the front frame work first and work backwards in the build.
- Page 28 For the latest fi ng instruc ons please visit www.insigniarange.co.uk For the latest fi ng instruc ons please visit www.insigniarange.co.uk...
Need help?
Do you have a question about the MY810L and is the answer not in the manual?
Questions and answers