Table of Contents
Advertisement
Quick Links
Advertisement
Table of Contents

Related Manuals for Metcalfe EC12


Summary of Contents for Metcalfe EC12
- Page 1 Metcalfe EC12 Electrically Operated Potato Chipping Machine Instruction Manual...
-
Page 3: Table Of Contents
INDEX Guarantee Delivery Introduction Chipper Dimensions Installation Electricity Supply Connection Commissioning Operation Change Chip Sizes Cleaning Changing Knife Blades Ordering Spare Parts Wiring Diagram for Chipper Exploded View Electrical Control Parts Parts List Metcalfe Warranty... -
Page 4: Guarantee
GUARANTEE This equipment is guaranteed by Metcalfe for 1 year from the date of its purchase from Metcalfe, or from one of its stockists, dealers or distributors. The guarantee is limited to the replacement of faulty parts or products and excludes any consequential loss or expense incurred by purchasers. -
Page 5: Introduction
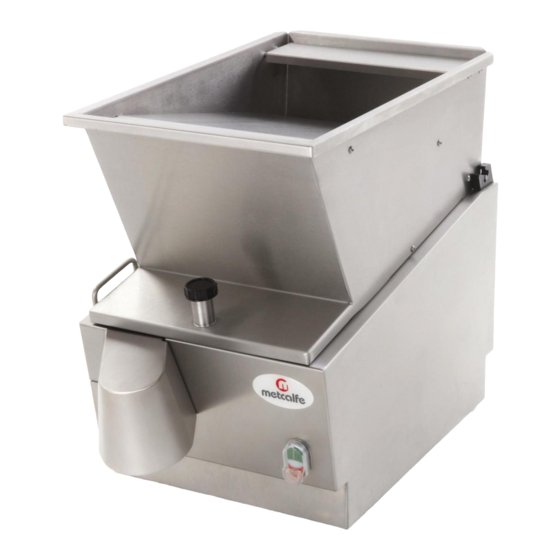
INTRODUCTION The chipper is intended for cutting peeled potatoes into chips or scallops, in a batch process. CHIPPER DIMENSIONS All dimensions are in mm. -
Page 6: Installation
The EC12 Chipper has a top loading hopper into which potatoes can be tipped from either side or from the front. It is not handed, and no consideration need be given to its loading direction. -
Page 7: Commissioning
(green button). To stop the machine, press the red button. One of the safety features provided on the Metcalfe Chipper are the interlock devices that ensures that the machine cannot run unless both the knife block and the hopper are properly and fully in position. -
Page 8: Change Chip Sizes
To change to a different size of chip, change the knife block assembly. Spare knife block assemblies are available from Metcalfe. Open the hopper, lift out the knife block and replace with the alternative selected. Knife blocks are available in the following sizes from the standard range: 8mm, 11mm, 14mm and 14x17mm. -
Page 9: Changing Knife Blades
Dispose of the old blades carefully and screw the new knife blade pack in place. See diagram below. For optimum performance Metcalfe recommend changing the blade pack every 6 months, or sooner depending on usage. NOTE: Take care when handling the knife block. The blades are sharp. -
Page 10: Wiring Diagram For Chipper
WIRING DIAGRAM FOR EC12... -
Page 11: Exploded View
EXPLODED VIEW... -
Page 12: Electrical Control Parts
ELECTRICAL CONTROL PARTS... -
Page 13: Parts List
PARTS LIST ITEM PART NO DESCRIPTION ITEM PART NO DESCRIPTION S61/121 Hopper assembly A10/266 Strain relief gland M81A Interlock body A10/224 Back nut A12/011 Interlock spring G35/012 Fuse holder Interlock knob G35/004 Fuse 5x20 0.5A D26/017 Interlock pin G30/343 Contactor 24V ac Interlock knob cap G60/427 Transformer terminated... -
Page 14: Metcalfe Warranty
• Failure caused due to improper maintenance • Blender clutches • Knives and gears on can openers • Sharpening of slicer blades Metcalfe and its suppliers reserve the right to make changes in design and specification to any product without prior notification. - Page 15 Electrical PAT Certificate Test Detail Results Test Detail Results Item: Item: Class 1 / Class Class: Class: Class 1 / Class 2 Date: Date: Appliance ID: Appliance ID: M.C.E. M.C.E. User ID: User ID: Visual: Visual: Earth Current: amps Earth Current: amps Class 1 Earth Class 1 Earth Result/RPE:...
Need help?
Do you have a question about the EC12 and is the answer not in the manual?
Questions and answers