
Related Manuals for Metcalfe NS300A


Summary of Contents for Metcalfe NS300A
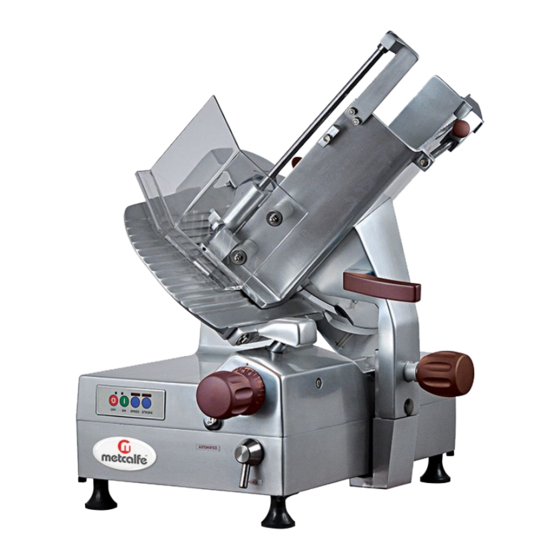
- Page 1 Metcalfe Automatic Gravity Feed Slicer NS300A Installation & Operating Instructions 01766 830 456 sales@metcalfecatering.com www.metcalfecatering.com...
-
Page 2: Table Of Contents
Index Your Slicer ……..………….……………………………….………………………. Technical Data ……………………………………………………..………………….. Optional Extras ………….……………………………………………………………… Installation Suitable Products for Slicing ………..……………….……………… Unpacking ……………………………………………………………………. Installation …………..……………………………………………………….. Operation Push Button Control Panel ………………………………………… Manual Use …………………………………………………………………… Automatic Use …………………………………………………………….. Slice Counter (if present) ……………………………………………….. Cleaning Instructions Disassembly ………………….…………..………………………………….. Cleaning …………..………..……………..………………………………….. -
Page 3: Your Slicer
Your Slicer Sharpening Knife Attachment Perspex Guard Slice Deflector Lubricating Screw Centre Plate Spindle Knob Push Button Control Panel Identification plate, technical data & CE marking Product Fences Table Fence Plate Centre Plate Table Support Table Handle Thickness Table Locking Selection Knob Knob Function Mode... - Page 4 Metcalfe NS300A Heavy Duty Automatic Slicer Features Automatic slicer designed to cut large quantities of food • Two independent motors (one for blade and one for carriage movement) • Can be used as a fully automatic slicer or switches to manual •...
-
Page 5: Optional Extras
Optional Extras Teflon Coated Parts, 20% increased in gliding property Stainless Steel Knife Remover Stainless Steel Guard Aluminium Knobs Kit Vegetable Cutting Tube Serrated Blade Slice Counter Plastic Cover Painting Customisation For more information and prices please contact the sales department (see page 14). -
Page 6: Installation
1. Read this manual thoroughly before installation and operation. DO NOT proceed with any installation nor operation if you have any questions or do not understand anything in this manual. Please see Metcalfe Catering Equipment Ltd contact details on page 14 to resolve any queries you may have. -
Page 7: Operation
Operation Push Button Control Panel 1. Off button 2. Off button (light) 3. On button 4. On button (light) 5. Speed button 6. Speed button (light) One LED on: low speed Two LEDs on: Intermediate speed Three LEDs on: High speed 7. -
Page 8: Automatic Use
Automatic Use Turn the function mode selector clockwise to the Automatic position. Pull back the carriage completely (towards the operator) to the loading position. Lift the end device up, into the rest position. Place product onto the table, the product will press against the fence plate because of its weight. Block it with the end device by lowering it onto the product and pressing down slightly. -
Page 9: Cleaning Instructions
Cleaning Instructions Daily cleaning should be considered mandatory for all equipment used in the preparation of food. When using a meat slicer and with the possibility of cross contamination, these units should be cleaned before slicing each new product. Once your slicer makes contact with any food product, the entire slicer, including removable parts, must be thoroughly cleaned. -
Page 10: Cleaning
Disassembling the slice deflector DO NOT clean the unit, or any parts of the unit • in a dishwasher. Rotate and lift the slice deflector as shown • below. It is not necessary to remove it, but it is • Rinse all parts after cleaning with clean water possible to extract it by pulling it towards you. -
Page 11: Reassembly After Cleaning
Reassembly After Cleaning Reassembling the sharpener • Insert the centre plate spindle completely and rotate clockwise to secure. • Ensure the screw at the rear is loose (about 10 turns). Reposition the sharpener and turn screw until tight Reassembling the table •... -
Page 12: Sharpening The Knife
Sharpening the Knife When and How Often to Sharpen the Knife • Symptoms of a dull knife are excess waste on the unsliced portion. • The blade needs to be sharpened periodically to provide consistent slices and maximum food product. •... -
Page 13: Lubricating Your Slicer
Lubricating Your Slicer NOTE: Use only the tasteless oil provided or white Vaseline oil. Do not use vegetable oils! Lubricating the bottom runner guide bars (weekly) Move the carriage as close as possible to the • operator Insert the oiler in the special hole/lubricating •... -
Page 14: Troubleshooting
Troubleshooting If the slicer is not working correctly please check the list below before contacting an engineer or Metcalfe Catering Equipment Ltd. Problem Possible Causes Action Required Pressing the start button does not start No electricity. Check that the plug is correctly inserted. -
Page 15: Spare Parts & Service
Spare Parts and Service For more information on Metcalfe spare parts, accessories, and service support, including breakdown drawings and parts lists please contact us on the details below. Please always quote the Serial Number of the machine. This can be found on the serial number plate which is located on the right-hand side of the machine’s base. -
Page 16: Warranty
All Metcalfe SP mixers are covered by a 3-year warranty (1st year parts and labour, 2nd & 3rd year parts only) and full after sales service. There is a limited 6-month warranty on the following: Mixer attachments (beater, whisk and dough hook) •...
Need help?
Do you have a question about the NS300A and is the answer not in the manual?
Questions and answers