
Related Manuals for Metcalfe EP10


Summary of Contents for Metcalfe EP10
- Page 1 Metcalfe EP10, NA10, EP15 & NA15 10lb (4.5kg) & 15lb (6.8kg) Bench Mounted Peelers Service Manual EP10 NA15 01766 830 456 sales@metcalfecatering.com www.metcalfecatering.com...
-
Page 3: Table Of Contents
Index Metcalfe Bench Potato Peeling Machines ............Technical Data ……………………..…………………............. Installation ....................- Water Supply Connection ..............- Waste Outlet Connection ..............- Installation Kit …………..............- Waste Disposal Adaptor …………............- External Interceptor …………………………………………………………………….. - Tundish ..................Operation ....................... -
Page 4: Metcalfe Bench Potato Peeling Machines
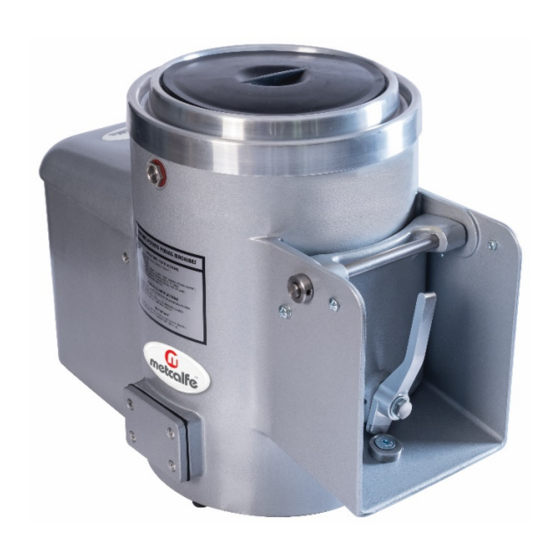
Metcalfe Bench Potato Peeling Machines Rubber Lid Aluminium Water Inlet On / Off Switches Door Handle Rubber Door Gasket Rotor/Peeling Motor Casing Plate Cover Waste Outlet Door Cam Peeling Chamber Guarded Chute Attachment Holes (optional extra) -
Page 5: Technical Data
D x W x H (mm) Weight (Kg) (m3) EP10 & NA10 576 x 339 x 365 665 x 265 x 480 0.04 EP15 & NA15 576 x 339 x 416 665 x 265 x 480 0.04 EP10 & NA10 Drawing EP15 & NA15 Drawing... -
Page 6: Installation
Installation Water Supply Connection The water inlet nozzle connector is supplied and should be fitted to the outside of the machine facing upwards. It has two possible inlet locations, one on either side of the machine, whichever is more convenient for your installation. 1. -
Page 7: Installation Kit
Installation of Optional Extras Installation Kit (optional extra) Comprises a Sink Skip, Length of Waste Pipe, Elbow & Coupling, 3ft Length Water Inlet Hose & Tap Connector. This image shows a typical installation utilising the kit. Waste Disposal Adaptor (optional extra) The waste disposal adaptor enables the waste pipe to be connected direct to the drain. -
Page 8: External Interceptor
The use of a tundish meets the requirements of water regulations G19.1, G19.3 & G19.4 contained in “The Water Supply Regulations 1999” and the “Water Byelaws 2000 (Scotland)”. The tundish can be fitted instead of the standard water inlet nozzle supplied with all Metcalfe peelers. -
Page 9: Operation
Operation Full operational instructions can be found on the side of each peeler. The machine works off 230volt 50Hz 1 Phase supply and comes fitted with a 3-pin 13amp fused plug. 1. Ensure that the chute door is closed. 2. Turn on the machine by pressing the green start button. 3. -
Page 10: Maintenance
Maintenance How to Adjust Door Cam Over time the door may loosen slightly. If this happens a door cam has been fitted to enable the operator to retighten the door. 1. Undo the nut underneath the chute to loosen the cam. 2. -
Page 11: Service
Service Disassembly Instructions 1. Remove rubber lid and aluminium lid. 2. Undo the rotor plate fixing screw using the box spanner provided and lift the rotor plate using the lifting hook provided. 3. Unscrew sweeper casting and remove. 4. Turn machine upside down and remove v-belt. 5. -
Page 12: Shaft & Bearing Assembly Replacement
Shaft & Bearing Assembly Replacement 1. Turn the machine upside down and fit the bottom bearing into the housing from underneath the machine, ensuring it is flush with the base of the peeler. 2. Stand the machine back upright and fit the first bearing along with the bearing spacing collar onto the shaft. -
Page 13: V-Belt Tensioning Instructions
V-belt Tensioning Instructions 1. Turn machine on its front so that the motor is on top and the machine is sitting on its door (if a guarded discharge chute is fitted please remove before attempting this). 2. Lubricate supply cable with washing-up liquid. Pull cable through cable grommet into the motor cover (enough to allow removal of the motor cover). -
Page 14: Motor Wiring Diagram
Wiring Diagrams Motor Wiring Diagram... -
Page 15: On/Off Switch Wiring Diagram
On/Off Switch Wiring Diagram... -
Page 16: Breakdown Drawing
Breakdown Drawing... -
Page 17: Parts List
Parts List Item Quantity Part Number Description PL01 Rubber Lid TSL01 Spun Lid C/W Gasket TD07 Drive Peg TR02 Rotor Plate Fixing Screw TR01 Rotor Plate TS02 Sweeper (Only) TS02 Spindle / Shaft TO01 Oil Seal TW06 Washer, Formed (Deflector Disc) TB01 Bearing TB05... -
Page 18: Assemblies Parts List
Assemblies Parts List Part Item Quantity Description Number 9T13 Sweeper Assembly Inc Parts: TD07 & TS01 9T11 Bearings, Shaft Assembly Inc Parts: TB01 x 2, TB05, TO01, TS02, TS07 & TW06 PC01 Chamber Blanking Bolt Inc Parts: PC01 & PN02 9T02M Door Handle, Bolt &... -
Page 19: Spare Parts & Service Contact Details
Spare Parts and Service For more information on Metcalfe spare parts, accessories and service support please contact us on the details below. Please always quote the Serial Number of the machine. This can be found on the serial number plate which is located on the rear of the motor cover. - Page 20 3/2021 Metcalfe Catering Equipment Ltd Haygarth Park Blaenau Ffestiniog Gwynedd, LL41 3PF 01766 830 456 sales@metcalfecatering.com www.metcalfecatering.com...
Need help?
Do you have a question about the EP10 and is the answer not in the manual?
Questions and answers