PaloAlto Networks ION 1000 Hardware Reference Manual
Hide thumbs
Also See for ION 1000:
- Hardware reference manual (34 pages) ,
- Hardware reference manual (28 pages)
Table of Contents
Advertisement
Quick Links
Advertisement
Table of Contents

Related Manuals for PaloAlto Networks ION 1000


Summary of Contents for PaloAlto Networks ION 1000
- Page 1 ION 1000 Hardware Reference docs.paloaltonetworks.com...
- Page 2 Alto Networks. A list of our trademarks can be found at www.paloaltonetworks.com/company/ trademarks.html. All other marks menoned herein may be trademarks of their respecve companies. Last Revised July 15, 2021 ION 1000 Hardware Reference 2021 Palo Alto Networks, Inc. ©...
-
Page 3: Table Of Contents
Install the ION 1000..................21 Rack Mount the ION 1000.....................22 Wall Mount the ION 1000..................... 24 Install the ION 1000 by Replacing an Exisng Router.............26 Install the ION 1000 With an Exisng Router..............27 Install the ION 1000 in Control Mode.................28 ION 1000 Hardware Reference 2021 Palo Alto Networks, Inc. - Page 4 Table of Contents ION 1000 Hardware Reference 2021 Palo Alto Networks, Inc. ©...
-
Page 5: Before You Begin
Before You Begin Read the following topics before you install or service a Palo Alto Networks next- ® generaon firewall or appliance. The following topics apply to all Palo Alto Networks firewalls and appliances except where noted. > Tamper Proof Statement >... -
Page 6: Tamper Proof Statement
• The integrity of the tamper-proof tape used to seal the box or crate is not compromised. • The integrity of the warranty label on the firewall or appliance is not compromised. ION 1000 Hardware Reference 2021 Palo Alto Networks, Inc. -
Page 7: Third-Party Component Support
Before You Begin Third-Party Component Support Before you consider installing third-party hardware, read the Palo Alto Networks Third-Party Component Support statement. ION 1000 Hardware Reference 2021 Palo Alto Networks, Inc. ©... -
Page 8: Product Safety Warnings
Meez au rebut les baeries usagées conformément aux instrucons. • I/O ports are intended for intra-building connecons only and not intended for OSP (Outside Plant) connecons or any network connecons subject to external voltage surge events. ION 1000 Hardware Reference 2021 Palo Alto Networks, Inc. ©... - Page 9 French Translaon: (Tous les appareils Palo Alto Networks avec au moins deux sources d’alimentaon) Débranchez tous les cordons d’alimentaon (c.a. ou c.c.) des entrées d’alimentaon et meez le matériel hors tension. ION 1000 Hardware Reference 2021 Palo Alto Networks, Inc. ©...
- Page 10 Before You Begin ION 1000 Hardware Reference 2021 Palo Alto Networks, Inc. ©...
-
Page 11: Ion 1000 Overview
ION 1000 Overview Learn about the Prisma SD-WAN ION 1000 and then plan your deployment. > ION 1000 > ION 1000 Ports > ION 1000 Front Panel with LEDs > ION 1000 Specificaons > ION 1000 Compliance Statement > ION 1000 Installaon Kit Components >... -
Page 12: Ion 1000
It also helps gain direct insight into end user applicaon performance for tradional, SaaS, modern encrypted applicaons. Deploy the ION 1000 in a standalone fashion without a data center device, thereby, enabling granular control and visibility for direct-to-internet deployment scenarios. -
Page 13: Ion 1000 Ports
ION 1000 Overview ION 1000 Ports The ports on the ION 1000 are used as follows: Ports Descripon This port is an auxiliary access port intended for offline access, configuraon, and troubleshoong of a system during installaon. Internet/LAN/WAN Ports Ports 1- 4 are individual ports, used for internet, local area network (LAN), or mul-path label switching (MPLS) -
Page 14: Ion 1000 Front Panel With Leds
ION 1000 Overview ION 1000 Front Panel with LEDs The Prisma SD-WAN ION 1000 LEDs indicate the following status: Icons Descripon Displays disk status. Orange light (Blinking)—Disk acvity. Displays controller connecvity status. Green light—Connected. Red light—Not Connected. Displays power status. -
Page 15: Ion 1000 SpecificaOns
ION 1000 Overview ION 1000 Specificaons The ION 1000 device specificaons are shown below: Feature Descripon WAN/LAN/Internet 4 x 10/100/1000 RJ-45 Throughput Throughput Up to 100 Mbps Encrypted throughput is measured with 1400 byte HTTP packets with all features turned on. - Page 16 WAN controller. It can be in the form of a private connecon by an MPLS network through a corporate data center. It can also be a public internet connecon provided through a local or broadband connecon. ION 1000 Hardware Reference 2021 Palo Alto Networks, Inc. ©...
-
Page 17: Ion 1000 Compliance Statement
ION 1000 Overview ION 1000 Compliance Statement The following lists the ION device hardware compliance statements: • VCCI: This secon provides the compliance statement for the Voluntary Control Council for Interference by Informaon Technology Equipment (VCCI), which governs radio frequency emissions in Japan. - Page 18 Canadian ICES-003. French Translaon: Cet appareil numérique de la classe B est conforme à la norme NMB-003 du Canada. • Declaraon of the Presence Condion of the Restricted Substances Marking. ION 1000 Hardware Reference 2021 Palo Alto Networks, Inc. ©...
-
Page 19: Ion 1000 InstallaOn Kit Components
ION 1000 Overview ION 1000 Installaon Kit Components The ION 1000 installaon kit contains the following parts and tools to install the device: • 1x 36W power adapter. • 1x power cord, which varies depending on the country or region. -
Page 20: Power On The Ion 1000
Press the power switch 5 mes (press and hold for 1 second, then, release) to shut down the device. Reboot the ION 1000 Press the power switch 3 or 4 mes to reboot the ION 1000. ION 1000 Hardware Reference 2021 Palo Alto Networks, Inc. -
Page 21: Install The Ion 1000
Install the ION 1000 The ION 1000 can be installed to replace the exisng router or deployed with an exisng router without modifying any of the network sengs at the remote office: > Rack Mount the ION 1000 > Wall Mount the ION 1000 >... -
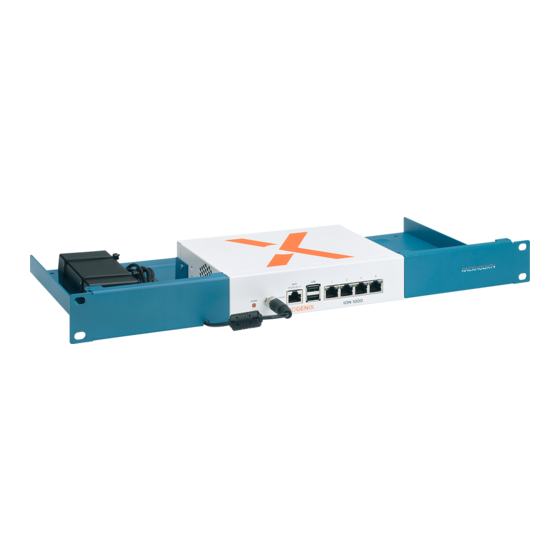
Page 22: Rack Mount The Ion 1000
Install the ION 1000 Rack Mount the ION 1000 Rack mount the ION 1000 on a standard 19 inch rack. The oponal rack-mount kit includes two idencal L-shaped brackets that you can aach to either side of the ION 1000 using screws. - Page 23 Install the ION 1000 STEP 5 | Aach the L-shaped rack-mounng brackets to a standard 19 inch rack with the cage screws. STEP 6 | Verify that the device is securely mounted on the rack. ION 1000 Hardware Reference 2021 Palo Alto Networks, Inc.
-
Page 24: Wall Mount The Ion 1000
Gather the wall mounng brackets, also referred to as the ear brackets. These brackets enable you to anchor the ION 1000 to the wall. STEP 2 | Place the ION 1000 upside down and locate the four (4) screw holes on each corner of the device. STEP 3 | Place the ear brackets on each side of the device and align the screw holes on the bracket and the device. - Page 25 Install the ION 1000 STEP 10 | Verify that the ION 1000 is securely mounted on the wall. Do not remove the rubber pads from the Prisma SD-WAN ION 1000 to prevent overheang and damage. ION 1000 Hardware Reference 2021 Palo Alto Networks, Inc.
-
Page 26: Install The Ion 1000 By Replacing An ExisNg Router
Configure the ION 1000 as a drop-in replacement for the WAN Router. This mode is most useful for saving cost at new sites that are designed without a tradional router in mind. -
Page 27: Install The Ion 1000 With An ExisNg Router
Install the ION 1000 Install the ION 1000 With an Exisng Router Install the Prisma SD-WAN ION 1000 with an exisng router. This allows you to insert the ION 1000 without modifying any network sengs at the remote locaon. ION 1000 Hardware Reference 2021 Palo Alto Networks, Inc. -
Page 28: Install The Ion 1000 In Control Mode
Install the Prisma SD-WAN ION 1000 in control mode. STEP 1 | Plan and prepare for cabling and connecon of the ION 1000 to insert it into your network. Ensure that internet access using a private WAN connecon or direct internet broadband is available at your site to allow remote configuraon of the ION 1000.
Need help?
Do you have a question about the ION 1000 and is the answer not in the manual?
Questions and answers