Table of Contents
Advertisement
Quick Links
Advertisement
Table of Contents

Related Manuals for PaloAlto Networks Prisma SD-WAN ION 9000


Summary of Contents for PaloAlto Networks Prisma SD-WAN ION 9000
- Page 1 ION 9000 Hardware Reference paloaltonetworks.com/documentation...
- Page 2 Contact Information Corporate Headquarters: Palo Alto Networks 3000 Tannery Way Santa Clara, CA 95054 www.paloaltonetworks.com/company/contact-support About the Documentation • For the most recent version of this guide or for access to related documentation, visit the Technical Documentation portal www.paloaltonetworks.com/documentation. • To search for a specific topic, go to our search page www.paloaltonetworks.com/documentation/ document-search.html.
-
Page 3: Table Of Contents
Table of Contents Before You Begin....................5 Tamper Proof Statement........................... 7 Third-Party Component Support......................8 Product Safety Warnings.......................... 9 ION 9000 Overview..................15 ION 9000..............................17 ION 9000 Ports............................18 ION 9000 Front Panel with LEDs......................19 ION 9000 Specifications......................... 20 ION Device Compliance Statement..................... 22 ION 9000 Installation Kit Components....................23 Power on the ION 9000.........................24 Shut down the ION 9000...................... - Page 4 TABLE OF CONTENTS...
-
Page 5: Before You Begin
Before You Begin Read the following topics before you install or service a Palo Alto Networks next-generation ® firewall or appliance. The following topics apply to all Palo Alto Networks firewalls and appliances except where noted. > Tamper Proof Statement >... - Page 6 ION 9000 HARDWARE REFERENCE | Before You Begin 2021 Palo Alto Networks, Inc. ©...
-
Page 7: Tamper Proof Statement
Tamper Proof Statement To ensure that products purchased from Palo Alto Networks were not tampered with during shipping, verify the following upon receipt of each product: • The tracking number provided to you electronically when ordering the product matches the tracking number that is physically labeled on the box or crate. -
Page 8: Third-Party Component Support
Third-Party Component Support Before you consider installing third-party hardware, read the Palo Alto Networks Third-Party Component Support statement. ION 9000 HARDWARE REFERENCE | Before You Begin 2021 Palo Alto Networks, Inc. ©... -
Page 9: Product Safety Warnings
Product Safety Warnings To avoid personal injury or death for yourself and others and to avoid damage to your Palo Alto Networks hardware, be sure you understand and prepare for the following warnings before you install or service the hardware. You will also see warning messages throughout the hardware reference where potential hazards exist. - Page 10 Caractéristiques techniques: • Le circuit de protection est conforme aux classifications de test IEC B2, C1, C2, C3, et D1. • Le courant de décharge normal (cœur vers terre) est de 2kA par paire de signal. • Le courant de décharge normal (cœur vers cœur) est de 100 A. •...
- Page 11 ION 9000 HARDWARE REFERENCE | Before You Begin 2021 Palo Alto Networks, Inc. ©...
- Page 12 (Applicable to ION 9000) ION 9000 HARDWARE REFERENCE | Before You Begin 2021 Palo Alto Networks, Inc. ©...
- Page 13 ION 9000 HARDWARE REFERENCE | Before You Begin 2021 Palo Alto Networks, Inc. ©...
- Page 14 ION 9000 HARDWARE REFERENCE | Before You Begin...
-
Page 15: Ion 9000 Overview
ION 9000 Overview Learn about Prisma SD-WAN Instant-On Network (ION) 9000 and plan your deployment. > ION 9000 > ION 9000 Ports > ION 9000 Front Panel with LEDs > ION 9000 Specifications > ION Device Compliance Statement > ION 9000 Installation Kit Components >... - Page 16 ION 9000 HARDWARE REFERENCE | ION 9000 Overview 2021 Palo Alto Networks, Inc. ©...
-
Page 17: Ion 9000
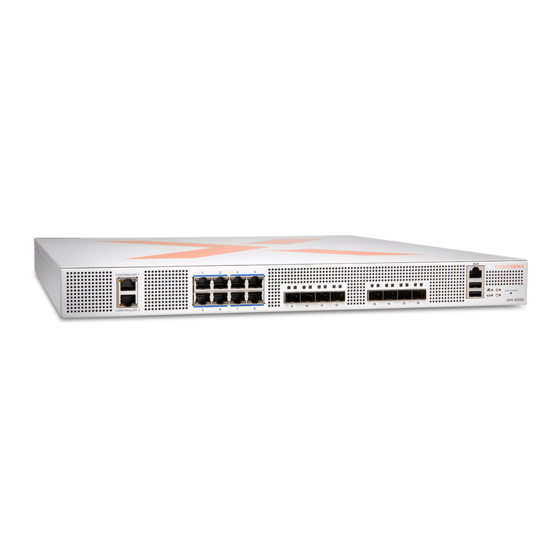
ION 9000 Prisma SD-WAN ION 9000, designed for the data center, enables you to create a secure SD-WAN fabric across branches and data centers. It is designed to install seamlessly in the data center by peering with adjacent data center devices using traditional, standards-based routing protocols. Deploy the ION 9000 in an off-path model enabling elastic, non-disruptive scale-out and high availability (HA). -
Page 18: Ion 9000 Ports
ION 9000 Ports The ports on the ION 9000 are used as follows: Ports Description AUX Port This port is intended for offline access and configuration of an uninstalled system. USB Port This port is reserved for future use. Controller Ports This port is used by the ION device to communicate with the Prisma SD-WAN controller. -
Page 19: Ion 9000 Front Panel With Leds
ION 9000 Front Panel with LEDs The ION 9000 LEDs indicate the following: Icons Description Displays power status Green light—Powered on. Black light—Powered off. Displays Controller connectivity Blue light—Connected. status No light—Not Connected. Displays disk status Orange light (blinking)—Displays disk activity. HA LED Off—Not configured. -
Page 20: Ion 9000 Specifications
ION 9000 Specifications The Prisma SD-WAN ION 9000 device specifications are described below: Device Specifications Description Place in Network Large and remote office data center. Controller ports 2 x 10/100/1000 RJ-45 WAN/LAN/Internet ports • 8 x 10 gigabit Ethernet SFP+ •... - Page 21 Device Specifications Description Dimensions (D x W x H) 20.07" X 17.24" X 1.73" (510 mm x 438 mm x 44 mm) Physical network connectivity A single gigabit ethernet copper port with DHCP, and two or more gigabit or ten gigabit ports for other features. BGP peers Layer 2 connectivity to two separate network devices that are currently participating in any dynamic routing protocol...
-
Page 22: Ion Device Compliance Statement
ION Device Compliance Statement The following compliance statements apply to this ION device: • VCCI—This section provides the compliance statement for the Voluntary Control Council for Interference by Information Technology Equipment (VCCI), which governs radio frequency emissions in Japan. The following information is in accordance to VCCI Class A requirements: Translation: This is a Class A product. -
Page 23: Ion 9000 Installation Kit Components
ION 9000 Installation Kit Components The ION 9000 installation kit contains the following parts and tools to install the device: • 2x 19-inch 1RU rack mount sliding rails built-in with quick-attach square hole adapters. • 2x Mounting brackets with accompanying screws. •... -
Page 24: Power On The Ion 9000
Power on the ION 9000 Connect the power cables to the ION device and plug the device power cable into an AC power outlet. When you switch on the power, the device is powered on and the power indicator turns green. Shut down the ION 9000 Shut down the ION 9000 in the following ways: •... -
Page 25: Install The Ion 9000
Install the ION 9000 Deploy the Prisma SD-WAN ION 9000 in the following modes: > Rack Mount the ION 9000 > Install the ION 9000 in Virtual In-Path Configuration > Install ION 9000 in High Availability... - Page 26 ION 9000 HARDWARE REFERENCE | Install the ION 9000 2021 Palo Alto Networks, Inc. ©...
-
Page 27: Rack Mount The Ion 9000
Rack Mount the ION 9000 Rack mount the ION 9000 on a standard 19 inch rack with square holes: STEP 1 | Attach the rack-mount brackets to the ION 9000 1. Unpack the installation kit and retrieve the rails. 2. Remove the chassis mounting brackets from the rails by extending the bracket out and sliding the bracket release button towards the front to fully withdraw it from the rails. - Page 28 Attach the slide rail to a standard 19-inch rack STEP 2 | 1. Select a 1-RU slot to insert the slide rail to the rack. 2. Align the rail end marked REAR to the rear side of the rack. 3. Insert the screws on the rails in the screw holes of the rack and ensure that the metal clasp secures the rails to the rack post.
- Page 29 4. Slide the ION 9000 into the rack and confirm that the device is installed securely. 4. On the front side of the racks, snap the rails in place by inserting the screws in the rack. Ensure that the spring retention clip is fully engaged, so that the rail is securely attached to the rack. STEP 3 | Slide the ION 9000 into the rails 1.
-
Page 30: Install The Ion 9000 In Virtual In-Path Configuration
Install the ION 9000 in Virtual In-Path Configuration The Prisma SD-WAN ION 9000 uses a virtual in-path configuration to allow the system to perform SD- WAN operations as it enters and exits the data center. This mode of operation allows the ION 9000 cluster to: •... -
Page 31: Configure Peering Ports
Prisma SD-WAN console. Configure Peering Ports The Prisma SD-WAN ION 9000 uses the peering ports to communicate with WAN edge or core or WAN distribution routers via BGP. The routers may be connected using one physical port per router or multiple routers can share a single port by using a shared Layer 2 VLAN. -
Page 32: Install Ion 9000 In High Availability
Install ION 9000 in High Availability The Prisma SD-WANprovides a horizontally-scalable, high availability (HA) solution between branch sites and data center clusters. Add a second ION 9000 to the data center that requires high availability (HA). STEP 1 | Use the same ports to cable the second ION 9000. STEP 2 | On the Prisma SD-WAN console, claim the ION device and assign it to the data center. - Page 33 The following image illustrates the logical connectivity and IP addressing for the ION 9000 HA. The following image illustrates the setting up BGP for ION 9000 HA. ION 9000 HARDWARE REFERENCE | Install the ION 9000 2021 Palo Alto Networks, Inc. ©...
- Page 34 ION 9000 HARDWARE REFERENCE | Install the ION 9000...
Need help?
Do you have a question about the Prisma SD-WAN ION 9000 and is the answer not in the manual?
Questions and answers