Table of Contents
Advertisement
Quick Links
Advertisement
Table of Contents

Related Manuals for Stryker SDC Ultra


Summary of Contents for Stryker SDC Ultra
- Page 2 SDC Ultra™ 240-050-988 User Guide 2007/08 www.stryker.com 1000-401-050 B...
-
Page 4: Table Of Contents
Contents Warnings and Cautions ............. 1 Symbols and Definitions ........... 3 Product Description/Intended Use ......5 System.Overview..............6 Setup ..................10 Operation ................. 15 Getting.Started...............15 Loading.the.Patient.List............16 Viewing.Archived.Information..........17 Capturing.Single.Channel.Images.and.Videos......18 Capturing.Dual.Channel.Images.and.Videos......21 Editing.Video.Settings............24 Entering.Patient.Information..........29 Viewing.and.Annotating.Images..........31 Viewing.and.Playing.Videos...........32 Viewing.and.Editing.the.Video.Album........33 Editing.Annotations. -
Page 6: Warnings And Cautions
Make all connections with the power cord unplugged from the mains outlet. 10. Ensure that all equipment connected to the SDC Ultra™ has proper... - Page 7 Failure to follow these instructions may result in product damage. 14. Attempt no internal repairs or adjustments not specifically detailed in this operating manual. Refer any readjustments, modifications, and/or repairs to Stryker Endoscopy or its authorized representatives. The warranty is void if any of these warnings are disregarded.
-
Page 8: Symbols And Definitions
Symbols and Definitions This device and its labeling contain symbols that provide important information for the safe and proper use of the device. These symbols are defined below. Warning Symbols Warning/Caution: See Hazardous voltage Instructions for Use present Device Symbols Mouse Keyboard Monitor... - Page 9 Lot number Product number Denotes compliance to CSA C22.2 No. Serial Number 601.1-M90, and UL 2601-1. Protective Earth Equipotentiality Ground Denotes compliance to 93/42/EEC, Medical Device Directive This product contains electrical waste or electronic equipment. It must not be disposed of as unsorted municipal waste and must be collected separately.
-
Page 10: Product Description/Intended Use
Flash Cards, USB Hard Drive, or USB dongles, which can then be viewed from a personal computer, a DVD player, or from the SDC Ultra itself. The SDC Ultra records images on a built-in hard drive, where they can be easily accessed after the surgical procedure. The images stored on the hard drive can be named and burned to a CD or DVD through a touch-screen control panel located on the front of the unit. -
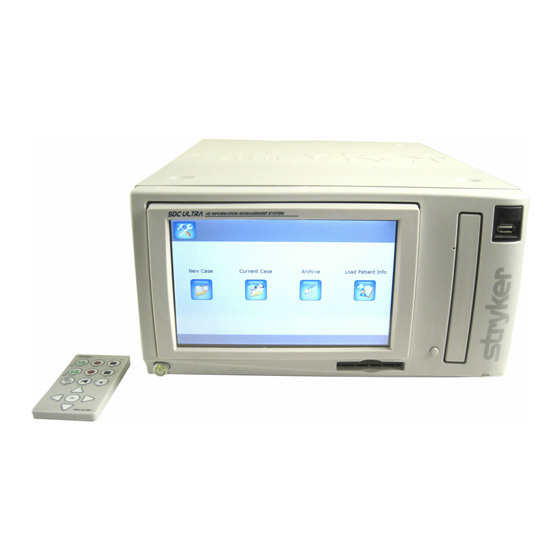
Page 11: System.overview
System Overview Front Panel CD/DVD drive USB port Eject button for CD/DVD drive Remote control Power button LCD touch screen... - Page 12 15. DVI 2 In –Secondary channel DVI input 16. DVI 1 Out –Primary channel DVI output 17. DVI 1 In –Primary channel DVI input 18. SIDNE port – Connection to SIDNE console for device control 19. SFB connectors ports – enables Firewire connection with the Stryker...
- Page 13 Firewire devices 20. Speaker port (development use only) 21. USB ports (2) 22. Monitor (development use only) 23. Keyboard (development use only) 24. Mouse (development use only) 25. Serial port (development use only) 26. Network port...
- Page 14 Remote Control Channel 1 video and image: capture, record, stop Channel 2 video and image: capture, record, stop Print images Display previous image on OSD Voice annotation (future use) Navigation (future use) Select (future use)
-
Page 15: Setup
Stryker Endoscopy representative to schedule an in-service after your equipment has arrived. Choose a location for the SDC Ultra. • Place the SDC Ultra on a Stryker cart or other sturdy platform. • Provide at least four to six inches of space around the sides and top of the SDC Ultra to ensure proper ventilation. - Page 16 Warning The printer must be properly connected to the isolation transformer prior to use. Failure to do so may result in a higher leakage current for the printer. Note See the “Technical Specifications” for approved printers and transformers. Connect the AC power. •...
- Page 17 Setting up the SDC Ultra™ with the 1188 Camera and SIDNE® Caution The other ports not listed in this section are intended for use by service technicians or for future device upgrades. Do not connect any devices to these ports as unexpected results may occur.
- Page 18 FTP server. Instructions Enter the IP address of the FTP server (and not the SDC Ultra) into the SDC Ultra “Network” tab in the “Config” menu. Create a folder named SDC in the default path of the FTP Server. In this folder, create a folder for the Username.
- Page 19 For Login with Username and Password: Note The FTP server should be setup for the users who have access. Passwords should be all caps. Create a folder under the root folder of the FTP server folder. Create another folder under the SDC folder with the same name as the username.
-
Page 20: Operation
Operation SDC Ultra™ provides an interface for entering patient information, capturing images and videos, and archiving photos and video. Getting Started Home Screen Select from the following options: Press New Case to begin a new patient case. Press Current Case to load the current patient information, images, and videos. -
Page 21: Loading.the.patient.list
Loading the Patient List Patient information can be added prior to surgery to save time. To load patient information, press the Load Patient List button on the Home screen. Press the Home button to return to the home screen. Enter the patient information. •... -
Page 22: Viewing.archived.information
Viewing Archived Information To archive information and to access the archive, press the Archive button on the Home screen. Press Album to view the album of the selected archived case. Press Save to save the selected archived case to media. Navigational buttons •... -
Page 23: Capturing.single.channel.images.and.videos
Capturing Single Channel Images and Videos Images can be captured from a single or a dual source/channel. To display the Capture screen, press the New Case or Current Case button on the home screen. Press Home to return to the home screen. Select a Patient ID from the drop-down menu. - Page 24 • Press Print to print images that have not previously been printed. • Press Stop to stop recording. • Press the Record/Pause button to toggle between recording and pausing the video mode. • Press the Capture button to begin capturing images. 15 Press the left/right arrow buttons to scroll through images.
- Page 25 Pausing Press the Pause button on the Recording screen to pause video. Press the Resume button to continue recording. Press the Stop button to stop recording.
-
Page 26: Capturing.dual.channel.images.and.videos
Capturing Dual Channel Images and Videos To capture dual channel images and video, press the Dual Capture button on the Capture screen PIP Capture Mode To capture images and videos in PIP mode, press the PIP (picture-in-picture) button on the Dual Capture screen. Press OSD (on screen display) PIP to toggle between turning on or off the PIP on the monitor. - Page 27 Synchronize Capture Mode To capture images and video in synchronize mode, press the Synchronize button on the Dual Capture screen. Press the Capture button to capture images on both channels simultaneously. Press the Record button to record video on both channels simultaneously. Press the Stop button to stop recording on both channels simultaneously.
- Page 28 Individual Capture Mode To capture images and video in the individual mode, press the Individual button on the Dual Capture screen. Press Capture to capture images on channel 1. Press Record to record video on channel 1. Press Stop to stop recording on channel 1. Press Capture to capture images on channel 2.
-
Page 29: Editing.video.settings
Editing Video Settings Editing Channel 1 Video Settings To edit channel 1 video settings, press the Video Settings button on the Capture screen. Select the Record Format from the drop-down menu. Select the Camera from the drop-down menu. Select the Signal from the drop-down menu. Press the left arrow button to return to the previous screen. - Page 30 Editing Channel 2 Video Settings To edit channel 2 video settings, press the Video Settings button on the Capture screen and then press the Channel 2 Video Settings button. Select the Record Format from the drop-down menu. Select the Camera from the drop-down menu. Select the Signal from the drop-down menu. Editing PIP Settings To edit PIP settings, press the Video Settings button on the Capture screen and then press the PIP settings button.
- Page 31 Editing Advanced Video Settings To edit advanced video settings, press the Video Settings button on the Capture screen and then press the More Settings button. Press Flip Screen to choose the image orientation on the OSD. Press Mute to toggle between On and Off. Press REC Display to toggle between On, display live video on the OSD, and Off.
- Page 32 Editing Print Settings To edit print settings, press the Print Settings button on the Album screen. Press the minus or plus sign to indicate the number of copies to print. Press the minus or plus sign to indicate the number of images to print per page.
- Page 33 Editing Advanced Print Settings To edit advance print settings, press the Print Settings button on the Capture screen and then press the More Settings button. Press the corresponding minus or plus buttons to edit the brightness, contrast, phase, chroma, or sharpness of channel 1 or channel 2 images. Press the Default Settings to reset the image options to the factory default settings.
-
Page 34: Entering.patient.information
Entering Patient Information To enter patient information, press the Patient Information button on the Home screen. Patient information. • Enter the last name. • Enter the birth date. • Enter the sex. • Enter the patient’s ID. • Enter the first name. Press the down arrow to display the second data-entry screen. - Page 35 Entering Patient Information - Second Data-entry Screen. To enter patient information on the secondary data-entry screen, press the down arrow on the Patient Information screen to display the second data-entry screen. Enter the facility. Enter the accession number. Press the up arrow to return to the primary data-entry screen. Select a station from the drop-down menu.
-
Page 36: Viewing.and.annotating.images
Viewing and Annotating Images To view images, press the Album button on the Capture screen and then press the Image album button. Press the arrow buttons to scroll through the images. Press DICOM Album for viewing PACS image information. Press Image Album to display the editing screen for the album. Press Video Album to annotate video and playback video. -
Page 37: Viewing.and.playing.videos
Viewing and Playing Videos To view and play videos, press the Album button then press the Video Album button. Press the arrow buttons to scroll through the images. Press the Select/Deselect All button to select or deselect images for printing and saving. Press the Stop button to stop playing the video. -
Page 38: Viewing.and.editing.the.video.album
Viewing and Editing the Video Album To view and edit the album, press the Annotation button on the video album screen. Press the Annotations button to bring up the editing annotations screen. Press Playback Video to display the playback mode screen. -
Page 39: Editing.annotations
Editing Annotations To edit annotations, press the Image Album button on the Capture screen and then press the Annotation Video button. Select the specialty from the drop-down menu. To add or delete an item on the list, press add or delete. Select the procedure from the drop-down menu. To add or delete an item on the list, press add or delete. -
Page 40: Saving.information
Saving Information To save information, press the New or Current Case buttons on the Home screen. Press CD/DVD to save the selected case to a CD or DVD. Press Eject to eject the CD or DVD. Press USB to save images or video to the USB. Press Save to Network to save images or video on the PACS or FTP network. -
Page 41: Saving.settings
Saving Settings To save settings, press the Save button on the Saving Information screen. Press Image Format to toggle between BMP, JPEG, JPEG2000, TGA, TIFF, and PNG. Press Encryption to toggle between On and Off. Press More Settings to display more save settings. (See the “More Save Settings”... - Page 42 More Save Settings To adjust more save settings, press the More Settings button on the Save screen. Press the corresponding minus or plus buttons to edit the brightness, contrast, phase, chroma, or sharpness of channel 1 or channel 2 images. Press the Default Settings to reset the image options to the factory default settings.
-
Page 43: Troubleshooting
Delete older entries in the list. SIDNE® Comm Error Ensure that SIDNE is connected properly. Reboot the SDC Ultra™ and SIDNE. Error printing. No image captured/ Capture images and then select them selected to print. - Page 44 Error: locating logo.bmp Ensure that the USB cable is connected properly. Ensure that the logo file is present on the USB drive and it is called “logo.bmp. ” Error: upgrading software Insert the upgrade dongle in the save screen. Application has encountered a critical Please reboot the system.
- Page 45 Print errors • Ensure there aren’t any paper jams. • Ensure the printer has enough ink.. • Ensure the printer door is closed. • Ensure the printer has paper. • Ensure the printer is powered on. • Ensure the printer cable is connected..
-
Page 46: Cleaning And Maintenance
Should the unit need cleaning, wipe it down with a sterile cloth. Warning To avoid electric shock and potentially fatal injury, unplug the SDC Ultra™ from the electrical outlet before cleaning. Caution Do not immerse the console in any liquid as product damage will result. Caution Do not use alcohol, solvents, or cleaning solutions that contain ammonia to clean the unit, as product damage may result. Caution Do not sterilize the unit as product damage may result. Maintenance SDC Ultra requires no preventative or periodic maintenance. However, Stryker recommends you reboot the system daily for best performance. -
Page 47: Technical Specifications
Technical Specifications Environmental Specifications Operating temperature: 10 – 40°C Operating humidity: 30 – 75% RH Shipping temperature: -20° – 60°C Shipping humidity: 10 – 85% RH System Type MPEG -1 or -2 compression engine with full IBP encoding Video Inputs 1 S-Video, 1 Composite 2 DVI and 2 RGBHV (via DVI-I connectors) Video Outputs... - Page 48 Disc Recording Formats CD-R, DVD-R, DVD+R (single session), DVD+RW NTFS format supported MAC users will only have read capabilities Remote Control Wireless infrared, camera head triggering Power Consumption 100 – 240VAC~ 50/60Hz, 4A maximum Safety and EMC Compliance IEC 60601-1:1988 + A1:1991 + A2:1995 CAN/CSA C22.2 No.601.1-M90 UL 60601-1:2003 AS/NZS 3200.1.0:1998...
- Page 49 Printers Supported HP 8250 HP D7160 Isolation Transformer Stryker 240-099-050 (2KVA transformer) Stryker 240-050-705 (180VA transformer) Display 8" TFT LCD, with digital touch screen...
-
Page 50: Electromagnetic Compatibility
(EMC), SDC Ultra must be installed and operated according to the EMC information provided in this manual. The SDC Ultra has been designed and tested to comply with IEC 60601-1-2:2001 requirements for EMC with other devices. Caution Portable and mobile RF communications equipment may affect the normal function of the SDC Ultra. - Page 51 Guidance and Manufacturer’s Declaration: Electromagnetic Emissions SDC Ultra™ is intended for use in the electromagnetic environment specified below. The customer or the user of SDC Ultra should ensure that it is used in such an environment. Emissions test Compliance Electromagnetic Environment - guidance SDC Ultra uses RF energy only for its internal function;...
- Page 52 RF transmitters, an electromagnetic site survey should be considered. If the measured field strength in the location in which the SDC Ultra system is used exceeds the applicable RF compliance level above, the SDC Ultra™ system should be observed to verify normal operation. If abnormal performance is observed, additional measures may be necessary, such as reorienting or relocating the SDC Ultra unit.
- Page 53 Guidance and Manufacturer’s Declaration: Electromagnetic Immunity SDC Ultra™ is intended for use in the electromagnetic environment specified below. The customer or the user of SDC Ultra should ensure that it is used in such an environment. IEC 60601 Electromagnetic Immunity Test...
- Page 54 RF transmitters, an electromagnetic site survey should be considered. If the measured field strength in the location in which the SDC Ultra system is used exceeds the applicable RF compliance level above, the SDC Ultra system should be observed to verify normal operation. If abnormal performance is observed, additional measures may be necessary, such as reorienting or relocating the SDC Ultra unit.
- Page 55 Recommended Separation Distances Between Portable and Mobile RF Communications Equipment and the SDC Ultra™ System The SDC Ultra™ system is intended for use in an electromagnetic environment in which radiated RF disturbances are controlled. The user of the SDC Ultra system can help prevent electromagnetic...
-
Page 56: Warranty
This product is being sold only for the purpose described herein. In no event shall Stryker Endoscopy be liable for any breach of warranty in any amount exceeding the purchase price of the product. Stryker Endoscopy warrants this product against defects in both materials and workmanship to the registered owner at the time of purchase. -
Page 57: Services And Claims
Stryker Endoscopy sales representative. When returning equipment for service, package all the components carefully in the original shipping container, if possible. Ship the unit, prepaid and insured, to your local Stryker Endoscopy distributor or to: Stryker Endoscopy Customer Service Attention: Repair Department... - Page 61 European Representative: Stryker Endoscopy Regulatory Manager, Stryker France 5900 Optical Court ZAC Satolas Green Pusignan San Jose, CA 95138 USA Av. De Satolas Green 1-408-754-2000, 1-800-624-4422 69881 MEYZIEU Cedex, France www.stryker.com 2007/08 www.stryker.com 1000-401-050 B...
Need help?
Do you have a question about the SDC Ultra and is the answer not in the manual?
Questions and answers