Table of Contents
Advertisement
Advertisement
Table of Contents

Related Manuals for Stryker SDC Ultra


Summary of Contents for Stryker SDC Ultra
- Page 1 SDC Ultra™ 0240050988...
-
Page 3: Table Of Contents
Contents Warnings and Cautions ............ 1 Symbols and Definitions ..........3 Product Description/Intended Use ......5 System Overview ..............6 Setup ..................10 Operation ................15 Loading the Patient List ............17 Viewing Archived Information ..........18 Studio3 Media Transfer Queue - Pending Cases ....20 Studio3 Media Transfer Queue - Completed Cases .....21 Entering Patient Information ..........22 Capturing Single Channel Images and Videos......25... -
Page 5: Warnings And Cautions
11. Make all connections with the power cord unplugged from the mains outlet. 12. Ensure that all equipment connected to the SDC Ultra™ has proper isolations. 13. To avoid risk of fire, do not use this device in the presence of flammable anesthetics. - Page 6 Refer any readjustments, modifications, and/or repairs to Stryker Endoscopy or its authorized representatives. 17. Do not modify this equipment without authorization of the manufacturer. The Stryker Standard Warranty and Return Policy (1000401175) is void if any of these warnings or cautions are disregarded.
-
Page 7: Symbols And Definitions
Symbols and Definitions This device and its labeling contain symbols that provide important information for the safe and proper use of the device. These symbols are defined below. Warning Symbols Warning/Caution: See Hazardous voltage Instructions for Use present Consult Instructions for Device Symbols Mouse Keyboard... - Page 8 Ambient temperature Relative humidity range range Denotes compliance to CSA C22.2 No. Serial Number 601.1-M90, and UL 2601-1. Protective Earth Equipotentiality Ground Product number Made in USA Complies with the requirements of directive 93/42/EEC. This product contains electrical waste or electronic equipment. It must not be disposed of as unsorted municipal waste and must be collected separately.
-
Page 9: Product Description/Intended Use
Flash Cards, USB Hard Drive, or USB dongles, which can then be viewed from a personal computer, a DVD player, or from the SDC Ultra™ itself. The SDC Ultra™ records images on a built-in hard drive, where they can be easily accessed after the surgical procedure. The images stored on the hard drive can be named and burned to a CD or DVD through a touch-screen control panel located on the front of the unit. -
Page 10: System Overview
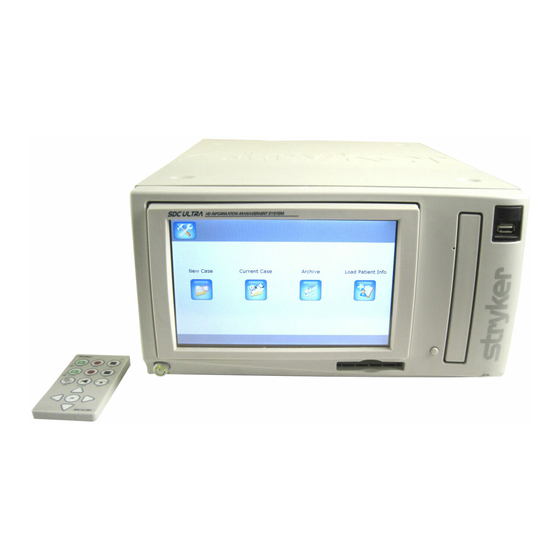
System Overview Front Panel CD/DVD drive USB port Eject button for CD/DVD drive Remote control (optional accessory) Power button LCD touch screen... -
Page 11: Rear Panel
15. DVI 2 In –Secondary channel DVI input 16. DVI 1 Out –Primary channel DVI output 17. DVI 1 In –Primary channel DVI input 18. SIDNE port – Connection to SIDNE console for device control 19. SFB connectors ports – enables Firewire connection with the Stryker... - Page 12 Firewire devices 20. Speaker port (development use only) 21. USB ports (2) 22. Monitor (development use only) 23. Keyboard (development use only) 24. Mouse (development use only) 25. Serial port (development use only) 26. Network port...
- Page 13 Remote Control (optional accessory) Channel 1 video and image: capture, record, stop Channel 2 video and image: capture, record, stop Print images Display previous image on OSD Voice annotation (future use) Navigation (future use) Select (future use)
-
Page 14: Setup
SDC Ultra™ to ensure proper ventilation. Warning RF and other mobile communications equipment may affect the normal function of the SDC Ultra™. When placing the SDC Ultra™, follow the instructions located in the “Electromagnetic Compatibility” section of this manual. - Page 15 Warning When used inside the patient environment (represented by an area 1.5 m from the patient in all directions), the printer must be properly connected to the isolation transformer prior to use. Failure to do so may result in a higher leakage current for the printer.
- Page 16 Setting up the SDC Ultra™ with the 1188 Camera and SIDNE® Caution The other ports not listed in this section are intended for use by service technicians or for future device upgrades. Do not connect any devices to these ports as unexpected results may occur.
- Page 17 Ultra does not support FTP over SSL. Instructions Enter the IP address of the FTP server (and not the SDC Ultra™) into the SDC Ultra™ Network tab in the Config menu. Create a folder named SDC in the default path of the FTP Server. In this folder, create a folder for the username.
- Page 18 A Stryker Studio3 Media Server installed and configured. . Instructions Enter the IP address of the Studio3 Media Server into the SDC Ultra Studio 3 tab in the Config menu. Select the Studio 3 checkbox in the Save Settings screen to enable the Studio 3 Save button.
-
Page 19: Operation
Operation SDC Ultra™ provides an interface for entering patient information, capturing images and videos, and archiving photos and video. Getting Started Login Screen If the application password is on, enter the user name and password. This security feature will be turned off by default for quicker access to... -
Page 20: Home Screen
Home Screen Select from the following options: Press New Case to begin a new patient case. Press Current Case to load the current patient information, images, and videos. Press Archive to view cases that were saved to the hard drive, a USB dongle, or a disc. -
Page 21: Loading The Patient List
Loading the Patient List Patient information can be added prior to surgery to save time. To load patient information, press the Load Patient List button on the Home screen. Press the Home button to return to the home screen. Enter the patient information. • Enter the patient’s name • Enter the patient ID • Enter the birth date... -
Page 22: Viewing Archived Information
Viewing Archived Information To archive information and to access the archive, press the Archive button on the Home screen. A checkmark under the SC (DICOM Storage Commit) column indicates that the case has been saved on the PACS server and acknowledgement for the same has been received from the server. - Page 23 12. Press Delete all to delete all patient information stored on the hard drive. 13. Press Delete to delete the selected patient’s case. The yellow row is the selected case data. Press the Check mark icon to select this case. ...
-
Page 24: Studio3 Media Transfer Queue - Pending Cases
Studio3 Media Transfer Queue - Pending Cases 1 2 3 4 Indicates image assets properly transferred over total image assets to be transferred. Indicates video assets properly transferred over total video assets to be transferred. Indicates PDF assets properly transferred over total PDF assets to be transferred. -
Page 25: Studio3 Media Transfer Queue - Completed Cases
Studio3 Media Transfer Queue - Completed Cases Checkmark indicates all case assets were properly transferred Red font indicates all case assets did not properly transfer after maximum attempts. Navigate to list of cases that are pending transfer. -
Page 26: Entering Patient Information
Entering Patient Information To enter patient information, press the Patient Information button on the Home screen. Patient information. • Enter the last name. • Enter the birth date. • Enter the sex. • Enter the patient’s ID. • Enter the first name. Press the up and down arrows to display the second and third data- entry screen. See the “Entering Patient Information - Second Data-entry Screen. - Page 27 Entering Patient Information - Second Data-entry Screen. To enter patient information on the secondary data-entry screen, press the down arrow on the Patient Information screen to display the second data-entry screen. Enter the facility. Select the procedure from the dropdown list. Select the specialty from the dropdown list.
- Page 28 Entering Patient Information - Third Data-entry Screen. To enter patient information on the third data-entry screen, press the down arrow on the second data-entry screen. Select a station from the drop-down menu. To add or delete an item on the list, press add or delete. Enter the details.
-
Page 29: Capturing Single Channel Images And Videos
Capturing Single Channel Images and Videos Images can be captured from a single or a dual source/channel. To display the Capture screen, press the New Case or Current Case button on the home screen. Press Home to return to the home screen. Select a Patient ID from the drop-down menu. - Page 30 • Press Print to print images that have not previously been printed. • Press Stop to stop recording. • Press the Record/Pause button to toggle between recording and pausing the video mode. • Press the Capture button to begin capturing images. 15. Press the left/right arrow buttons to scroll through images. 16.
- Page 31 Pausing Press the Pause button on the Recording screen to pause video. Press the Resume button to continue recording. Press the Stop button to stop recording.
-
Page 32: Capturing Dual Channel Images And Videos
Capturing Dual Channel Images and Videos To capture dual channel images and video, press the Dual Capture button on the Capture screen PIP Capture Mode To capture images and videos in PIP mode, press the PIP (picture-in-picture) button on the Dual Capture screen. Press OSD (on screen display) PIP to toggle between turning on or off the PIP on the monitor. - Page 33 PIP is disabled. Synchronize Capture Mode To capture images and video in synchronize mode, press the Synchronize button on the Dual Capture screen. Press the Capture button to capture images on both channels simultaneously. Press the Record button to record video on both channels simultaneously.
- Page 34 Individual Capture Mode To capture images and video in the individual mode, press the Individual button on the Dual Capture screen. Press Capture to capture images on channel 1. Press Record to record video on channel 1. Press Stop to stop recording on channel 1. Press Mute to mute the microphone.
-
Page 35: Editing Video Settings
Editing Video Settings Editing Channel 1 Video Settings To edit channel 1 video settings, press the Video Settings button on the Capture screen. Press Image Count to adjust the font size for the image- count display on the single channel capture screen. Select None for no display, Small for small font, and Large for large font. - Page 36 Editing Channel 2 Video Settings To edit channel 2 video settings, press the Video Settings button on the Capture screen and then press the Channel 2 Video Settings button. Select the Record Format from the drop-down menu. This will be enabled only if the DVD write format is DVD Data and channel 1 recording format is MPEG 2 HD.
- Page 37 Editing Advanced Video Settings To edit advanced video settings, press the Video Settings button on the Capture screen and then press the More Settings button. Press Flip Screen to choose the image orientation on the OSD. Press Auto Cut Off to toggle between CD (600MB), DVD (4GB), None (20GB), 15 sec, 30 sec, 1 min, 2 min, 5 min, 30 min.
- Page 38 Editing Print Settings To edit print settings, press the Print Settings button on the Album screen. Press the minus or plus sign to indicate the number of copies to print. Press the minus or plus sign to indicate the number of images to print per page.
- Page 39 Editing Advanced Print Settings To edit advance print settings, press the Print Settings button on the Capture screen and then press the More Settings button. Press the corresponding minus or plus buttons to edit the brightness, contrast, phase, chroma, or sharpness of channel 1 or channel 2 images. Press Print to print the selected images.
-
Page 40: Viewing And Annotating Images
Viewing and Annotating Images To view images, press the Album button on the Capture screen and then press the Image album button. Press the arrow buttons to scroll through the images. Press the Live Video button to return to live video on the OSD. Press Image Album to display the editing screen for the album. -
Page 41: Viewing And Playing Videos
Viewing and Playing Videos To view and play videos, press the Album button then press the Video Album button. Press the arrow buttons to scroll through the images. Press the Select/Deselect All button to select or deselect images for printing and saving. Press the seek bar button to move to a specific time segment in the video during playback. - Page 42 This shows the playback getting started. This shows the playback in progress.
- Page 43 This shows the playback is paused.
-
Page 44: Viewing And Editing The Video Album
Viewing and Editing the Video Album To view and edit the album, press the Annotation button on the video album screen. Press the Annotations button to bring up the editing annotations screen. Press Playback Video to display the playback mode screen. -
Page 45: Editing Annotations
Editing Annotations To edit annotations, press the Image Album button on the Capture screen and then press the Annotation Video button. Select the specialty from the drop-down menu. To add or delete an item on the list, press add or delete. Select the procedure from the drop-down menu. -
Page 46: Saving Information
Saving Information To save information, press the New or Current Case buttons on the Home screen. Press CD/DVD to save the selected case to a CD or DVD. Press Eject to eject the CD or DVD. Press USB to save images or video to the USB. Press Save to Network to save images or video on the PACS or FTP network. -
Page 47: Saving Settings
Saving Settings Press Image Format to toggle between BMP, JPEG, JPEG2000, TGA, TIFF, and PNG. Press Encryption to toggle between On and Off. Save PDF files to archive media (CD/DVD, USB drives, Studio3 and FTP). When this option is on, any PDF files created for the case will be saved (along with images, videos, case details) to the external media or network. - Page 48 More Save Settings To adjust more save settings, press the More Settings button on the Save screen. Press the corresponding minus or plus buttons to edit the brightness, contrast, phase, chroma, or sharpness of channel 1 or channel 2 images. Press the Default Settings to reset the image options to the factory default settings.
- Page 49 System Advanced Settings Video and Microphone Press +/- button to set desired speaker volume. Press +/- button to set desired microphone volume. Switch between SPI Monitor and SDC screens. Toggle between NTSC and PAL video types. Toggle between DVD Video and DVD Data. Toggle to select live video preview in single channel mode.
- Page 50 Video Setting Channels Chroma Brightness Phase Contrast Factory defaults Flip Screen Display Setting Selection to indicate whether or not a case PDF file is automatically created upon entry into the Save screen. Move on-screen display left or right. Move on-screen display up or down. Factory defaults.
- Page 51 Printer Settings Press to restore factory defaults. Upload logo. File name needs to be ‘logo.bmp’ . Network Settings FTP Login ID. FTP IP Address...
- Page 52 Press the Ping button to test for a successful connection to the FTP site. Press the Save button to save the entered settings. Press the Save button to save the entered settings.
- Page 53 User Management (Add/Remove Users) Enable security for the system. DICOM Settings DICOM connection name.
- Page 54 DICOM Connection Name. Wildcard can be blank or ‘*’ . Save. PACS Settings Back to DICOM settings. Save settings. Check connection.
- Page 55 SCU Setting Service Class User (SCU) Settings. Shows all mandatory fields as defined by the PACS server.
- Page 56 Turn Storage Commit ON or OFF. Turn ON or OFF support for DICOM video. Use Instance ID from Service Class Provider (SCP) of Service Class User (SCU). Can be C-Move or C-Get based on PACS equipment.
- Page 57 Studio3 Media Server Settings Check connection. Save settings. Allows user to remove cases from Studio3 Transfer Queue. Maximum number of system attempts to save a case to a connected Studio3 Media Server. Maximum number of pending cases allowed in the Studio3 Transfer Queue.
- Page 58 The Required Field Settings screen allows you to select the required fields before saving a case to a Studio3 Media Server. System Date and Time Settings This screens provides the ability to change the day, month, and year.
- Page 59 Version-Log Setting Export Annotations. Import Annotations. Copy log file to USB drive. Format USB drive to NTFS format. Caution: All data on USB drive will be lost. Save log file to SMS site. Language Selection ...
- Page 60 This screens provides the ability to change the language of the system. SMS Setting 1. Software Upgrade using SMS.
-
Page 61: Troubleshooting
Delete older entries in the list. SIDNE® Comm Error Ensure that SIDNE is connected properly. Reboot the SDC Ultra™ and SIDNE. Error printing. No image captured/ Capture images and then select them selected to print. - Page 62 Error: locating logo.bmp Ensure that the USB cable is connected properly. Ensure that the logo file is present on the USB drive and it is called “logo.bmp. ” Error: upgrading software Insert the upgrade dongle in the save screen. Application has encountered a critical Please reboot the system.
- Page 63 Print errors • Ensure there aren’t any paper jams. • Ensure the printer has enough ink.. • Ensure the printer door is closed. • Ensure the printer has paper. • Ensure the printer is powered on. • Ensure the printer cable is connected.. Error saving more than 4GB files to Ensure that the USB is formatted as the USB NTFS. FAT 32 will not support any file size bigger than 4GB. Error reading archived cases from Reboot the system if you have just DVD/CD...
-
Page 64: Cleaning And Maintenance
Take extra care when cleaning the front LCD screen. Excess liquid or drips that enter the bottom of the screen may result in product damage. Maintenance SDC Ultra™ requires no preventative or periodic maintenance. However, Stryker recommends you reboot the system daily for best performance. -
Page 65: Technical Specifications
Technical Specifications Environmental Specifications Operating temperature: 10 – 40°C Operating humidity: 30 – 75% RH Shipping temperature: -20° – 60°C Shipping humidity: 10 – 85% RH System Type MPEG -1, -2, or -2 HD compression engine Video Inputs Input Resolution (1) S-Video (NTSC) 720 ×... -
Page 66: Remote Control
Image Resolution Depending on input signal: NTSC: 720 × 480 PAL: 768 × 576 XGA: 1024 × 768 SXGA: 1280 × 1024 High Definition 720: 1280 × 720 High Definition 1080: 1920 × 1080 Video Resolution Depending on input signal: MPEG1: 352 ×... -
Page 67: Equipment Classification
Power Consumption 115-230VAC ~ 50/60Hz, 4A/2A maximum Equipment Classification Class I equipment No applied part Water ingress protection, IPX0 Continuous Operation Size (control unit) 12.5" W × 16.2" D × 7.0" H Network 10/100 Mbps ethernet Auto Printing 1, 2, 4L, 4S, 6, 8, 12, or 18 images per page for portrait orientation 1, 2, 4L, 4S, 6, 9, 12, or 16 images per page for landscape orientation... - Page 68 (EMC), SDC Ultra™ must be installed and operated according to the EMC information provided in this manual. The SDC Ultra™ has been designed and tested to comply with IEC 60601-1 requirements for EMC with other devices. Caution Portable and mobile RF communications equipment may affect the normal function of the SDC Ultra™.
- Page 69 Guidance and Manufacturer’s Declaration: Electromagnetic Emissions SDC Ultra™ is intended for use in the electromagnetic environment specified below. The customer or the user of SDC Ultra™ should ensure that it is used in such an environment. Emissions test Compliance Electromagnetic Environment - guidance SDC Ultra™...
- Page 70 RF transmitters, an electromagnetic site survey should be considered. If the measured field strength in the location in which the SDC Ultra™ system is used exceeds the applicable RF compliance level above, the SDC Ultra™ system should be observed to verify normal operation. If abnormal performance is observed, additional measures may be necessary, such as reorienting or relocating the SDC Ultra™...
- Page 71 Guidance and Manufacturer’s Declaration: Electromagnetic Immunity SDC Ultra™ is intended for use in the electromagnetic environment specified below. The customer or the user of SDC Ultra™ should ensure that it is used in such an environment. IEC 60601 Electromagnetic Immunity Test...
- Page 72 RF transmitters, an electromagnetic site survey should be considered. If the measured field strength in the location in which the SDC Ultra™ system is used exceeds the applicable RF compli- ance level above, the SDC Ultra™ system should be observed to verify normal operation. If abnormal performance is observed, additional measures may be necessary, such as reorienting or relocating the SDC Ultra™...
- Page 74 Stryker Endoscopy 5900 Optical Court San Jose, CA 95138 USA 1.800.624.4422 U.S. Patents: www.stryker.com/patents 2016/02...
Need help?
Do you have a question about the SDC Ultra and is the answer not in the manual?
Questions and answers