
Related Manuals for Stryker SDC3


Summary of Contents for Stryker SDC3
- Page 1 SDC3 HD Information Management System PowerShare Package SDC 3 HD INFORMA TION MANAGEMENT SYSTEM...
-
Page 3: Table Of Contents
Table of Contents Warnings and Cautions ....................1 About Your Product ....................2 SDC3 HD Information Management System ������������������������������������������������������������2 SDC3 Product Description ����������������������������������������������������������������������������������������2 SDC3 Intended Use �����������������������������������������������������������������������������������������������������2 SDC3 Indications ���������������������������������������������������������������������������������������������������������2 SDC3 Contraindications ��������������������������������������������������������������������������������������������3 PowerShare Integration Package (optional) �������������������������������������������������������������3 PowerShare Package Product Description �����������������������������������������������������������3 PowerShare Package Intended Use and Indications ������������������������������������������3... - Page 4 Printer Settings: Advanced ������������������������������������������������������������������������������������������� 33 Saving Images and Videos ..................34 Selecting the Save Location ����������������������������������������������������������������������������������������� 35 Connecting the iPad® to the SDC3 ����������������������������������������������������������������������� 35 To save to disc (CD or DVD) ����������������������������������������������������������������������������������� 36 To save to a USB drive or iPad ������������������������������������������������������������������������������� 36 To save to a Network location ������������������������������������������������������������������������������...
- Page 5 General Audio Settings ������������������������������������������������������������������������������������������� 54 Printer Settings ����������������������������������������������������������������������������������������������������������������� 55 Network Settings�������������������������������������������������������������������������������������������������������������� 56 Network FTP Settings ���������������������������������������������������������������������������������������������� 56 SDC3 Networking Setup ����������������������������������������������������������������������������������������� 56 Network Adapter Settings ������������������������������������������������������������������������������������� 58 WiFi Network Connection �������������������������������������������������������������������������������������� 59 Authentication ��������������������������������������������������������������������������������������������������������� 60 Wireless IP Settings �������������������������������������������������������������������������������������������������� 61 Manage Networks ���������������������������������������������������������������������������������������������������...
- Page 6 Symbols ........................88 Technical Specifications ..................89...
-
Page 7: Warnings And Cautions
11� Make sure that all equipment connected to the SDC3 is properly grounded (and isolated, if required)� 12� To avoid risk of fire, do not use this device in the presence of flammable anesthetics�... -
Page 8: About Your Product
USB storage devices, which can then be viewed from a personal computer, a DVD player, or from the SDC3 itself� The SDC3 records images and videos on a built-in hard drive, where they can be easily accessed after the surgical procedure� The media stored on the hard drive can be tagged with patient-specific information and burned to digital media using a touchscreen control panel located on the front of the unit�... -
Page 9: Sdc3 Contraindications
Enterprise (0240060557) PowerShare Package Intended Use and Indications The SDC3 Powershare package is intended to be used as an optional software accessory package to the SDC3 HD Information Management System (SDC3)� The SDC3 PowerShare package allows surgeons/medical personnel to save case images from SDC3 to the facility’s PowerShare Network�... -
Page 10: Recommended Security Practices
Recommended Security Practices The following security practices protect patient health information (PHI) archived on the device from data security threats� Stryker strongly recommends that all customers enable the following security practices� Access Control Enable account access controls through the “Active Directory Authentication”... - Page 11 Data Security During When returning the device to Stryker for repair, remove all PHI, Repair per Stryker policy� See contract for terms of agreement� Contact a Stryker sales representative to request a Stryker factory restore� If transferring the device with archived PHI, anonymize the data before transit�...
-
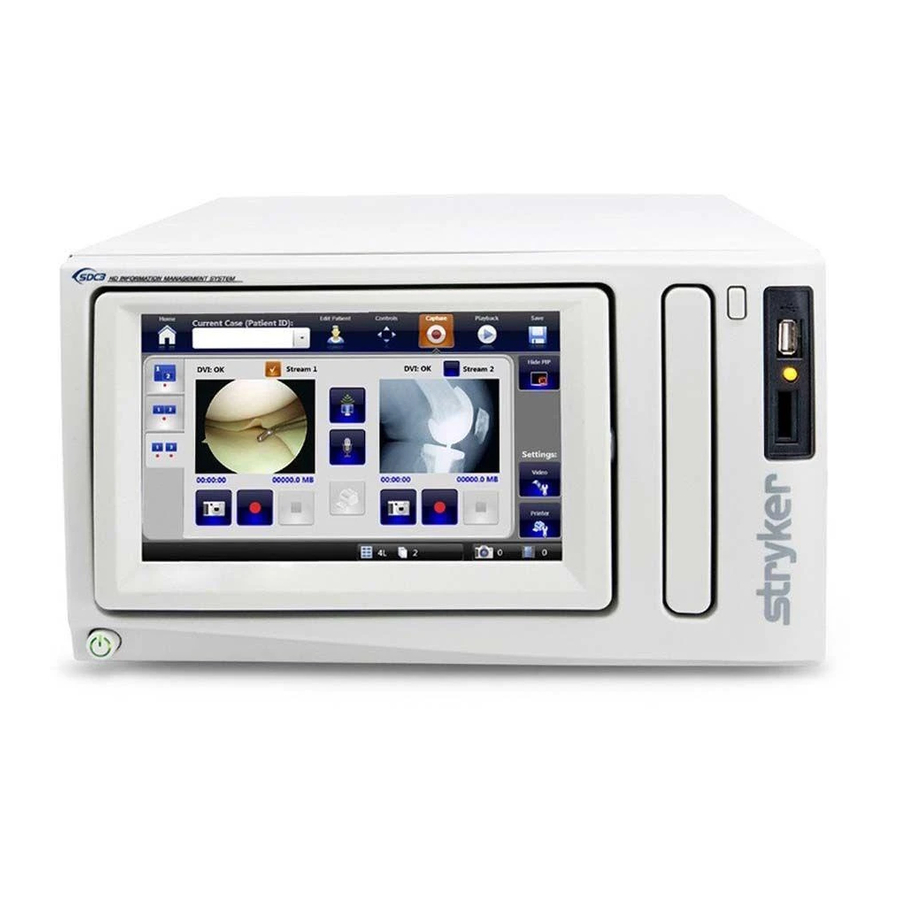
Page 12: System Overview
Token LED (for use with WiSe Receiver) 5� Token Slot (for use with WiSe Receiver) 6� Power Button 7� LCD Touchscreen Note: SDC3 files are not readable on the SDC UItra. but SDC Ultra files can be read on SDC3. -
Page 13: Rear Panel
S-Video IN1 – S-Video Input 1 23� RJ45 Port – Network Port 9� S-Video IN2 – S-Video Input 2 24� Devices – Stryker Devices Port 10� S-Video Out – S-Video Output 25� Line-In – Audio Input 11� Secondary R1 – Remote connection for 26�... -
Page 14: Setup
Place the SDC3 on a Stryker cart or other sturdy platform� • Provide a minimum of 4 to 6 inches of space around the sides and top of the SDC3� This allows for sufficient ventilation and access to the power cord�... - Page 15 SDC3� • From the Current Case > Controls screen, go to the Transmitter tab� • Press the Link button to link the SYNK transmitter and the SDC3� All controls for the transmitter are now available through the SDC3 touchscreen�...
-
Page 16: Basic Setup
Warning In the event of power loss, all DVI output signals routed from the SDC3 to the surgical display will be lost� Analog signals (RGBHV, S-Video, Composite) will not be affected by power loss, and can therefore be used as backup video signals if they have been connected prior to power loss�... -
Page 17: Getting Started
After successful log in, the system shows the Home screen� The Home Screen After the SDC3 starts up, the Home Screen displays� The Home Screen has links to the primary functions of the SDC3� From the Home Screen, you can: •... -
Page 18: Selecting A Surgeon Profile
Press the LOG OFF 6� button to change operators (if Access Control is enabled)� Press the CHANGE PROFILE 7� button to choose a different profile� The Profile screen shows the available profiles� Selecting a Surgeon Profile From the Profiles screen, you can change the current surgeon profile and search profiles� 1�... -
Page 19: Creating Patient Cases
Note: If a patient case has already been started and you have not saved any information to the case, the SDC3 asks if you want to discard that case (the “current case”) before creating a new case. If you do not want to discard the current case, you can access it through the CURRENT CASE button from the Home screen. -
Page 20: Loading Patient Information
The patient information entered and saved in the Load Patient Info screen becomes available as a Current Case in the dropdown menu on the Capture screen� To load patient information into the SDC3: On the Home Screen, press the LOAD PATIENT INFO 1�... -
Page 21: Importing Icd10 Codes
Press the IMPORT button� The updated codes load� 3� Loading Patient Data with a Barcode Reader You can use any USB Barcode Scanner to load patient data onto the SDC3� From the Load Patient Info screen: 1� Connect the barcode scanner’s USB adapter to one of the SDC3 USB ports�... -
Page 22: Viewing The Patient List
Viewing the Patient List The Patient List screen shows patient cases that have already been loaded into the system� 1� To select a case for editing or deletion, touch the corresponding row� To view or edit the selected case, press the OK 2�... -
Page 23: Surgical Timeout Checklist Screens
Surgical Timeout Checklist Screens To set up or activate the surgical timeout checklist, go to Settings > General > Misc� To launch the Surgical Timeout Checklist, go to either Current Case or New Case, then go to the Edit Patient tab� Surgical Timeout Checklist Start Screen Note: Before the Surgical Timeout Checklist launches, you are asked to confirm the current date and time. -
Page 24: Surgical Timeout Checklist Verification Screen
Surgical Timeout Checklist Verification Screen When the Surgical Timeout Checklist begins, the SDC3 will present a series of questions about the patient and the procedure that can be answered as yes, no, or not applicable� 1� The Surgical Timeout Checklist Verification Screen shows the patient name, the patient ID, the facility name, and the station name on the screen�... -
Page 25: Surgical Timeout Checklist Summary Screen
The live image can be recorded as video or captured as a still image� Note: At least one video source (channel) must be connected to the SDC3 to enable video recording and image capture. -
Page 26: To Stream Live Video
9� indicator shows how many copies of each page will print� Additional Functions 10� If a microphone is connected to the SDC3, press the MICROPHONE button while recording to switch between muted and unmuted audio input� 11� The SINGLE CHANNEL/PIP tab accesses the Single Channel capture screen�... -
Page 27: Recording Picture-In-Picture Images And Video
Recording Picture-in-Picture Images and Video When 2 video sources are connected to the SDC3, the system can show Picture-in-Picture (PIP) video� In PIP mode, video from Channel 2 appears in the lower corner of the Channel 1 screen� The SDC3 records images and videos from both sources as one file�... -
Page 28: Synchronized Video Recording Of Dual Channels
Synchronized Video Recording of Dual Channels When 2 video sources are connected to the SDC3, the system can record synchronized video from both video sources� In Synchronized Capture mode, images and video are captured simultaneously from both channels, but saved as separate files�... -
Page 29: Independent Video Recording Of Dual Channels
Independent Video Recording of Dual Channels When 2 video sources are connected to the SDC3, the system can record independent video from both video sources� In Dual Capture mode, images or video can be captured from Channel 1 and Channel 2 independently of each other and saved as separate files�... -
Page 30: The Flip Screen
The Flip Screen When images are captured, the SDC3 shows the most recent captured images in a “flip” screen� The images appear on the SDC3 screen and the surgical display for several seconds before the SDC3 “flips” back to the capture screen�... -
Page 31: Applying Device Presets
Device Presets from the Capture screen� Press the green APPLY DEVICE PRESETS button to apply the presets� 1� The DEVICE PRESETS button is greyed out while the SDC3 applies the presets� 2� 3� The SDC3 shows a status message: “Applying user device presets� Please wait��� ”... - Page 32 6� The SDC3 shows a screen explaining the error� Once you acknowledge the error, the alert icon is cleared� Possible error messages: Status Solution Device Not Connected Make sure the device is connected to the SDC3 and that the device is turned on� Press the RETRY button�...
-
Page 33: Device Presets Settings
Device Presets Settings Access the Device Presets settings for the current surgeon from the DEVICE PRESETS screen� Only the saved presets for the current Specialty or Procedure are displayed from this screen� To set up Device Presets, go to Settings > Profiles, and press the SPECIALTY/PROCEDURE button� Refer to the Profiles Settings section of this manual for more detailed instructions�... -
Page 34: Video Settings
Recording mode and disc format settings for Channel 1 are shown here� Choose these settings in the General Settings screen, accessible from the Home Screen� 5� The drop-down menu shows available selections for video sources, based on what is connected to the SDC3�... -
Page 35: Video Settings: Channel 2
The drop-down menus show selections for Recording Format, Record Resolution, and Record Bitrate� Press the EXIT 3� button to close the settings screen and return to the Capture screen� 4� The drop-down menu shows available selections for video sources, based on what is connected to the SDC3�... -
Page 36: Video Settings: Picture-In-Picture
Video Settings: Picture-in-Picture Picture-in-Picture settings are accessible from the VIDEO SETTINGS tab� 1� Press the PIP tab to go to the “Video Settings: Picture in Picture (PIP)” screen� 2� Choose the Picture by Picture (PBP) checkbox to view video inputs adjacent to each other in the main preview screen�... -
Page 37: Video Settings: Picture-By-Picture
Video Settings: Picture-By-Picture 1� When the Picture by Picture checkbox is selected, video inputs appear next to each other in the main preview screen� The PIP Size, and Select PIP Location options are disabled� Video Settings: On-Screen Display On-Screen Display settings are accessible from the VIDEO SETTINGS tab�... -
Page 38: Printer Settings
Printer Settings From the Capture screen, you can adjust the printer settings according to your preference� Printer Settings: Page Layout Page Layout settings are accessible from the PRINTER SETTINGS tab� 1� Select the PAGE LAYOUT tab to show the “Printer Settings: Page Layout” screen� 2�... -
Page 39: Printer Settings: Advanced
Printer Settings: Advanced Advanced printer settings are accessible from the PRINTER SETTINGS tab� 1� Select the ADVANCED SETTINGS tab to go to the “Printer Settings: Advanced” screen� Use the +⁄− buttons or the sliders to adjust the following settings for Channel 1 and 2�... -
Page 40: Saving Images And Videos
1� button at the top of the SDC3 display� 2� All images and video are saved automatically to the SDC3 built-in hard disk� 3� To save them to external media or server, choose the appropriate destination from the Save screen�... -
Page 41: Selecting The Save Location
1� Set the SDC3 power to on� 2� Make sure that the iPad power is on and the iPad is unlocked, and that the My SDC3 or Studio3+ app is installed� 3� Connect the iPad to the USB port on the front of the SDC3 with a standard Apple Dock to USB cable�... -
Page 42: To Save To Disc (Cd Or Dvd)
To save to disc (CD or DVD) 1� The Save to Disc column shows the space required to save a selected image or video, the space available on the CD or DVD, and the time elapsed in the save process� 2�... -
Page 43: To Save To A Network Location
To save to a Network location Note: Video does not save to a Network location unless “Network” is checked on the Save Settings screen � See the “Save Settings” section of this manual for details� 9� The Send via Network drop-down menu provides names of available network addresses� Note: In the Save Settings screen , “FTP”... -
Page 44: Saving To An Emr Server
Note: Make sure that you enter the first name and last name of the patient, and the Patient ID before you save the case images. 1� Go to Current Case > Save� 2� Press the PowerShare button� The SDC3 sends the case data to PowerShare�... -
Page 45: Save Settings
Save Settings Save settings are accessible though the SETTINGS tab on the Save screen� 1� Select the SETTINGS tab to open the “Save: Settings” screen� Press the IMAGE FORMAT button to set the format in which to save pictures� The available 2�... -
Page 46: Advanced Save Settings
Advanced Save Settings Advanced save settings are accessible though the SETTINGS tab on the Save screen� 1� Select the ADVANCED SETTINGS tab to go to the “Save: Advanced Setting” screen� 2� Use the +⁄− buttons or the sliders to adjust brightness, contrast, phase, chroma and sharpness for images captured on Channel 1 and Channel 2�... -
Page 47: Playback Of Images And Videos
Captured images and videos can be viewed, played back, annotated, and printed using the Playback screens� To go to the Playback screens, press the PLAYBACK 1� tab at the top of the SDC3 display� View image playback from the IMAGES 2� tab�... -
Page 48: Playback Of Recorded Images
Playback of Recorded Images Within the Playback screen, the IMAGES tab on the right side of the screen allows review, annotation, and printing of previously captured images� To browse images: 1� Press the arrows on either side of the center preview screen to scroll through captured images one at a time�... -
Page 49: Adding Image Annotations
To print images: Press the PUSH TO PDF 8� button to make a PDF of the selected images� An information message box shows while the PDF is processing� 9� Press the PRINT button to print the selected images� If no printer is connected, a warning message shows in the status bar at the bottom of the screen�... -
Page 50: Playback Of Recorded Videos
Playback of Recorded Videos Within the Playback screen, the VIDEOS tab on the right side of the screen allows review and annotation of previously captured videos� To browse videos: Press the PRIMARY button to choose Primary or Secondary and browse videos recorded on 1�... -
Page 51: Viewing Archived Information
Viewing Archived Information Patient cases are automatically saved to the SDC3 hard disk, and can be archived for future reference or access� Archived cases are accessible through the ARCHIVE 1� button on the Home screen� 2� Within the Archive screen, cases can be accessed from or moved to external media such as USB, Discs, Network locations, and the PowerShare cloud server (with optional PowerShare package installed)�... -
Page 52: Viewing Information Archived On The Hard Disk
Viewing Information Archived on the Hard Disk All patient cases archived on the hard disk appear in a list on the Archive screen� To browse patient cases: Press the HARD DISK tab to see all cases saved to the SDC3 hard disk� 1� 2�... -
Page 53: Viewing Information Archived On A Usb Drive
Viewing Information Archived on a USB Drive 1� Press the USB tab to see patient cases stored on a USB drive connected to the SDC3� Patient cases show in read-only mode and the SAVE button is disabled� Press anywhere on a patient case to select it� Press the OK 2�... -
Page 54: Viewing Information Archived On The Studio3 Media Server
Viewing Information Archived on the Studio3 Media Server Press the STUDIO3 1� tab to see patient cases stored on the Studio3 server� 2� The Archive Patient List shows the number of images, videos or PDFs saved with a particular case on the Studio3 server� The SAVE and PLAYBACK buttons are disabled in the STUDIO3 tab�... -
Page 55: Sdc3 Settings
SDC3 Settings Change system settings for the SDC3 from the SETTINGS button at the top left of the Home screen� From the Settings screens, you can adjust system settings including: General, Printer, Network, Profiles, Server, and System� General Settings General system settings are available from the GENERAL tab in the Settings menu�... - Page 56 15� The GUI MONITOR button allows the touchscreen interface to appear on an external touchscreen monitor (the monitor must be connected via VGA and Serial connection to the SDC3 console)� Select Internal for the interface to appear on the SDC3 screen, or External for the interface to appear on the external monitor�...
-
Page 57: General Miscellaneous Settings
The SURGICAL TIMEOUT CHECKLIST buttons enable or disable the surgical timeout 3� checklist� The SETUP button launches the Surgical Timeout Checklist Setup screen� The ACCESS CONTROL buttons enable or disable access control for SDC3 operators� The 4� SETUP button launches the Access Control Setup screen�... -
Page 58: Setting Up Access Control
Setting Up Access Control From the Access Control Setup Screen, you can turn on Active Directory Authentication, set passwords, or both, for logging in to the SDC3� Active Directory Setup 1� Enter the Domain Server name, and the username and password to access the active directory�... -
Page 59: Setting Up The Surgical Timeout Checklist
Setting Up the Surgical Timeout Checklist The Surgical Timeout Checklist Setup screen shows when the SETUP button is selected in the General Miscellaneous Settings screen� Press the FACTORY DEFAULT button to restore the factory default checklist� 1� 2� Press the IMPORT and EXPORT buttons to import a checklist from a USB storage device or export a checklist to a USB storage device�... -
Page 60: General Audio Settings
General Audio Settings 1� Press the AUDIO tab to see the General Audio settings screen� The +⁄− buttons adjust volumes for the Headset, Speaker, and Microphone� 2� The MUTE 3� buttons mute the Headset, Speaker, or Microphone� 4� Press the OSD AUDIO METER button to show the strength of the audio input on the surgical display�... -
Page 61: Printer Settings
7� The paper type is shown in the Paper Type display window� Paper type is set to “Letter” by default� If the SDP1000 printer is connected to the SDC3, the PAPER TYPE button changes between “Letter” and “A4� ”... -
Page 62: Network Settings
A secure FTP (FTP over SSH) server may be installed and configured, if needed� SDC3 does not support FTP over SSL� Instructions Enter the IP address of the FTP server (and not the SDC3) into the SDC3 tab in the “Config” 1� menu�... - Page 63 Anonymous Login checkbox� The SDC3 checks the server for a response� If it gets a valid response, it performs an anonymous FTP login� It then changes directory to the directory corresponding to the current Username (JOHND, in current example)�...
-
Page 64: Network Adapter Settings
Network Adapter Settings Select the ADAPTER 1� tab to show the Network Adapter Settings screen� 2� There are two options: IPV4 or IPV6� Toggle this button to set the correct network type� 3� Select the Network Adapter from the dropdown menu� 4�... -
Page 65: Wifi Network Connection
WiFi Network Connection The WiFi Network Connection screen shows a list of available wireless networks, their signal strengths, and security status� Select a network from this screen to open an authentication screen and log in to that network� Press the WIFI tab to show the WiFi Network Connection screen� 1�... -
Page 66: Authentication
Authentication Depending on the type of wireless network selected, the SDC3 asks for a username and password, or for a WiFi password� Username and Password 1� Enter the Username and Password in the corresponding fields� Press the JOIN button to allow users to join the network�... -
Page 67: Wireless Ip Settings
Wireless IP Settings 1� The WiFi Setting screens show the IP settings of the connected WiFi network � Press the EXIT 2� button to return to the WiFi Network Connection screen� Manage Networks From the Manage Networks screen, you can view the security type and profile name of each network, and move the networks up or down in order of preference�... -
Page 68: Network Streaming Settings
Network Streaming Settings The Network Streaming Settings lets you set up a destination for streaming video from the SDC3� Start and stop video streaming from the Capture screen� Press the STREAM 1� tab to see the Video Streaming Settings screen�... -
Page 69: Network Share Settings
Enter the network path, username and password for the network� Press the SAVE 3� button to save the shared network� The SDC3 tries to connect to the network� The status message at the bottom of the screen indicates if the connection is successful�... -
Page 70: Profiles Settings
Press the IMPORT ALL USERS button to import all surgeon profiles stored on a USB drive� 5� 6� Press the EXPORT ALL USERS button to export all surgeon profiles to a USB drive� The FAVORITES button is for use by Stryker Representatives only� 7�... -
Page 71: Creating A New Surgeon Account
Creating a New Surgeon Account New surgeon accounts can be created by an Administrator only� 1� Enter the new surgeon name� ” Press the CREATE ACCOUNT button to save the new account� The status bar confirms that a 2� new account has been entered successfully� Press the EXIT 3�... -
Page 72: Modifying A Selected Profile
DISABLE OPNOTE and PROMOTE TO CLOUD are for Stryker Representatives only� 3� Press UPDATE SURGEON NAME to change the stored name� 4� Press SYNC PROFILE to save changes made to the profile on the SDC3 to the cloud� 5� Press the EXIT 6�... - Page 73 Changing a Surgeon Annotation List From the Select Annotation screen, you can select previously saved image and video annotations for a surgeon account� Select the SPECIALTY/PROCEDURE button in the Account Modification screen to go to the 1� Select Annotation screen� 2�...
- Page 74 The Specialties/Procedures list shows the specialties and procedures saved in the surgeon profile� You can apply presets to multiple specialties and procedures� 2� The Connected Devices list shows the devices connected to the SDC3� To select all devices and their settings, press SELECT ALL. To deselect all devices and their 3�...
- Page 75 Editing Device Presets From the Editing Device Presets screen, you can edit device settings that are saved in the surgeon’s profile� 1� From the Specialties/Procedures list, select the procedure and the device you want to edit� Press REMOVE PRESET to delete the saved settings� 2�...
- Page 76 Setting Up Custom Compliments The SDC3 gives the doctor a compliment when prompted� Select compliments from a pre- defined list, or enter a custom compliment� Compliments are stored in each surgeon profile� Press the CHANGE CUSTOM COMPLIMENTS button in the Account Modification screen to 1�...
-
Page 77: System Settings
System Settings Within the SYSTEM SETTINGS tab, you can adjust the system date and time, view the system log, select the system language, and set data protection� Date and Time Settings Select the DATE & TIME 1� tab from the System screen to go to the Set Date & Time Screen� 2�... -
Page 78: System Log Settings
System screen to open the Log screen� 2� The Log screen lists each SDC3 component, along with its version, active status and type� 3� The scroll bar moves to show components not included in the initial view�... -
Page 79: System Language Settings
System Language Settings Change the System Language on the SYSTEM LANGUAGE SETTING screen� Select the LANGUAGE 1� tab in the System screen to open the “Language Setting” screen� 2� Press any button to select the corresponding language� The system reboots before the language change takes effect�... -
Page 80: System Data Protection Settings
System Data Protection Settings The SDC3 Data Protection Settings screen lets you anonymize the patient data stored on the system� Always anonymize data before returning the unit to Stryker for repair� Turning on Data Protection 1� Make sure you are using the default Surgeon Profile, and are logged in as an Administrator if Access Control is on�... -
Page 81: Server Settings
Select the Allow Deletion of Pending Cases checkbox to allow deletion of pending cases from the Studio3 archive list� 6� Set the amount of times the SDC3 attempts to transfer data to the Studio3 server in the Maximum Transfer Attempts field� The default value is five attempts� 7�... -
Page 82: Selecting Fields For Cases Saved On The Studio3 Server
Studio3 Networking Setup Setup Requirements • A TCP/IP network� • A Stryker Studio3 Media Server installed and configured� Instructions Enter the IP address of the Studio3 Media Server into the STUDIO3 tab in the Studio3 Server 1� Settings screen� 2�... -
Page 83: Dicom Server Settings
DICOM Server Settings To configure DICOM server settings, go to Current Case > Server, and confirm that the DICOM menu is active� From the DICOM menu, you can: 1� Toggle the IPV4/IPV6 button to select the connection type� 2� Select a connection name, or create a new connection� 3�... -
Page 84: Stryker Link Server Settings
From the CLOUD INTEGRATION SETTINGS screen, you can: • Link the SDC3 to your customer account in the cloud, and download information from the cloud to your local machine (for Stryker Representatives only)� • Link the facility’s PowerShare account to the SDC3 and save case images to the PowerShare Network�... -
Page 85: Save Settings For Powershare
2� 3� Enter your PowerShare User ID and Password� 4� To test the connection, press VALIDATE� If the connection is successful, the SDC3 shows the message, “Authentication successful� ” To save the connection, press SAVE� 5� Save Settings for PowerShare To enable saving case information to PowerShare: 1�... - Page 86 Press the SETTINGS button� 2� 3� Select PowerShare to make PowerShare a Save option� Press EXIT to close the Save Settings screen� 4�...
-
Page 87: Emr Integration Settings
EMR Integration Settings From the EMR Integration screen, you can link the SDC3 to an EMR system� The SDC3 links to four EMR systems: AGFA, Allscripts, CERNER, and EPIC� This functionality is only available with the optional EMR Integration Package�... -
Page 88: Troubleshooting
Make sure that the FTP server is up and the network cable is plugged in� Error: Media unavailable Please insert/connect a valid media to the SDC3� USB space insufficient Make sure that there is free space available on the media�... - Page 89 Device status overlays do not Make sure proper connections have been made between appear on the surgical display devices and device ports on the SDC3� Make sure the device is selected/added in the “Video Settings: On-Screen Display” menu� Touchscreen controls are not Go to Settings >...
-
Page 90: Electromagnetic Compatibility
Caution: If the SDC3 is used adjacent to or stacked with other equipment, observe and verify normal operation of the SDC3 in the configuration in which it will be used prior to using it in a surgical procedure� Consult the tables below for guidance in placing the SDC3 Guidance and Manufacturer’s Declaration: Electromagnetic Immunity... - Page 91 Guidance and Manufacturer’s Declaration: Electromagnetic Emissions SDC3 is intended for use in the electromagnetic environment specified below� The customer or the user of SDC3 should ensure that it is used in such an environment� Emissions test Compliance Electromagnetic Environment - guidance SDC3 uses RF energy only for its internal function;...
- Page 92 Guidance and Manufacturer’s Declaration: Electromagnetic Immunity SDC3 is intended for use in the electromagnetic environment specified below� The customer or the user of SDC3 should ensure that it is used in such an environment� Immunity Test IEC 60601 test Compliance Level...
-
Page 93: Cleaning And Maintenance
Cleaning and Maintenance Warning • To avoid electric shock and potentially fatal injury, unplug the SDC3 from the electrical outlet before cleaning� Caution • Do not spray cleaning liquid directly onto the unit as product damage may result� Spray cleaning liquid on the cloth before wiping the unit�... - Page 94 Relative humidity range Serial Number Product number Equipotentiality Protective Earth Ground Authorized representative Made in France in Europe Stryker Firewire Radiation Emitting Compliance to Electrical Complies with Australian regulatory Safety Standards requirements PPAA Warning/Caution: See Federal law restricts this device to Instructions for Use sale by or on the order of a physician�...
- Page 95 Technical Specifications Equipment Information Size • Control Unit: 12�5” W × 16�5” D × 7�25” H Total Weight: 22�5 lbs (10�2 kg) • Display: 8” TFT LCD, with digital touchscreen • Power Consumption 100-240VAC ~ 50/60Hz, 4A/2A maximum Recommended WPA2-Enterprise (PEAP-MSCHAP v2 authentication) with AES Security - encryption Authentication and...
- Page 96 Resolution NTSC: 640 × 480 • PAL: 768 × 576 • XGA: 1024 × 768 • SXGA: 1280 × 1024 • • High Definition 720: 1280 × 720 • High Definition 1080: 1920 × 1080 Formats Bitmap (BMP), Joint Photographic Experts Group (JPG, JPEG), JPEG2000, Tagged Image File Format (TIFF), Truevision Targa (TGA) and Portable Network Graphics (PNG) Audio...
- Page 100 5900 Optical Court San Jose, CA 95138 USA 1-408-754-2000, 1-800-624-4422 www.stryker.com Stryker Corporation or its divisions or other corporate affiliated entities own, use or have applied for the following trademarks or service marks: the Stryker logo. All other trademarks are trademarks of their respective owners or holders.
Need help?
Do you have a question about the SDC3 and is the answer not in the manual?
Questions and answers