
Related Manuals for THORLABS NanoTrak KNA-IR


Summary of Contents for THORLABS NanoTrak KNA-IR
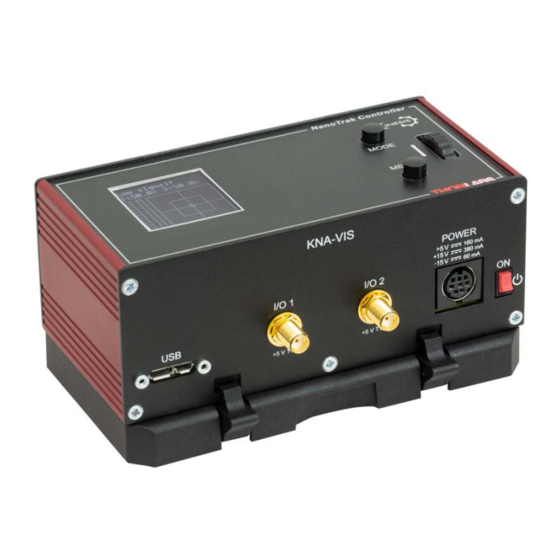
- Page 1 KNA-IR and KNA-VIS ® K-Cube NanoTrak Auto-Alignment Controller APT User Guide Original Instructions HA0388T...
-
Page 2: Table Of Contents
5.6 Preventive Maintenance ....................31 5.7 Troubleshooting....................... 31 Appendices Appendix A Power Connector Pin Out Details ...................33 Appendix B Specifications and Associated Parts ................34 Appendix C Principles of Operation ....................35 Appendix D Regulatory .........................43 Appendix E Thorlabs Worldwide Contacts ..................44 Page 0 ETN043886-D02... -
Page 3: Chapter 1 Overview
1.2 Power Options A compact power supply unit (TPS002) is available from Thorlabs. This power supply unit is designed to take up minimal space and can be mounted to the optical table in close proximity to the driver units, connected via short power leads. Although the TPS002 has two outputs, it should not be used to drive another K-Cube as well as the KNA unit. - Page 4 K-Cube NanoTrak Auto-Alignment Controller Aside ActiveX®, a Windows®-based, language-independent technology, allows a user to quickly develop custom applications that automate the control of APT system hardware units. Development environments supported by ActiveX® technology include Visual Basic®, LabView™, Borland C++ Builder, Visual C++, Delphi™, and many others. ActiveX® technology is also supported by.NET development environments such as Visual Basic.NET and Visual C#.NET.
- Page 5 Chapter 1 Overview 1.3.3 APT Config Utility There are many system parameters and configuration settings associated with the operation of the APT Server. Most can be directly accessed using the various graphical panels, however there are several system wide settings that can only be made 'off-line' before running the APT software.
- Page 6 K-Cube NanoTrak Auto-Alignment Controller 1.3.4 APT Server (ActiveX Controls) ActiveX Controls are re-usable compiled software components that supply both a graphical user interface and a programmable interface. Many such Controls are available for Windows applications development, providing a large range of re-usable functionality.
- Page 7 APT ActiveX Controls collection. Additional software developer support is provided on our website. 1.3.5 Software Upgrades Thorlabs operate a policy of continuous product development and may issue software upgrades as necessary. The latest software can be downloaded from the ‘services’ section of www.thorlabs.com.
-
Page 8: Chapter 2 Safety
To minimize the possibility of this happening it is strongly recommended that any such modes that result in prolonged unresponsiveness be disabled before the software is run. Please consult your system administrator or contact Thorlabs technical support for more details. Page 6... -
Page 9: Chapter 3 Getting Started
+44 (0)1353 654440 and ask for Technical Support. DO NOT CONNECT THE CONTROLLER TO YOUR PC YET 1) Go to Services/Software Downloads/Motion Controllers at www.thorlabs.com and download the Servo, Stepper and Closed-Loop Piezo Controllers software. 2) Run the .exe file and follow the on-screen instructions. - Page 10 K-Cube NanoTrak Auto-Alignment Controller 3.2.3 Using the Baseplate The baseplate must be bolted to the worksurface before the K-Cube is fitted, as shown below. The K-cube is then located on two dowels in the baseplate and secured by four clips. Fig.
-
Page 11: Electrical Installation
Chapter 3 Getting Started 3.3 Electrical Installation 3.3.1 Rear Panel OPTICAL INPUT MONITOR 1 MONITOR 2 OUT 1 OUT 2 0 - 150V 0 - 150V 900 - 1700 nm 1.5 mW IN 1 IN 2 0 - 10V 0 - 10V Fig. - Page 12 (0 to 2 V) (e.g. for use in a dual NanoTrak set up - see Section 5.5.2.). 3.3.3 Supply Voltage and Current Requirements Thorlabs offers a compact two-way power supply (TPS002) or the K-Cube hub (see Section 1.2. for more details) for use with the NanoTrak cube. Do not use power supplies by other manufacturers.
-
Page 13: Detector Heads And Cables
Chapter 3 Getting Started 3.3.4 Typical System Connections Warning High voltages may be present at the rear panel terminals. Ensure that the power is switched off before making or breaking any electrical connections. In particular, the piezo ‘HV OUT’ terminals can carry up to 150 V piezo drive connections OPTICAL INPUT MONITOR 1... -
Page 14: Connect The Hardware
K-Cube NanoTrak Auto-Alignment Controller 3.5 Connect The Hardware 1) Perform the mechanical installation as detailed in Section 3.2. 2) Connect the various system components - see Section 3.3.4. Caution During items (3) to (6) the instructions should be followed in the order stated. Problems may occur if the process is not performed in the correct sequence. -
Page 15: Chapter 4 Standalone Operation
Chapter 4 Standalone Operation Chapter 4 Standalone Operation 4.1 Control Panel Buttons and Indicators T r a c k i n g L a t c h e d 1 : 5 0 . 0 % 2 : 4 9 . 1 % Fig. -
Page 16: Overview
K-Cube NanoTrak Auto-Alignment Controller 4.2 Overview After the power up sequence is complete, the normal operating screen is displayed. T r a c k i n g 1 : 5 0 . 0 % 2 : 4 9 . 1 % Press the MENU button to enter the settings mode. - Page 17 Chapter 4 Standalone Operation 4.2.1 Menu Option - 1 HOME OUTPUTS T r a c k i n g H E L D This option is used to ‘HOME’ the output from the HV OUT connectors. The outputs are reset to 1 : 5 0 .
- Page 18 K-Cube NanoTrak Auto-Alignment Controller 4.2.4 Menu Option - 4 OUTPUTS ENABLE T r a c k i n g H E L D This option is used to enable and disable the drive voltage output from the HV OUT connectors. 1 : 5 0 .
- Page 19 Chapter 4 Standalone Operation 4.2.7 Menu Option - 7 SIGNAL OUT The internal piezo drivers of the KNA unit are limited to an output current of around 5 mA, which is insufficient for some of the higher circle scanning frequencies available. In this case it will be necessary to route the output signals from the NanoTrak K- Cube to an external piezo driver that has a higher operating bandwidth.
- Page 20 K-Cube NanoTrak Auto-Alignment Controller 4.2.9 Menu Option - 9 AC BOOST At low signal levels, when scanning for optical power, a small change in circle position can result in a large change in power reading. As the search gets closer to the max power position, changes in circle position result in only small changes in power reading.
- Page 21 1 3 I N F O R M A T I O N Press the MENU button to enter the 13 INFORMATION option and view the Thorlabs web site S w R e v : 0 1 0 1 0 9 address.
-
Page 22: Xy Scan Mode
K-Cube NanoTrak Auto-Alignment Controller 4.3 XY Scan Mode In some applications, it may be useful to know roughly where the high power region is located within the travel range of the piezo devices (e.g. to avoid power optimization on a side peak). When the XY SCAN is selected, the K-Cube unit moves the stage in an XY raster scan pattern over the full piezo range, and measures the optical power in a grid 96 x 96 points. - Page 23 To create a simulated configuration proceed as follows: 1) Run the APT Config utility - Start/All Programs/Thorlabs/APT/APT Config. 2) Click the 'Simulator Configuration' tab. Fig. 4.2 APT Configuration Utility - Simulator Configuration Tab 3) Enter ‘LAB1’...
- Page 24 K-Cube NanoTrak Auto-Alignment Controller 5) In the ‘Control Unit’ field, select ‘NanoTrak K-Cube (KNA001)’. 6) Enter a 6 digit serial number. Note Each physical APT hardware unit is factory programmed with a unique 8 digit serial number. In order to simulate a set of ‘real’ hardware the Config utility allows an 8 digit serial number to be associated with each simulated unit.
-
Page 25: Chapter 5 Pc Operation - Tutorial
Chapter 5 PC Operation - Tutorial Chapter 5 PC Operation - Tutorial 5.1 Introduction The following brief tutorial guides the user through a typical series of actions and parameter adjustments performed using the PC based software. It assumes that the unit is electrically connected as shown in Section 3.3. and that the Software is already installed - see Section 3.1. - Page 26 K-Cube NanoTrak Auto-Alignment Controller 5.2.2 Description of GUI Panel Controls Referring to Fig. 5.1. Note The serial number of the unit associated with the GUI control instance is displayed in the top right hand corner of the control. Range Indicator — Displays the current range of the internal power meter. When operating in 'Manual' ranging mode, the range can be changed by clicking the required range number.
-
Page 27: Circle Position Window
Chapter 5 PC Operation - Tutorial Error LED — Lit when a fault condition occurs, i.e. either a power supply voltage is out of range, or a channel has closed loop mode selected but the associated piezo is disconnected. Circle Position Display — Shows the position of the scan circle which in turn, corresponds to the horizontal and vertical position of the piezo actuators. -
Page 28: Settings Panel
K-Cube NanoTrak Auto-Alignment Controller 5.4 Settings Panel When the 'Settings' button on the GUI panel is clicked, the 'Settings' window is displayed. This panel allows data such as scan circle frequency and diameter, and loop gain to be entered. Note that all of these parameters have programmable equivalents accessible through the functions on this Control (refer to the API helpfile for further details). - Page 29 Chapter 5 PC Operation - Tutorial The gain value can be specified in the range 100 to 10,000 - see Section C.1.3. for further details and helpful hints on setting the loop gain. Phase Compensations - the feedback loop scenario in a typical NanoTrak application can involve the operation of various electronic and electromechanical components (e.g.
- Page 30 K-Cube NanoTrak Auto-Alignment Controller PIN (TIA) Reading Units Units Mode - this parameter specifies the units relating to the input signal measured by the NanoTrak, and is applicable only if a PIN (TIA) input source has been specified. If Amps is selected, readings are displayed or returned in mA, i.e. the raw PIN current input signal to the internal amplifier.
- Page 31 Chapter 5 PC Operation - Tutorial Note - when set to an analog input the 'I/O 1' port is dedicated to be the external feedback signal input. Therefore if the 'Input Signal Source' (described above) is selected to be '0-2V SMA input' the mode for 'I/O 1' is automatically selected to be '0-2V Input - F/B Source'.
- Page 32 K-Cube NanoTrak Auto-Alignment Controller 5.4.3 NanoTrak Screen tab Fig. 5.4 NanoTrak Settings panel - Screen Tab Sometimes, it may be useful to explore the response of the feedback signal by manually repositioning the two piezos driven by the NanoTrak. If desired, the NanoTrak circle can be positioned by using the mouse on the main panel display. This feature allows manual repositioning of the piezos, e.g.
- Page 33 Chapter 5 PC Operation - Tutorial 5.4.4 TIA Tab Fig. 5.5 NanoTrak Settings panel - Advanced Tab Input Signal Amplifier (TIA Autorange Settings This panel is used to modify the autoranging and output characteristics of the NanoTrak input amplifier circuit (Trans- impedance amplifier (TIA) circuit).
-
Page 34: Programmed Operation - Nanotrak
K-Cube NanoTrak Auto-Alignment Controller 5.5 Programmed Operation - NanoTrak Note Familiarize yourself with NanoTrak operation from the GUI panel before attempting programmed operation from the Controller PC. 5.5.1 A Typical Alignment using the NanoTrak 1) In the NanoTrak GUI, set the ‘Scan Circle Diameter’control to approximately mid-position. 2) Press the ‘Latch’... - Page 35 Chapter 5 PC Operation - Tutorial 7) In the slave NanoTrak GUI, select ‘Settings’. 8) Select the ‘Tracking’ tab, then set the Circle User Frequency, e.g. 30 Hz. Note A difference of at least 10 Hz is recommended between this frequency and that set at item (5). This is to ensure adequate frequency separation between the bandpass filters of the two NanoTraks.
-
Page 36: Preventive Maintenance
The equipment contains no user servicable parts. There is a risk of severe electrical shock if the equipment is operated with the covers removed. Only personnel authorized by Thorlabs Ltd. and trained in the maintenance of this equipment should remove its covers or attempt any repairs or adjustments. Maintenance is limited to safety testing and cleaning as described in the following sections. -
Page 37: Troubleshooting
Chapter 5 PC Operation - Tutorial 5.6.1 Cleaning Warning: Risk of Electrical Shock Disconnect the power supply before cleaning the unit. Never allow water to get inside the case. Do not saturate the unit. Do not use any type of abrasive pad, scouring powder or solvent, e.g. alcohol or benzene. The fascia may be cleaned with a soft cloth, lightly dampened with water or a mild detergent. -
Page 38: Appendix A Power Connector Pin Out Details
A.1.1 Pin Identification Thorlabs recommends that the NanoTrak K-Cube is operated with Thorlabs power supply TPS002, as it was specifically designed for use with this product. However, to enable customers to use the cube in installations where a ±15V and 5V power is already available, the unit can be operated with a different external power supply, such as a bench or lab supply. - Page 39 Appendix B Specifications Appendix B Specifications B.1 Specifications Optical Power Measurement Photo-Diode Type KNA-IR: InGaAs KNA-VIS: Si FC/PC Connector Detector Photocurrent 5 nA to 2.5 mA KNA-IR: 1.5 mW Saturation KNA-VIS: 4 mW Saturation Wavelength KNA-VIS: 320 to 1000 nm KNA-IR: 900 to 1700 nm Optical Power Monitor (SMA) Multiple Ranges...
-
Page 40: Appendix C Principles Of Operation
K-Cube NanoTrak Auto-Alignment Controller Appendix C Principles of Operation C.1 The NanoTrak C.1.1 Introduction For simplicity, the following example refers to the alignment of two opposing butt-coupled single mode fibers, however the principles of operation are equally valid for the physical alignment of any two opposing optically coupled faces or indeed any two objects that can provide a feedback signal (voltage) that varies as a function of their alignment with respect to each other. - Page 41 Appendix C Principles of Operation C.1.2 How the NanoTrak Maximizes Optical Power To understand the principles involved in the alignment, consider the operation in a single axis. When two fibers are aligned, maximum power is transmitted between them, and if the fiber is moved a few microns to the left (Fig. C.3, position A), the power is reduced.
- Page 42 K-Cube NanoTrak Auto-Alignment Controller detail A increased offset V mid position (37.5V) offset = 37.5V (mid position) time fiber position in X axis (μm) detail B y axis x axis Y axis (μm) time X axis (μm) Fig. C.4 Offset voltage and fiber position In reality, the fiber is oscillated both horizontally and vertically, with the modulating signal for Y phase shifted by 90°...
- Page 43 Chapter 5 PC Operation - Tutorial C.1.3 Circle Size and Gain Control Given that movement of two opposing fibers produces variations in the coupled power, the very act of automatically aligning the fibers to increase the coupled power may cause unwanted disturbances to the signal path. Consider the optical profile in Fig.
- Page 44 K-Cube NanoTrak Auto-Alignment Controller C.1.5 Latch, Track and Tracking modes The purpose of the latch is to disable scanning and hold the drive outputs at the present position. With the latch released, the NanoTrak is in track mode. However, to minimise the risk of detecting a false peak, tracking should be activated only after a threshold power sufficiently above the background noise level has been located.
-
Page 45: Appendix D Regulatory
Chapter 5 PC Operation - Tutorial Appendix D Regulatory D.1 Declarations Of Conformity D.1.1 For Customers in Europe D.1.2 For Customers In The USA This equipment has been tested and found to comply with the limits for a Class A digital device, persuant to part 15 of the FCC rules. -
Page 46: Appendix E Thorlabs Worldwide Contacts
EC, and are not dissembled or contaminated. Contact Thorlabs for more information. Waste treatment is your own responsibility. "End of life" units must be returned to Thorlabs or handed to a company specializing in waste recovery. Do not dispose of the unit in a litter bin or at a public waste disposal site. - Page 47 www.thorlabs.com...
Need help?
Do you have a question about the NanoTrak KNA-IR and is the answer not in the manual?
Questions and answers