
Related Manuals for Garage Smart Basic MyLifter


Summary of Contents for Garage Smart Basic MyLifter
-
Page 1: Table Of Contents
Installation and Operation Guide About Garage Smart Basic Lifter FCC Statement Limited Lifetime Warranty Installation Overview What you need Identify parts Part 1: Install the Mounting Bracket Part 2: Install the Power Adapter Part 3: Install the Eyelet Screw Part 4: Install the Hook and Pulley... -
Page 3: Installation And Operation Guide
Installation and Operation Guide... -
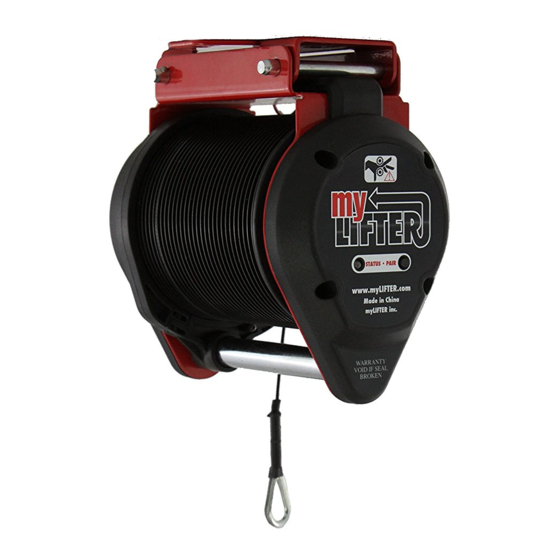
Page 4: About Garage Smart Basic Lifter
About Garage Smart Basic Lifter The Garage Smart Basic MyLifter is a motorized hoist controlled by your smart device. It allows you to safely lift your items off the garage floor to be stored on the ceiling. A single MyLifter can lift up to 100 pounds when using the included pulley hook. Multiple MyLifters can be connected to work as if they were one to raise, lower, and store items weighing up to 400 pounds. -
Page 5: Fcc Statement
FCC Statement This device complies with Part 15 of the FCC Rules. Operation is subject to the fol- lowing two conditions: 1. This device may not cause harmful interference, and 2. This device must accept any interference received, including interference that may cause undesired operation. -
Page 6: Limited Lifetime Warranty
Limited Lifetime Warranty Garage Smart offers a Limited Lifetime Warranty on all products. If a defect in the hard- ware, or any component thereof, occurs Garage Smart will repair or replace the sys- tem, or the defective component. There is no cost to you beyond the cost of shipping the defective item to us. - Page 7 Lifter system voids the warranty. Unauthorized repair or modification voids the warranty. The Lifter system is intended for personal, indoor, home use. Garage Smart does not warrant its lift system for commercial use, and any such use voids the warranty.
-
Page 8: Installation Overview
Installation Overview Installing the Basic Lifter is easy and involves the following basic steps: Install the mounting bracket. Install the power adapter. Screw in the eyelet screw. Attach the cable to the hook. What you need Installation requires the following tools: Ladder Stud finder Tape measure... - Page 9 If you are missing parts, contact Garage Smart for replacements (visit https://gar- agesmart.com or call 833-234-8711, 6:00 am to 10 pm Mountain Time).
-
Page 10: Part 1: Install The Mounting Bracket
NOTICE The mounting bracket needs to be installed in the center of a ceiling stud. MyLifter units from Garage Smart are designed to be secured to flat ceil- ings only. Do NOT attempt to secure lifters to angled ceilings or walls. - Page 11 a. Mark the left edge of the stud. b. Mark the right edge of the stud. c. Draw an X to mark the center of the stud. WARNING If your garage ceiling is textured, triple check the center marks you made to ensure that you have found the center of each stud.
- Page 12 7. Hold the mounting bracket in place on the ceiling and align the bracket's holes with the pilot holes you drilled. 8. Use a 1/2 inch wrench or socket wrench to mount the bracket to the ceiling with the included lag screws and washers. 9.
-
Page 14: Part 2: Install The Power Adapter
Part 2: Install the Power Adapter Find a suitable location to mount the power adapter to the wall or the celing. Confirm that the AC cable will reach a power outlet and the DC cable will reach your MyLifter. 1. Find the closest outlet on the wall or ceiling. 2. - Page 15 6. Plug one end of the DC power cable into the power adapter and the other end into the MyLifter unit.
- Page 16 7. Plug the power adapter into the nearest outlet. 8. Secure the cables with the included cable fasteners. a. Peel off the adhesive backing. b. Stick the clip on the ceiling where you want it. c. Use a cable management screw to secure the clip to the ceiling. d.
- Page 17 NOTICE Multiple power adapters can be "daisy chained" together by plugging the AC power cable into the AC outlet on the power adapter.
-
Page 18: Part 3: Install The Eyelet Screw
Part 3: Install the Eyelet Screw NOTICE If your MyLifter is mounted parallel to the stud, the eyelet screw must be placed on the same side as the unit's power plug. This prevents the fully raised cable from contacting the MyLifter and causing cable damage. - Page 19 5. If your ceiling has drywall, tighten the eyelet screw until you can't see the screw's threads, then turn the screw three more complete revolutions. 6. If your ceiling does not have drywall, tighten the eyelet screw just until you can't see the screw's threads.
-
Page 20: Part 4: Install The Hook And Pulley
Part 4: Install the Hook and Pulley NOTICE The basic MyLifter unit can lift up to 50 pounds without using the eyelet screw and pulley system. If your item weighs more than 50 pounds you must install the eyelet screw and run the cable under the pulley in the hook. - Page 21 When the Status light blinks green, the lifter is paired with your app. On the Available Lifters screen, your newly paired lifter is displayed with its MAC (media access control) address as the default name. 5. Tap in the upper left-hand corner to go to the Home screen. 6.
- Page 22 8. Tap Exit in the upper right-hand corner to close the Edit Mode. 9. On the Home screen, tap the name of your MyLifter unit. This opens the Device Control screen, which lets you raise and lower items using your smart device. 10.
-
Page 24: Using The Mylifter App
Using the MyLifter App Use the MyLifter app to easily lift and lower items in your garage. The MyLifter app is paired with your MyLifter unit using a Bluetooth connection. Be sure to enable your mobile device’s Bluetooth capabilities before attempting to pair with your lifter. In this section you will learn how to: Pair your MyLifter app with your MyLifter units Edit and rename the MyLifter units... -
Page 25: Edit And Rename A Paired Mylifter
3. Firmly press the Pair button next to the Status light on your lifter. When the Status light blinks green, the lifters are paired with your app. On the Available Lifters screen, your newly paired lifter is displayed with its MAC (media access control) address as its default name. -
Page 26: Raising And Lowering Items
4. Type a name for the lifter and then tap OK. 5. Tap Exit in the upper right-hand corner to close the Edit Mode. Raising and Lowering Items The Device Control screen lets you raise and lower items manually by tapping the up and down arrow buttons. -
Page 27: Set The Smart High And Low Points
have selected. If you need to operate more than one lifter at the same time, you can create groups. The following graphic gives you an overview of the Device Control screen interface and its manual operation features. Set the smart high and low points 1. -
Page 28: Creating Mylifter Groups
The Locked Group ensures that all lifters in the group lift and lower items at the same time and at the same speed. For example, the Garage Smart Universal XL HD Lifter requires two MyLifter units to lift large and oddly-shaped items. In order to keep the load balanced as the item is lifted, the two MyLifter units need to be locked together so they can work together as one. - Page 29 3. Enter a name for the group and select at least two devices from your list of paired devices. 4. Tap Save.
- Page 30 The Device Control screen opens with one of the lifters from the group selected (indicated by a rectangle around the lifter's name). At this point, you can control each lifter individually so you can raise or lower their cables to set a reference point for the group.
-
Page 31: To Create A Flex Group
An alert opens asking, "Are you sure you want to set the smart lifters as level at this position?" 8. Tap SET. 9. The newly created group is added to the Home screen. 10. Tap the name of the group to open it in the Device Control screen. 11.
Need help?
Do you have a question about the Basic MyLifter and is the answer not in the manual?
Questions and answers