Table of Contents
Advertisement
Advertisement
Table of Contents

Subscribe to Our Youtube Channel
Related Manuals for Garage Smart MY LIFTER BASIC LIFTER


Summary of Contents for Garage Smart MY LIFTER BASIC LIFTER
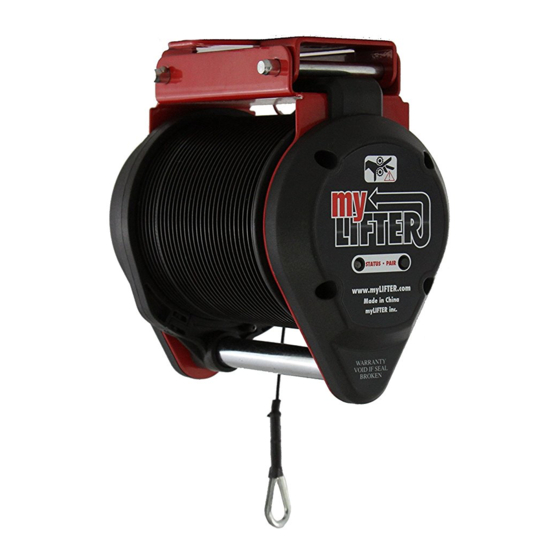
- Page 1 BASIC LIFTER...
-
Page 2: Table Of Contents
TABLE OF CONTENTS LIMITED LIFETIME WARRANTY SAFETY INFORMATION WARNING ABOUT THE BASIC LIFTER INSTALLATION GUIDE REQUIRED TOOLS PARTS IDENTIFIER INSTALLATION MOUNTING BRACKET POWER ADAPTER EYELET SCREW HOOK & PULLEY APP GUIDE FAQS... -
Page 3: Limited Lifetime Warranty
AND EXCLUDES ALL OTHER Garage Smart will repair or replace the system, sale or taped cartons, fire, flood, acts of God, or WARRANTIES NOT EXPRESSLY SET or the defective component. There is no cost failure to follow the Owner’s Manual. -
Page 4: Safety Information
SAFETY INFORMATION Read and follow all safety, installation, and operation instructions. Do not operate the Basic Lifter while hands or other body parts are near the system. Do not stand under the Basic Lifter or items lifted by the system. Do not use the Basic Lifter to lift people or animals. -
Page 5: Warning
WARNING DO NOT install Garage Smart products in any other manner than specified in the instructions. To avoid risk of electric shock and other potential injury, DO NOT open the product casing. This product is for indoor use only. Failure to follow these safety instructions may result in property damage, serious personal injury, or death. -
Page 6: About The Basic Lifter
ABOUT THE BASIC LIFTER The Basic Lifter is a motorized hoist controlled by your smart device. It allows you to safely lift your items off the garage floor and onto the ceiling, without lifting more than a finger. Each hoist lifts up to 100 lbs. when using the included pulley hook. Lifters are designed to work together. -
Page 7: Installation Guide
INSTALLATION GUIDE Scan the QR code or follow the link to access the Garage Smart DIY Installation Guides: https://garagesmart.com/pages/diy-installation... -
Page 8: Required Tools
REQUIRED TOOLS • Ladder Stud Finder • Pencil • Tape Measure • Drill • 1/2” Socket • Wrench or Box Wrench • Phillips Screwdriver • Safety Glasses •... -
Page 9: Parts Identifier
PARTS IDENTIFIER: LIFTER Garage Smart Lifter (x1) Lag Washer (x2) Lag Screw (x2) QD Pins (x2) Pulley Hook (x1) Eyelet Screw (x1) Drill Bit (x1) Carabiner (x1) - Page 10 PARTS IDENTIFIER: POWER ADAPTER Power Adapter (x1) Universal Mount (x1) DC Power Cable (x1) (attached to Power Adapter) Cable Management Clip (x2) Wall Mount Screw (x1) Cable Management Screw (x2)
-
Page 11: Installation Mounting Bracket
INSTALLATION PART 1: MOUNTING BRACKET Step 1: Reference Before Mounting Bracket Decide where to place your Basic Lifter by putting your item in the location you want to install it. The Mounting Bracket needs to be installed in the center of a ceiling joist. Center it above the items intended location. - Page 12 INSTALLATION PART 1: MOUNTING BRACKET Step 2: Locate Ceiling Joists Use a stud finder to locate the ceiling joist where you plan to place the Mounting Bracket. Make sure you have the clearance and adequate spacing for the hard top you will be lifting.
- Page 13 INSTALLATION PART 1: MOUNTING BRACKET Step 3: Install The Mounting Bracket Consider which way you want your item and MyLifter to face, and mount the bracket accordingly. Refer to Figures 1.2a and 1.2b for correct mounting configurations. Fig 1.2a Fig 1.2b...
- Page 14 INSTALLATION PART 1: MOUNTING BRACKET Step 3: Install The Mounting Bracket, cont. Place the mounting bracket on the joist. Be sure to align the mounting holes with the center of the joist. With a pencil, mark an “X” on the ceiling where you want the two holes to mount your Lifter (Figure 1.3).
- Page 15 INSTALLATION PART 1: MOUNTING BRACKET Step 3: Install The Mounting Bracket, cont. Tighten the screws with a ½" wrench until the bracket is snug against the ceiling (Figure 1.5). As you turn the wrench, you should feel resistance. If the lag screw turns freely, your pilot hole is not in the ceiling joist and must be Fig 1.5 repositioned on a secure portion of the joist.
-
Page 16: Power Adapter
INSTALLATION PART 2: POWER ADAPTER Step 1: Placing Power Adapter Find a suitable location to mount the power adapter to the wall. Confirm that the AC cable will reach a power outlet and the DC cable will reach your MyLifter. Use the printable screw template to place the two wall mount screws into the desired location (Figure 2.1) exactly 2 inches apart... - Page 17 INSTALLATION PART 2: POWER ADAPTER Step 2: Placing Power Adapter Line up the product mounting holes with the screws as shown. Place the product over the screws and slide to lock into place. There is more than one orientation that can be used.
- Page 18 INSTALLATION PART 2: POWER ADAPTER Step 3: Secure Wires 1. Peel off sticker backing. (Figure 2.5) 2. Stick the clip where you want it. (Figure 2.6) Fig 2.5 3. Install the screw through the hole Fig 2.6 (Figure 2.7) in the center of the clip. 4.
- Page 19 Step 4: Plug In Power Adapter Plug the AC cable into a power source. (Figure 2.11) 2. Additional AC Garage Smart products may be powered by connecting their AC cable to the AC outlet on the Power Adapter. (Figure 2.11) Fig 2.11...
-
Page 20: Eyelet Screw
INSTALLATION PART 3: EYELET SCREW Fig 3.1 Eyelet Screw Eyelet Screw Fig 3.2... - Page 21 INSTALLATION PART 3: EYELET SCREW Step 1: Install Eyelet Screw Use the stud finder to locate the center of the stud. Follow the same procedure as the lag screw, pre-drilling a hole. (Page 16 of Manual) Insert the eyelet screw into the ceiling joist, turn the eyelet screw using a screwdriver to tighten.
-
Page 22: Hook & Pulley
INSTALLATION PART 4: HOOK & PULLEY Step 1: Install The Hook & Pulley When using the hook, extend the cable and run it under the pulley (Figure 4.1). Use the provided carabiner to anchor the cable to the eyelet screw about 3 inches away from the lifter. -
Page 23: App Guide
MYLIFTER APP GUIDE Step 1: Pairing Your Lifter Download the MyLifter App to your smart device from either Google Play™ or the Apple App Store™. Open the App, and tap the Add Devices button in the bottom right corner. - Page 24 MYLIFTER APP GUIDE Step 1: Pairing Your Lifter, cont. A dialog box will appear and prompt you to press the PAIR button on your MyLifter. Tap the “Got It” button at the bottom of the screen. (You can choose to hide this menu in the future by selecting “Don’t show this again”...
- Page 25 MYLIFTER APP GUIDE Step 1: Pairing Your Lifter, cont. The icon next to the lifter listed on your App should change from a gray outline to a filled-in image of a MyLifter. This filled-in icon indicates that your lifter is paired with your smart device.
- Page 26 MYLIFTER APP GUIDE Step 2: Editing A Lifter To change the name of your Lifter, return to the App main screen by tapping the back arrow in the top left corner, and then tap Edit in the top right corner. Android Users: Tap the pencil icon, type the new name for your Lifter unit, and tap Submit.
- Page 27 MYLIFTER APP GUIDE Step 3: Removing A Lifter To remove a Lifter from your smart device, return to the App main screen, and tap Edit in the top right corner. Android Users: Tap the trash can icon, and tap Yes when the dialog box appears.
- Page 28 MYLIFTER APP GUIDE SET HIGH OR LOW SMART LIFT OR LOWER Use these buttons Tap these buttons to lift to program where and lower your items to you want to set your preset high and low your Smart Lift and points.
- Page 29 MYLIFTER APP GUIDE Step 4: Manually Lifting and Lowering Units 1. To manually lift or lower items, hold down either the manual lift or manual lower arrows. 2. To control the speed of your lifting/lowering, hold down the variable speed control: slide the circle upward to control the speed of lifting, and slide the circle downward to control the speed of...
- Page 30 MYLIFTER APP GUIDE Step 4: Manually Lifting and Lowering Units, cont. 4. To access your preset low or preset high point, tap the SMART LOWER or SMART LIFT button. The lifter will lift or lower until it reaches your preset position. 5.
-
Page 31: Faqs
BASIC LIFTER FAQS How much weight can my Basic Lifter hold? The Basic Lifter can lift up to 100 lbs. DO NOT use more than one lifter to lift more than the designed weight limit. Why is my load tilting when I place the lifter over the center? Not all loads have their balance point in their center.
Need help?
Do you have a question about the MY LIFTER BASIC LIFTER and is the answer not in the manual?
Questions and answers