Advertisement
Quick Links
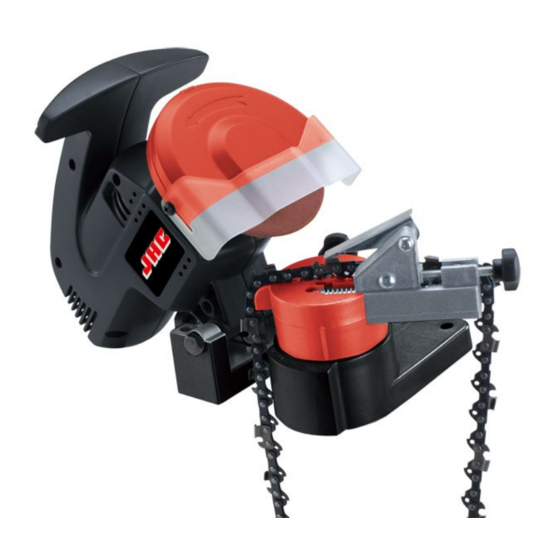
Operation Manual
Electric Chainsaw Sharpener
61029
Illustration similar, may vary depending on model
Read and follow the operating instructions and safety information before using for the first time.
Technical changes reserved!
Due to further developments, illustrations, functioning steps and technical data can differ insignificantly.
Updating the documentation
If you have suggestions for improvement or have found any irregularities, please contact us.
Advertisement

Subscribe to Our Youtube Channel
Related Manuals for WilTec 61029


Summary of Contents for WilTec 61029
- Page 1 Operation Manual Electric Chainsaw Sharpener 61029 Illustration similar, may vary depending on model Read and follow the operating instructions and safety information before using for the first time. Technical changes reserved! Due to further developments, illustrations, functioning steps and technical data can differ insignificantly.
- Page 2 All rights re- served. The WilTec Wildanger Technik GmbH cannot be held accountable for any possible mistakes in this operating manual, nor in the diagrams and figures shown.
- Page 3 Dress adequately. Do not wear loose clothing or jewellery as they can be caught in moving parts. Protective, electrically non-conductive clothes and non-slip footwear are recommended when working. Tie long hair together. © by WilTec Wildanger Technik GmbH Item 61029 Page 3 http://www.WilTec.de...
- Page 4 (i.e., screwdriver handle). If it is in a good condition, it will produce a metallic sound. A dull sound indicates a crack or break. © by WilTec Wildanger Technik GmbH Item 61029 Page 4 http://www.WilTec.de...
- Page 5 Refer to the assembly drawing and fig. 3 and 4 below. 1. Raise the engine casing (12, 24) and lock it in the up position by tightening the screw (45). © by WilTec Wildanger Technik GmbH Item 61029 Page 5 http://www.WilTec.de...
-
Page 6: Operation
3. Lower the chain stop (53) so that it is positioned on the tooth (blade) you want to start with (see fig. 5). The tip of chain stop needs to be positioned against the tooth. Figure 5: Chain stop (53) and screw (58) Figure 6: Chain stop (53) © by WilTec Wildanger Technik GmbH Item 61029 Page 6 http://www.WilTec.de http://www.aoyue.eu... - Page 7 10. Put on your protective gear and make sure the immediate area is clear of bystanders. 11. Plug in the power cord (23) and press the green button on the switch (25) to turn on the ma- chine. © by WilTec Wildanger Technik GmbH Item 61029 Page 7 http://www.WilTec.de...
- Page 8 Note: Some parts are listed and shown for illustration purposes only and are not available individually as replacement parts. © by WilTec Wildanger Technik GmbH Item 61029 Page 8 http://www.WilTec.de http://www.aoyue.eu...
- Page 9 Spring pad Rotor Stator Flat pad Bolt Fixing disc Pressing line plate Power cord Screw Right engine casing Chain stop Switch Capacitor Right cover Chain Bolt Screw © by WilTec Wildanger Technik GmbH Item 61029 Page 9 http://www.WilTec.de http://www.aoyue.eu 2021-1 http://www.teichtip.de...
- Page 10 Explosion view © by WilTec Wildanger Technik GmbH Item 61029 Page 10 http://www.WilTec.de http://www.aoyue.eu 2021-1 http://www.teichtip.de...
- Page 11 This logo indicates that this electric equipment must not be disposed with the domestic waste. The company WilTec Technik GmbH has been registered in the German registry EAR under the WEEE- registration number DE45283704. Disposal of used electrical and electronic appliances...
Need help?
Do you have a question about the 61029 and is the answer not in the manual?
Questions and answers