Table of Contents
Advertisement
Quick Links
Advertisement
Table of Contents

Subscribe to Our Youtube Channel
Related Manuals for KingSlim DL12 Pro


Summary of Contents for KingSlim DL12 Pro
- Page 1 USER MANUAL KINGSLIM DL12 Pro Dash Cam v2.0...
- Page 2 CONTACT US For any inquiries about KingSlim products, please feel free to contact us. We will respond within 24 hours. Tel: 888-811-1140 (US) Email: cs@kingslim.net Web: www.kingslim.net...
-
Page 3: Table Of Contents
CONTENTS What's in the Box Camera Overview Installation Formatting the microSD Card Start Video Recording Icon Introduction Setup Menu Gestures Download the GPS Player Specifications Troubleshooting Caution! -
Page 4: What's In The Box
Extension Cable * 1 Power Cable * 1 Double-sided Adhesive Tape Screws * 4 Cable Clips * 5 for Rear Camera * 2 Quick Start Guide KingSlim Mirror Dash Cam DL12 Pro V2.0 Pry Tool * 1 Quick Start Guide * 1... -
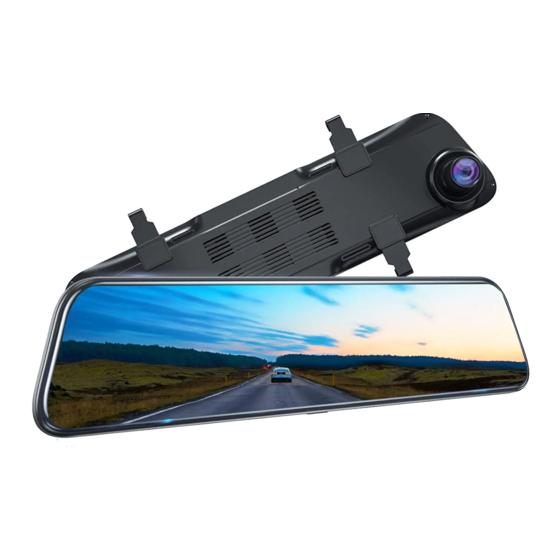
Page 5: Camera Overview
CAMERA OVERVIEW Touchscreen Display Rear Camera IN GPS Port Mini USB Power Port Memory Card Slot Speaker Reset Front Camera Back Clasp Vent Power Button/Screen Saver... -
Page 6: Installation
Mount the DL12 Pro over the original rearview mirror of the car with the provided strap, then adjust the angle of the front camera. 3. Connect the USB power cable into the USB power port of DL12 Pro Dash Cam, then plug the car charger into the cigarette lighter of your car. - Page 7 4. Connect the GPS module to the dash cam and attach it on the A-Pillar. 5. Install the rear camera. ① Connect the rear camera with the extension cable into DL12 Pro Dash Cam to check whether the rear camera works well.
- Page 8 Position 2: Install the rear camera near the license plate. Position 2 is highly recommended. The back image is crisp and clear for both rear viewing and reversing guide. To use the reversing function, please install the rear camera in position 2, then connect the red trigger wire of the rear camera extension cable to the positive lead of the vehicle reversing lamp.
-
Page 9: Formatting The Microsd Card
1. After finishing formatting, connect a car charger and start the car engine. The device will automatically turn on and begin recording. 2. Loop recording is already enabled on the DL12 Pro dash cam. The default setting is "1 MIN". -
Page 10: Icon Introduction
ICON INTRODUCTION The Main Interface 4 5 6 Recording Indicator Recording Resolution Video Time Microphone Indicator Power Status Date/Time Stop/Start Recording Taking Photo When taking photos, click the icon " " to save the photo. Emergency Recording When DL12 begins to work, click the icon " "... -
Page 11: Setup Menu
SET-UP MENU 1. Resolution Choose a recording resolution. Options: 4K(3840*2160)/ 2K(3840*2160) Default Setting: 4K+1080P 2. Split time Files will be saved every 3 minutes if you choose the 3 MINS option. When the memory card is full, the new file will cover the existed one if loop recording is on. Options: 1 MIN/3 MINS/5 MINS Default Setting: 1MIN 3. - Page 12 6. Parking Guard The camera will automatically turn on, begin the 20s recording, and lock if there is an impact to the car during parking. The higher the level you select, the easier it is to trigger the recording. Options: Off / Low / Middle / High Default Setting: Off...
- Page 13 12. Intelligent voice Option: ON and OFF Default Setting: ON Ture on the intelligent vice feature, user can operate the device by saying key command while driving. Intelligent voice Intelligent voice Voice-control words are as follows: Take Photo Turn On Audio Turn Off...
- Page 14 The device can set High/Middle/Low which three types views of reversing assistance while reversing car. 15. Fatigue reminder Option: ON and OFF The device will remind you to rest every 2 hours when you have been driving. 16. Time Setting Set date and time format.
- Page 15 21. Format Format the memory card. Note: ① All data will be deleted. Before formatting your memory card, please remember to back up your important data on another device. ② Before the memory card is inserted for the first time, please format it in the camera to ensure that the card is compatible with the camera.
-
Page 16: Gestures
GESTURES 1. SWITCH RECORDING DISPLAY MODES On the screen, slide from right to left to switch the view modes among front view only, back view only, and both front and back views. 2. ENTER THE PLAYBACK MENU On the screen, slide from left to right to enter the playback menu. Tap the folder name to choose a folder. - Page 17 3. ADJUST THE VIEWING ANGLE OF THE CAMERA On the left side of the screen, slide your finger up or down to adjust the viewing angle. Note: If you choose the view mode that displays both views of the front and rear cameras, the view angle adjustment feature is disabled.
-
Page 18: Download The Gps Player
DOWNLOAD THE GPS PLAYER Download the GPS player: www.kingslim.net/player SPECIFICATIONS Front Camera f/1.8, 170° FOV Rear Camera f/1.8, 160° FOV Video 4K+1080P/2.5k+1080P Screen 12-inch IPS touchscreen Video Coding H.264/H.265 Input 5V DC Memory Card support up to 128GB Battery 500mAh Working Temperature -20°C~60°C (-4°F~140°F) -
Page 19: Troubleshooting
TROUBLESHOOTING 1. The dash cam is not recording. Check whether your memory card has enough space. Back up any important data to another device first, and then format the memory card. 2. The dash cam stops during recording. During recording, a large amount of high-definition video data is processed. Please use a high-speed memory card of Class 10 or higher.
Need help?
Do you have a question about the DL12 Pro and is the answer not in the manual?
Questions and answers