Table of Contents
Advertisement
Quick Links
Advertisement
Table of Contents

Subscribe to Our Youtube Channel
Related Manuals for KingSlim D4


Summary of Contents for KingSlim D4
- Page 1 Dash Cam User Manual...
-
Page 2: Table Of Contents
CONTENTS GETTING STARTED 1. Memory card 2. First-time charging 3. Recording 4. Settings 5. Setting date & time 6. How to hide power cable inside your car’ s dash board? 7. How to transfer videos to pc/mac? 8. Wifi 9. Camera specifications 10. - Page 3 PLAYBACK 1. Dash cam playback 2. Kingslim app playback 3. Playback on pc/mac SYSTEM SETTING 1. Resolution 2. Video encode 3. Speed unit 4. Screen dormant 5. Light source frequency 6. Impact sensitivity 7. Recording in parking mode 8. Date format 9.
- Page 4 User agreement By purchasing KINGSLIM Dash cam, it is assumed that by default you agree with precautions, user warnings and all the terms & conditions of warranty. If for any reason you do not agree with any of the terms mentioned in this manual, then you may return the product in its original packaging unused within its return window for a full refund.
-
Page 5: Getting Started
3. Recording KINGSLIM D4 4K dash cam is programmed to turn ON and start recording automatically when it receives power, and when the power gets disconnected, it will stop recording, save the last... -
Page 6: Settings
(See Page 30 for details) 8. Wifi You can also connect KINGSLIM D4 Car Dash Cam to your smart phone directly by using built-in Wifi feature. After your mobile phone is connected to the hotspot of our device, the 4G signal of the mobile phone will be blocked, and it will automatically recover after disconnection. -
Page 7: Camera Specifications
9. Camera specifications Sensor Sony IMX335 LCD touch screen 3 inch IPS Video resolution 3840*2160 @30fps (front)*1080P (rear) 2560*1440p (front)+1080P (rear) Photo resolution Lens aperture F/1.8 Built in GPS Wifi Built in Video format Memory card Above Class10 U3 speed, max up to 256GB G-sensor Built-in 3-Axis Impact Accelerometer Gravitational Sensor to lock &... -
Page 8: What's In The Box
10. What's in the box D4 Dual Dash Cam Dash Cam Bracket Double-sided Adhesive Static Sticker Tape for Dash Cam * 2 Waterproof 7m Rear Camera Double-sided Adhesive Car Charger with Rear Camera * 1 Extension Cable * 1 Tape for Rear Camera * 4 3.5m Power Cable * 1... -
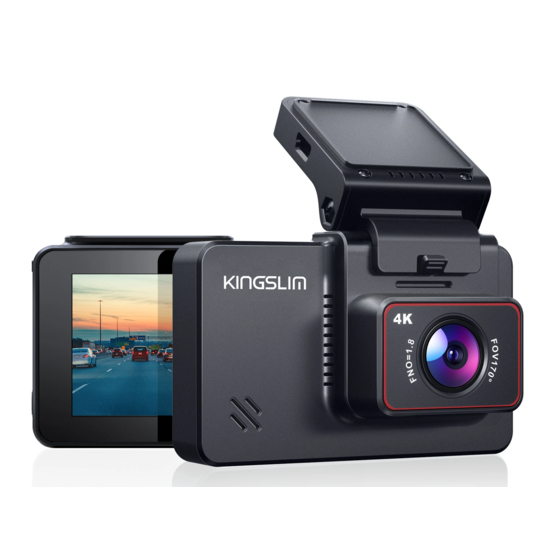
Page 9: Camera Overview
11. Camera overview Bracket Slot Rear Camera IN Front Camera Please remove the front lens film before use. Speaker Mini USB Power Port Memory Card Slot Working Indicator Power Button Hold: Power on/off Press: Turn off/wake up screen... - Page 10 Vent Mini USB Power Port Screen...
-
Page 11: Installation
12. Installation 1. Memory card use A Class 10 or above memory card is highly recommended for the D4 dash cam (memory card is not included). D4 dash cam supports an up to 256GB memory card. Please format your card in the camera before using this dash cam. - Page 12 ③ Formatting the memory card Please format your memory card in the camera before using this dash cam and use a high- speed memory card of Class10 or higher. a. Tap the “Settings” icon to enter the Settings page. b. Select "Format Memory Card", then tap the "Confirm" icon. Wait a few seconds to finish the formatting and the system will exit automatically.
- Page 13 3. Take off one film on the dash cam bracket sticker, and apply it to the dash cam bracket. 4. Clean the windshield with a dry cloth, then take off the film of the static sticker, apply the static sticker to the windshield and make sure there is no air inside.
- Page 14 5. Peel off the other film on the dash cam bracket sticker, and secure it on the static sticker. Notes: ① If you want to remove the dash cam, please take off the static sticker. ② If you don't want to use static sticker, you can stick the dash cam on the windshield. 6.
- Page 15 7. Press the buckle firmly with your finger, and push the camera out at the same time.
-
Page 16: Charging
13. Charging 1. Connect the USB power cable into the USB power port of D4 Dash Cam, then plug the car charger into the cigarette lighter of your car. Car cigarette lighter socket Car cigarette lighter plug D4 Dash Cam Do NOT connect the camera to PC for charging. -
Page 17: Hardwire Kit (Sold Separately) Installation Guide
1. We strongly suggest the professional installation of the hardwire kit. If you attempt to install it by yourself, KINGSLIM will not take the responsibility or liability for any product and vehicle damage or personal injuries due to improper operation during the process. - Page 18 ② Open the cover of fuse box and find a constant fuse slot. Remove the original fuse in the constant fuse slot and install it into the bottom slots of the fuse tap. ③ Connect the fuse tap to the positive terminal of your constant fuse slot. ④...
- Page 19 ⑤ Crimp the black wire and screw it down to any non-coated metal bolt/screw in your vehicle to ground it. ⑥ Connect the USB connector of the hardwire kit to the USB input of your dash camera. 2. Low voltage protection When the voltage detected by the hardwire kit is lower than 11.6V/23.5 (it varies depending on your vehicle), the hardwire kit will automatically cut off...
-
Page 20: Install The Rear Camera
15. Install rear camera Position 1: Install the rear camera on the rear windshield. The installation is easier when using this method. The power cables are routed as follows: Position 2: It is recommended to install the rear camera near the license plate. In this way, the image is crisp and clear for both rear viewing and reversing guide. - Page 21 To use the reversing function, please install the rear camera near the license plate, then connect the red wire of the rear camera extension cable to the positive lead of the vehicle reversing lamp. Rear camera Rear camera connector Reversing light positive pole Reversing light Note: ①...
-
Page 22: Start Recording
START RECORDING 1. Main interface 4 5 6 00:00:34 2020-11-27 13:47 Recording indicator Power status Video time Settings Date/Time Album Emergency recording Microphone indicator Audio recording (Mute/Unmute) Wifi indicator Stop/Start recording... -
Page 23: Gestures
2. Gestures 1. Taking a photo In the video recording mode, slide from left to right to take photos. 00:00:34 2020-11-27 13:47 2. Switching recording display modes Click the right side of the screen to switch recording display modes. 00:00:34 2020-11-27 13:47 00:00:34 2020-11-27 13:47... -
Page 24: Status Icons
3. Status icons Interface Status Recording on Recording status Recording time Recording time 00:00:34 Date/Time Date/Time 2020-11-27 GPS locate Locate successfully GPS not located Signal searching Microphone indicator on Microphone on Microphone indicator off Microphone off Wifi on Wifi interface Wifi... -
Page 25: Led Status Light Indicator
4. LED status light indicator Charging indicator: Red light flickering: Recording video + Battery charging Blue light flickering: Use of built-in battery power + parking monitor starts recording. Power off condition: Blue light flickering: Recording video + Battery fully charged Purple-red light flickering alternately: Recording video + Screen off... -
Page 26: Time Zone Setting
5. Time zone setting Choose the time zone manually. The device will then display the time of the selected time zone. Default Setting: OFF Settings Settings Set Time UTC/GMT-OFF TimeZone Setting UTC/GMT-OFF UTC/GMT-12 Language English UTC/GMT-11 Greenwich Mean Time (GMT) Time zone When Daylight Savings Ends Nov- When Daylight Savings Begins... -
Page 27: Playback
Tap the “Album” icon to enter the album to be played back. 00:00:34 2020-07-17 13:47 Album Front Normal Album Front Urgent Album Front Photo Back Normal Album Back Urgent Album Back Photo 2. KINGSLIM APP playback 1. APP download Download the “KINGSLIM” APP on the APP Store or Google Play. - Page 28 2. Connect to the APP ① Stop video recording on the dash cam. 00:00:34 2020-11-27 13:47 ② After pausing video recording, tap the “Wifi” icon on dash cam, wait for 1-2 seconds to enter Wifi mode (once you quit, the WIFI will be disconnected) 00:00:34 2020-11-27 13:47 WiFi Info WiFi SSID:...
- Page 29 ③ GO to your smartphone’ s WIFI setting, search for the same Wifi SSID name displayed on the screen, and enter the password 12345678 for connection. ④ Open the “KINGSLIM” APP, tap the “New Account” icon, enter your email and get the verification code for login.
- Page 30 ⑤ Tap "Add Recorder", wait a few seconds to enter the preview interface. 3. APP playback To play on smartphone, simply turn on Wifi first from the camera, then connect the KINGSLIM Hot spot by entering the default password “12345678” . Once connected, simply open the correct KINGSLIM APP for your model.
- Page 31 4. Using APPs to download videos to your smartphone for local playback ① Tap the “video set” icon to enter the menu. ② Tap the “Select” icon at the upper right conner and tap the video you want to download, tap the icon at the bottom left conner to download the video.
- Page 32 ③ Waiting for the completion of download progress, the video will be downloaded to phone photo album. Tap the video and it will play.
-
Page 33: Playback On Pc/Mac
3. Playback on PC/MAC 1. Data transmission ① Connect the camera using included short USB data cable and choose the connect as USB flash drive on the camera when this message pops up. (USB cable sold separately) USB Storage PC Camera Charge ②... - Page 34 ① We recommend VLC Media player. You can get the player for free at www.videolan.org. ② GPS player (GPS player software installation (PC/MAC only) You can also use our GPS Player from our website for free to view the google maps from https://kingslim.net/pages/gps-player. What are the features? To see the exact GPS route with the video on google maps;...
-
Page 35: System Setting
SYSTEM SETTING Tap the icon at the bottom right corner to enter the system menu interface. 00:00:34 2020-11-27 13:47 Settings Resolution 4KP30 Video Encode H.264 Speed Unit 1. Resolution The recording resolution of front camera can be 4KP30 or 2KP30. The default resolution is 4KP30. The recording resolution of rear camera is not optional, with a default resolution of 1080P. -
Page 36: Screen Dormant
4. Screen dormant The screen will be turned off automatically after the time you set. After turning off, the screen will reduce power consumption. The camera still works while the display screen is turned off. Just click the screen and it will turn on. Options: Off... -
Page 37: Recording In Parking Mode
7. Recording in parking mode Stop and turn off the engine and it will enter the parking monitoring mode. If an impact or sudden braking is detected, it will automatically start recording a 20-second video and save the content. The videos will be locked in the front or rear emergency video folder and will not be overwritten by new video files. -
Page 38: Volume
10. Volume Adjust the volume of video and keys. Options: Mute / low / medium / high Default setting: medium 11. Loop recording If the 3-minute option is selected, the recorder will save the video file every 3 minutes. When the memory card is full, the new video files will overwrite the old ones. -
Page 39: Time Zone Setting
13. Time zone setting Choose the corresponding time zone of the region, and the recorder will automatically display the date and time of the time zone. Default setting: UTC/GMT-OFF 14. Language Options: English/Simplified Chinese/Français/Japanese/Español/Deutsch/Italiano/한 국 어 Default setting: Simplified Chinese 15. -
Page 40: Restore Factory Settings
17. Restore factory settings Restore the personality settings of the dash cam to the factory defaults, but the data on the memory card will not be removed. Notice Reset factory at once? Cancel Confirm Back 18. About Display this dash cam model and software version. -
Page 41: General Faq
GENERAL FAQ 1. Why does my dash cam turn on and off automatically? ① Please check if the dash cam turns on normally when you remove the SD card and connect your dash cam to a socket with a USB cable. ②... - Page 42 6. Why does my dash cam do not save the Date and Time that I set? ① Please confirm whether the battery can charge. If the battery damages, the dashcam can't save the Date and Time. ② Please check whether the GPS time zone is in the location time zone. If not, it can't save the Date and Time.
-
Page 43: Contact Us
A BIG THANK YOU Thank you for purchasing your new KINGSLIM D4 dash camera. We hope our product that can bring a newly safety and fun experience for you. If you are having difficulties setting it up, please email us at cs@kingslim.net.
Need help?
Do you have a question about the D4 and is the answer not in the manual?
Questions and answers