Advertisement
Quick Links
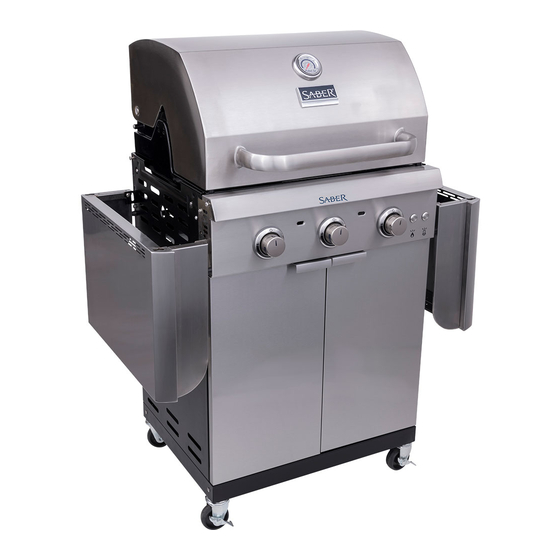
SAB E R SE LECT
3-BURNER GAS GRILL
GRIL À GAZ À 3 BRÛLEURS
3-QUEMADORES PARILLA DE GAS
FOR OUTDOOR USE ON LY
POU R USAG E E N M I LI E U EXTÉ RI E U R U N IQU E M E NT
ESTE J U EGO SÓLO SE PU E DE USAR EXTE RIORS
Easily converts from (LP) liquid propane to (NG) natural gas
Convertit facilement de forme (LP) propane liquide (NG) de gaz naturel
Se convierte facilment de propano liquido (LP) a gas natural (NG)
CONVERSION KIT | ENSEMBLE DE CONVERSION | KIT DE CONVERSIÓN
# A00AA5417
If you have questions or need assistance during assembly, please call 1-888-94-SABER 1-888-947-2237
Si vous avez des questions ou besoin d´aide pendant l'assemblage, S'il vous plaît appelez 1-888-94-SABER 1-888-947-2237
Si tiene alguna pregunta o si Necesita ayuda durante el Ensamblado, llámenos Al 1-888-94-SABER 1-888-947-2237
12/16/20 • G475-001-010801
P RODUCT G U I DE
G U I DES DES P RODU ITS
GUíA DEL PRODUCTO
M O D EL
M O D ÈLE
M O D ELO
S E R IAL N U M B E R
N U M ÉR O D E SÉ R I E
N Ú M E R O D E S E R I E
• See rating Label on grill for serial number.
• Ce numéro se trouve sur l´étiquette
signalétique sur i´appareil.
• El número de serie se encuentra en la etiqueta
deespecificaciones de la parrilla.
DATE P U R C HA S E D
DATE D ' CH AT
F EC HA D E C O M P R A
TOOLS REQU I RE D FOR ASSE M B LY:
• Adjustable wrench (not provided)
• Screwdriver (not provided)
• 7/16" Combination wrench (not provided)
OUTI LS REQU IS P OU R L'ASSE M B LAG E:
• Clé réglable (non comprise)
• Tournevis (non comprise)
• Clé mixte de 7/16 po (non comprise)
H E RRAM I E NTAS N ECESARIAS PARA E L MONTAJ E:
• L l a ve a j u st a bl e (n o i n cl u i d o )
• D e st o rn i l l a do r (n o in c l u i d o )
• 7 / 16" C o mbi n a c i ó n l l a ve (n o i n cl ui d o )
©
2020 Saber Grills, LLC. Columbus, GA, 31902. Printed in China. Imprimé en Chine. Impreso en China.
R42SC0321
Advertisement

Related Manuals for Saber Compact R42SC0321


Summary of Contents for Saber Compact R42SC0321
- Page 1 G U I DES DES P RODU ITS GUíA DEL PRODUCTO M O D EL SAB E R SE LECT M O D ÈLE R42SC0321 M O D ELO 3-BURNER GAS GRILL GRIL À GAZ À 3 BRÛLEURS 3-QUEMADORES PARILLA DE GAS S E R IAL N U M B E R N U M ÉR O D E SÉ...
-
Page 2: Table Of Contents
IMPORTANT SAFETY TABLE OF CONTENTS INFORMATION For Your Safety ........2-3 SAFETY SYMBOLS The symbols and boxes shown below explain what each heading Use and Care . -
Page 3: For Your Safety
FOR YOUR SAFETY - INSTALLING YOUR GRILL WARNING CAUTION DANGER For residential use only. Do not use for commercial Failure to follow all manufacturer’s instructions could If during operation the flames go out (You smell cooking. result in serious personal injury and/or property gas or cannot see the flame) damage. -
Page 4: Use And Care
USE AND CARE Installation Safety Precautions LP Cylinder • Use grill, as purchased, only with LP (propane) gas and the regulator/valve • The LP cylinder used with your grill must meet the following requirements: assembly supplied. If your grill is Dual Fuel ready, a conversion kit must be •... - Page 5 USE AND CARE LP Cylinder Exchange Connecting Regulator to the LP Cylinder • Many retailers that sell grills offer you the option of replacing your empty LP cylinder 1. LP cylinder must be properly secured onto grill. (Refer to assembly section.) through an exchange service.
- Page 6 USE AND CARE Safety Tips WARNING • Before opening LP cylinder valve, check the coupling nut for tightness. • When grill is not in use, turn off all control knobs and LP cylinder valve. • Never move grill while in operation or still hot. •...
- Page 7 USE AND CARE WARNING WARNING For Safe Use of Your Grill and to Avoid Serious Injury: LP GAS CYLINDER RUBBER SEAL INSPECTION. • Do not let children operate or play near grill. • Inspect the LP gas cylinder valve rubber seal for cracks, wear or deterioration prior •...
- Page 8 USE AND CARE Ignitor Lighting CAUTION • Do not lean over grill while lighting. Turn gas burner control valves to (off). • Open lid during lighting or re-lighting. Putting out grease fires by closing the lid is not possible. Grills are well Turn ON gas at LP cylinder.
- Page 9 USE AND CARE Burner Flame Check CAUTION • Remove cooking grates. Light burners, rotate knobs from HIGH to LOW. You should see a smaller flame in LOW position than seen on HIGH. Perform burner flame check on side burner, also. Always check flame prior to each use. If only SPIDER ALERT! low flame is seen refer to “Sudden drop or low flame”...
- Page 10 USE AND CARE CLEAN Setting Your grill is equipped with an innovative CLEAN setting that allows for hassle-free grill cleaning. The high heat generated from the burners will turn all remaining food debris to ash. Firebox Follow these steps: • After you are done grilling, adjust all main burners to CLEAN setting, close lid and remain for approximately 12 –...
-
Page 11: Limited Warranty
LIMITED WARRANTY This warranty only applies to units purchased from an authorized retailer. Manufacturer warrants to the original consumer-purchaser only that this product shall be free from defects in workmanship and materials after correct assembly and under normal and reasonable home use for the periods indicated below beginning on the date of purchase*. The manufacturer reserves the right to require that defective parts be returned, postage and or freight pre-paid by the consumer for review and examination. -
Page 12: Parts Diagram
ASSEMBLY / ASSEMBLAGE / ASAMBLEA PARTS DIAGRAM / SCHÉMA DES PIÈCES / VISTA ESQUEMÁTICA DE PIEZAS P a ge 32 S A BE RGR ILLS . C OM... -
Page 13: Parts List
ASSEMBLY / ASSEMBLAGE / ASAMBLEA PARTS LIST Description Description WARMING RACK TOP LID LEFT, CART FRAME LOGO PLATE F/ LID RUBBER BUMPER, W/ HOLE, F/ TOP LID RIGHT, CART FRAME HANDLE F/ LID FRONT DOOR BRACE THERMOMETER GROMMET LOWER BACK PANEL BEZEL, F/ THERMOMETER TANK EXCLUSION LID STOP... -
Page 14: Assembly
ASSEMBLY / ASSEMBLAGE / ASAMBLEA HARDWARE LIST / LISTA DE HERRAJES / LISTE DES FERRURES Key/ Réf./ Clave Description/ Description/ Descripción Picture/ Illustré/ Ilustra Qty/ Qté/ Cant 1/4-20 x 3/8" Screw Vis ¼-20 x 3/8 po Tornillo de 1/4 -20 x 3/8" Tool Holder Porte-outil Portaherramientas... - Page 15 ASSEMBLY / ASSEMBLAGE / ASAMBLEA Do Not tighten the screws Ne pas serrez les vis No apriete los tornillos P a ge 37 S A BE RGR ILLS . C OM...
- Page 16 ASSEMBLY / ASSEMBLAGE / ASAMBLEA P a ge 38 S A BE RGR ILLS . C OM...
- Page 17 ASSEMBLY / ASSEMBLAGE / ASAMBLEA P a ge 39 S A BE RGR ILLS . C OM...
- Page 18 ASSEMBLY / ASSEMBLAGE / ASAMBLEA Do Not tighten the screws Ne pas serrez les vis No apriete los tornillos Cardboard Carton Cartón P a ge 40 S A BE RGR ILLS . C OM...
- Page 19 ASSEMBLY / ASSEMBLAGE / ASAMBLEA Cardboard Carton Cartón Note: Remove tie wrap(s) securing hose/ regulator to gas manifold tube. Remarque : Enlevez les attaches qui retiennent tuyau/ régulateur au conduit de gaz. Nota: Retire la(s) correa(s) de amarre asegurando los manguera/ regulador al tubo del colector de gas. P a ge 41 S A BE RGR ILLS .
- Page 20 ASSEMBLY / ASSEMBLAGE / ASAMBLEA Tighten the screws Tighten the screws Serrez les vis Serrez les vis Apriete los tornillos Apriete los tornillos P a ge 42 S A BE RGR ILLS . C OM...
- Page 21 ASSEMBLY / ASSEMBLAGE / ASAMBLEA P a ge 43 S A BE RGR ILLS . C OM...
- Page 22 ASSEMBLY / ASSEMBLAGE / ASAMBLEA IMPORTANT: Infrared emitters must be placed keeping both flat walls overlapped to prevent any flare-up. IMPORTANT : Les émetteurs infrarouges doivent être placés de manière que les deux parois plates se chevauchent pour fournir une protection contre les flambées soudaines.
- Page 23 ASSEMBLY / ASSEMBLAGE / ASAMBLEA P a ge 45 S A BE RGR ILLS . C OM...
- Page 24 ASSEMBLY / ASSEMBLAGE / ASAMBLEA Large - 2 grande - 2 Grande - 2 Small - 3 petit - 3 Poco - 3 P a ge 46 S A BE RGR ILLS . C OM...
- Page 25 ASSEMBLY / ASSEMBLAGE / ASAMBLEA CAUTION/ ATTENTION/ ADVERTENCIA Failure to install grease tray will cause hot grease to drip from bottom of grill with risk of fire or property damage. Si le plateau d'écoulement de la graisse n'est pas installé, de la graisse chaude pourrait s'écouler de la partie inférieure du gril et provoquer un risque d'incendie ou des dommages matériels.
- Page 26 ASSEMBLY / ASSEMBLAGE / ASAMBLEA PRESS APPUYEZ OPRIMA P a ge 48 S A BE RGR ILLS . C OM...
- Page 27 ASSEMBLY / ASSEMBLAGE / ASAMBLEA CAUTION/ ATTENTION/ ADVERTENCIA Cylinder valve must face as shown once tank is attached. Failure to install cylinder correctly may allow gas hose to be damaged in operation, resulting in the risk of fire. Le robinet du réservoir doit être orienté vers le devant du chariot une fois le réservoir fixé...
-
Page 28: Troubleshooting
EMERGENCIES: If a gas leak cannot be stopped, or a fire occurs due to gas leakage, call the fire department. Emergencies Possible Cause Prevention/Solution • • Gas leaking from cracked/cut/ Damaged hose. Turn off gas at LP cylinder or at source on natural gas systems. Discontinue use burned hose. - Page 29 Troubleshooting (continued) Problem Possible Cause Prevention/Solution • • Sudden drop in gas flow or low Out of gas. Check for gas in LP cylinder. • • flame. Excess flow valve tripped. Turn off knobs, wait 30 seconds and light grill. If flames are still low, turn off knobs and LP cylinder valve.
- Page 30 ASSEMBLY / ASSEMBLAGE / ASAMBLEA HARDWARE LIST / LISTA DE HERRAJES / LISTE DES FERRURES Key/ Réf./ Clave Description/ Description/ Descripción Picture/ Illustré/ Ilustra Qty/ Qté/ Cant 1/4-20 x 3/8" Screw Vis ¼-20 x 3/8 po Tornillo de 1/4 -20 x 3/8" Tool Holder Porte-outil Portaherramientas...
- Page 31 ASSEMBLY / ASSEMBLAGE / ASAMBLEA Do Not tighten the screws Ne pas serrez les vis No apriete los tornillos P a ge 37 S A BE RGR ILLS . C OM...
- Page 32 ASSEMBLY / ASSEMBLAGE / ASAMBLEA P a ge 38 S A BE RGR ILLS . C OM...
Need help?
Do you have a question about the R42SC0321 and is the answer not in the manual?
Questions and answers