
Subscribe to Our Youtube Channel
Related Manuals for FabiaTech FX5638 Series


Summary of Contents for FabiaTech FX5638 Series
- Page 1 FabiaTech Corporation IPC Solution Website: http://www.fabiatech.com Email: support@fabiatech.com Small Cube System Fanless Series FX5638 User’ Manual JAN 2019 Version: 1.3 Part Number: FX5638X...
- Page 2 FabiaTech shall not be reliable for technical or editorial errors or omissions, which may occur in this document. FabiaTech shall not be reliable for any indirect, special, incidental or consequential damages resulting from the furnishing, performance, or use of this document.
-
Page 3: Table Of Contents
Table of Contents FX5638 User’ Manual ......................i Chapter 1 Introducing the FX5638 System ................1 Overview..........................1 Series Comparison Table .......................2 Layout............................3 Specifications..........................4 Packing List ..........................5 Chapter 2 Hardware Installation ....................7 Before Installation ........................7 To install Hardware- remove the bottom cover..........8 ... - Page 4 Power Setup ..........................46 Advanced CPU Controller ................47 Boot Setup ..........................52 Legacy > Boot Device Priority.................54 Chapter 4 Software Installation ....................55 System Driver .........................55 Windows 7/8/8.1 X86/X64- System Driver ...............55 VGA Driver..........................56 WIN7/8/8.1 X86/X64 Driver ..................56 USB Driver ..........................56 WIN7 X86/X64 Driver ....................56 Audio Driver...........................57 WIN7/8/8.1 X86/X64 Driver ..................57...
-
Page 5: Chapter 1 Introducing The Fx5638 System
FabiaTech Corporation Chapter 1 Introducing the FX5638 System Overview The FX5638x is an embedded system with Intel® Core™ i5 -4422E (Haswell) CPU module inside. This user’s manual provides information on the physical features, installation, and BIOS setup of the FX5638. -
Page 6: Series Comparison Table
FabiaTech Corporation Series Comparison Table Model FX5638 Processor Intel ® i5-4422E™ (HasWell) Clock Speed 1.8 GHz Intel® Turbo Boost 2.9 GHz Technology 2.0: (Max Frequency) Memory DDR3L/1333,1600/1.35V 204 Pin-DIMM*2(Max.) 8GB/16GB Graphics Display CRT/Two HD(Intel HD4600) Chipset QM87 Storage Space One CFAST &... -
Page 7: Layout
FabiaTech Corporation Layout a. FX5638 LAN1 LAN2 RESET LINK POWER BUTTON EAR-PHONE DISPLAY LAN1 LAN2 COM4 COM3 COM2 COM1 DC IN DC12~24V ANTENNA ANTENNA... -
Page 8: Specifications
FabiaTech Corporation Specifications Processor Board – 4th Generation Intel® Core™ i5-4422E (Dual Core 1.8GHz,3MB L3 Cache, 25 Watts and support Intel® Turbo Boost Technology up to 2.9GHz) low power processor with 8GB DDR3L-RAM (Two So-DIMM sockets support up to 16GB DDR3L maximum) I/O Outlets –... -
Page 9: Packing List
FabiaTech Corporation Packing List Upon receiving the package, verify the following things. Should any of the mentioned happens, contact us for immediate service. • Unpack and inspect the FX5638 package for possible damage that may occur during the delivery process. - Page 10 FabiaTech Corporation...
-
Page 11: Chapter 2 Hardware Installation
FabiaTech Corporation Chapter 2 Hardware Installation This chapter introduces the system connectors & jumper settings, and guides you to apply them for field application. Before Installation Before you install the system, make sure you follow the following descriptions. 1. Before removing the cover, shut down the operation System and disconnect power switch to off and unplug AC-to DC Adapter cable. -
Page 12: To Install Hardware- Remove The Bottom Cover
FabiaTech Corporation To install Hardware- remove the bottom cover If you are installing following hardware items, you can remove the bottom cover. They include SATA 2.5" HDD inside, mini PCIE WLAN or GPRS module, and DDR3L- RAM module to the FX5638. (Please see the spots circled.) a. - Page 13 FabiaTech Corporation b. Installing hard disk: SATA Hard disk, SSD or CFAST Faster Screws up the Hard disk or SSD device to HDD metal frame before plug to the SATA connector then insert to SATA slot and screws up metal frame to system.
- Page 14 FabiaTech Corporation d. Installing PCIe Mini Card Module FX5638 supports PCIe mini card socket; you may extend additional PCIe mini card module and SIM card to system. Connect to the antenna cable from rear and front side antenna holes to GPRS or Wireless LAN module and install the SIM card for GPRS.
- Page 15 FabiaTech Corporation e. Installing the universal fixers on FX5638 Please refer to the down side figure for installing the FX5638 with universal fixers. e1. FX5501K1- Wall Mounting Kit M3*P0.5 e2. FX5504K1- Panel Mounting Kit#1 (VESA-75*75/100*100) M3*P0.5 e3. FX5407K3- Panel Mounting Kit#2 (VESA-50*50/75*75/100*100) M3*P0.5...
- Page 16 FabiaTech Corporation e4. FX5622K1- Rack Mounting Kit M3*P0.5 e4-1. FX5622K1- Rack Mounting Kit M3*P0.5...
-
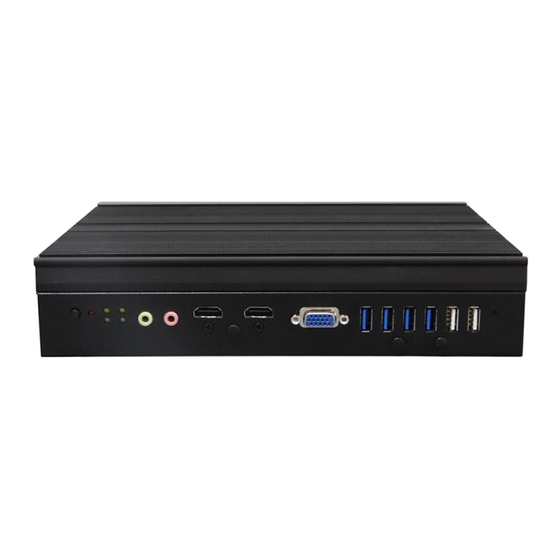
Page 17: Led Indicators (On The Front Panel)
FabiaTech Corporation LED Indicators (On the Front Panel) The Power Button and HDD LED have two distinctive statuses: Off for inactivity and blinking light for active operation. And the 4 LED’s for LAN ports. The up side LED (Orange) indicates data is being accessed and the down side LED’s (Green) indicates on-line status. - Page 18 FabiaTech Corporation 1. A VGA (CRT) connector is provided for VGA signals. DB15 Signal Green Blue Hsync Vsync DDC Data DDC Clock 5 & 10 Digital Ground 6,7,8 Analog Ground Others Not Used Connecting the Display2 (HD) and Display3 (HD) port...
- Page 19 FabiaTech Corporation Connecting the Giga-LAN ports The RJ45 connector with 2 LED’s for LAN. The left side LED (orange) indicates data is being accessed and the right side LED (green) indicates on-line status. (On indicates on-line and off indicates off-line) The following lists the pin assignment of RJ45.
-
Page 20: Connecting The Dc Power And Power Button
FabiaTech Corporation Connecting the DC Power and Power Button Power is supplied through an external AC/DC power adapter or power DC In. Take reference to the technical specification section for information about AC/DC power input voltage. See following figure. DC-Power Jack: Plug External AC/DC power adapter into DC-jack (2) plug the cable into hole (1), then pull up the end of the cable (3). -
Page 21: Internal Connector And Jumper Setting
FabiaTech Corporation Internal Connector and Jumper Setting The COM1 and COM2 are designed for multiple proposes. Using JP5 (COM1) or JP6 (COM2) is to select RS485 terminator resistor. JP7 is used to select 3VSB /3.3V voltage with PCIE mini card module (See a PCIE mini card module specification.) JP2 is used to clear CMOS data, and other connectors are reserved for other usage. - Page 22 FabiaTech Corporation c. JP7: Select 3VSB/3.3V Voltage for PCIE Mini Card Module When installing the PCIE Mini card module, if the card doesn’t work properly (See a PCIE module card specification pin-24 3.3VAUX.), you can select 3VSB/3.3V voltage. (Defaulted 2, 3 closed.) 3.3V StandBy/3.3VSB...
-
Page 23: Chapter 3 Bios Setup
FabiaTech Corporation Chapter 3 BIOS Setup This chapter describes the BIOS setup. Overview BIOS are program located on a Flash memory chip on a circuit board. It is used to initialize and set up the I/O peripherals and interface cards of the system, which includes time, date, hard disk drive, and connected devices such as the video display, diskette drive, USB device, and the USB keyboard. -
Page 24: Boot Manager Setup
FabiaTech Corporation Press “ESC” or “Delete” key enter to BIOS Setup screen Boot Manager Setup Use this screen to specify the order in which the system checks for the device to boot from. To access this screen, select Boot Option Menu on the Boot Manager... -
Page 25: Device Manager Setup
FabiaTech Corporation Device Manager Setup You can use this screen to select options for the Devices List Configuration. Device Manager is a Super I/O chipset on the system board that controls the basic serial port functions, and hardware monitor. - Page 26 FabiaTech Corporation SIO ITE8786E IO Configuration This section describes the function of Super I/O (ITE8787E) settings. Serial Port A/B This item allows users to enable and disable Serial Port A/B (COM1/2). If set to Auto, is EFI/OS chooses configuration. Available Options: Disabled, Enabled and Auto...
- Page 27 FabiaTech Corporation COM Port 1/2 Select Function These fields item can select RS-232, RS-422 and RS-485 of select port 1/2. Available Options: RS-232, RS-422 and RS485 Default setting: RS-232 Serial Port C/D This item allows users to enable and disable Serial Port C/D (COM3/4). If set to Auto, is EFI/OS chooses configuration.
- Page 28 FabiaTech Corporation Hardware Monitor On the Hardware Monitor screen, you can monitor the CPU temperature, CPU voltage, and 3.3V voltage…...
-
Page 29: Scu Setup
FabiaTech Corporation SCU Setup On the menu, you can perform the following functions 1. Main 2. Advanced Boot Configuration Peripheral Configuration SATA Configuration Thermal Configuration Video Configuration USB Configuration Chipset Configuration PCI Configuration Console Configuration Chipset PCIE Controller 3. Security... -
Page 30: Keyboard Convention
FabiaTech Corporation Exit Saving Changes: Exit system setup after saving the changes.F10 key can be used for this operation. Save Change Without Exit: Save changes and without exiting system. Exit Discarding Changes: Exit system setup without saving any changes. ESC key can be used for this operation. -
Page 31: Main Setup
FabiaTech Corporation Main Setup This section describes basic system hardware configuration, CPU information, system clock setup and BIOS version information. If the CPU board is already installed in a working system, you will not need to select this option anymore. -
Page 32: Advanced Setup
FabiaTech Corporation Advanced Setup Select the Advanced tab from the setup screen to enter the Advanced BIOS Setup screen. You can select any of the items in the left frame of the screen, such as Boot Configuration, to go to the sub menu for that item. You can display an Advanced BIOS Setup option by highlighting it using the <Arrow>... -
Page 33: Boot Configuration
FabiaTech Corporation Boot Configuration Boot Up Num-Lock This field is used to activate the Num Lock function upon system boot. If the setting is on, after a boot, the Num Lock light is lit, and user can use the number key. -
Page 34: Peripheral Configuration
FabiaTech Corporation Peripheral Configuration This section describes the function of peripheral settings. Azalia Controller This field specifies the internal Azalia codec Control. Available Options: Auto, Enabled and Disabled Default setting: Auto... -
Page 35: Sata Configuration
FabiaTech Corporation SATA Configuration You can use this screen to select options for the SATA Configuration Settings. Use the up and down <Arrow> keys to select an item. Use the <Plus> and <Minus> keys to change the value of the selected option. A description of the selected item appears on the right side of the screen. - Page 36 FabiaTech Corporation SATA Port0/1 Hot plug The system SATA HDD corresponding SATA port 0 hot plugs, this item allows users to enable or disable SATA port 0. Available Options: Disabled, and Enabled Default setting: Disabled Spin-Up Device The item supports staggered Spin-Up (SSS) in AHCI Host Capability register Bit 27.
-
Page 37: Video Configuration
FabiaTech Corporation Video Configuration You can use this screen to select options for the video Configuration. Use the up and down <Arrow> keys to select an item. Use the <Plus> and <Minus> keys to change the value of the selected option. - Page 38 FabiaTech Corporation Internal Graphics Internal Graphics Device This field is select internal graphics controller device to Enabled or Disabled. Available Options: Enabled, Disabled, and Auto Default setting: Auto IGD – Aperture Size This field specifies the system memory size that can be used by the Internal Graphics Device (IGD).
- Page 39 FabiaTech Corporation Available Options: 0MB, 32MB, 64MB, 96MB, 128MB, 160MB, 192MB, 224MB, 256MB, 288MB, 320MB, 352MB, 384MB, 416MB, 448MB, 480MB, 512MB, and 1024MB Default setting: 32 MB IGD – DVMT Size This field specifies allows you to select the maximum amount of graphics memory of DVMT 5.0 to be shared with the system memory.
-
Page 40: Usb Configuration
FabiaTech Corporation USB Configuration You can use this screen to select options for the USB Configuration. USB BIOS Support The USB BIOS Support refers to the USB mouse, USB keyboard and USB storage support. Normally if this option is not enabled; any attached USB mouse or USB keyboard will not become available until a USB compatible operating system is fully booted with all USB drivers loaded. - Page 41 FabiaTech Corporation XHCI The item XHCI (eXtensible Host Controller Interface) a workaround for specification for Universal Serial Bus 3.0 support. Available Options: Disabled, Auto, Smart Auto, and Enabled Default setting: Disabled...
-
Page 42: Chipset Configuration
FabiaTech Corporation Chipset Configuration VT-d The Item is Check to enable VT-d function on MCH. Available Options: Disabled, and Enabled Default setting: Enabled After G3 On This field is specify what state to go to when power is re-applied after power failure (G3 State).The states S0(G0) is working of power state, the states S5(G2) is soft off of... - Page 43 FabiaTech Corporation Max TOLUD This field is Max value of TOLUD; Dynamic assignment would adjust TOLUD automatically based on largest MMIO length of installed graphic controller. Available Options: Dynamic, 1GB, 1.25GB, 1.5GB, 1.75GB, 2GB, 2.25GB, 2.5GB, 2.75GB, 3GB, and 3.25GB...
-
Page 44: Console Redirection Setup
FabiaTech Corporation Console Redirection Setup This option turns on Console Redirection Setup for remote access support in the BIOS and is the default setting. The console remote access feature requires the use of the serial port connector located at the back side of the system. - Page 45 FabiaTech Corporation Available Options: COM_1, COM_2, COM_3, COM_4, PCI Device, and All Device Ports. Default setting: COM_1 Terminal Type This field is selecting the target terminal type. Available Options: VT100, vt100+, VT-UTFB, and PC_ANS1 Default setting: VT100 Baud Rate This field is select Serial ports can use baud rate. Just keep in mind that speed must match terminal setting.
- Page 46 FabiaTech Corporation C (Console).R (Redirection) After Post These fields is select console redirection is active during post and during boot loader or always active or off active. (Some OSS may not work if set to Always) Available Options: Yes, and No...
-
Page 47: Chipset Pcie Controller
FabiaTech Corporation Chipset PCIE Controller You can use this screen to select options for the PCIE controller Configuration. PCIe LAN1/LAN2 Controller This field specifies the Enabled or Disable of the onboard LAN1 and LAN2 chip. Available Options: Disabled, Enabled Default setting: Enabled... -
Page 48: Security Setup
FabiaTech Corporation Security setup There are two security passwords: Supervisor and User. Supervisor a privileged person that can change the User password from the BIOS, According to the default setting, both access passwords are not set up and are only valid after you set the password from the BIOS. - Page 49 FabiaTech Corporation 5. Select the Disabled or Enabled. Enabled: System will ask input password on post time. Disabled: System will ask input password on post time. When go to BIOS setup. 6. Point to Save Settings and Exit and press Enter. (or Press F10) 7.
-
Page 50: Power Setup
FabiaTech Corporation Power Setup The Power menu allows user to set or control various parameters on power manager, and sleep states. Wake on LAN This item is can select Enabled to integrated LAN to wake up the system. Available options: Enabled, Disabled... -
Page 51: Advanced Cpu Controller
FabiaTech Corporation Advanced CPU Controller You can use this screen to select options for the CPU controller Configuration. Hardware Prefetcher This field specifies the Enabled or Disable to turn on/turn off the MLC (Mid Level Cache, L2 Cache) streamer prefetcher. - Page 52 FabiaTech Corporation HT Support This field specifies can select Auto or Disabled of Hyper-Threading. Available Options: Disabled, and Auto Default setting: Auto Excute Disable Bit This field specifies is XD can prevent certain classes of malicious buffer overflow attacks when combined with supporting OS.
- Page 53 FabiaTech Corporation Config TDP Configurations You can use this screen to select options for the CPU controller Configuration. Configurable TDP Boot Mode This field specifies is Configure TDP Mode as Nominal / Up / Down for windows OS. Available Options: Nominal, Up, and Down...
- Page 54 FabiaTech Corporation Custom Configurable TDP Setting Custom ConfigTDP Count This field specifies is Configure the number of custom ConfigTDP levels required. Note: this must be 1 if Configurable TDP Lock is enabled. Available Options: 1, and 0 Default setting: 1...
- Page 55 FabiaTech Corporation Custom Setting 0 Long Term Power Limit This field specifies is Long Term Power Limit (aka Power Limit 1) value in Watts. XE SKU: any value can be programmed. Overclocking SKU: Value must be between Max and Min Power Limits. Other SKUs: This Value must be between Min Power Limit and TDP Limit.
-
Page 56: Boot Setup
FabiaTech Corporation Boot Setup Select the Boot tab from the setup screen to enter the Boot BIOS Setup screen. You can select any of the items in the left frame of the screen, such as Legacy, to go to the sub menu for that item. You can display a Boot BIOS Setup option by highlighting it using the <Arrow>... - Page 57 FabiaTech Corporation Available Options: Disabled, and Enabled Default setting: Disabled Network Stack This field specifies the PXE boot ROM of the onboard LAN chip. Available Options: Disabled, Enabled Default setting: Disabled Add Boot Options This field specifies the position in boot order for shell, network and removable.
-
Page 58: Legacy > Boot Device Priority
FabiaTech Corporation Legacy > Boot Device Priority Use this screen to specify the order in which the system checks for the device to boot from. To access this screen, select Normal or Advance of Normal Boot Menu on the Boot Setup screen. -
Page 59: Chapter 4 Software Installation
FabiaTech Corporation Chapter 4 Software Installation The enclosed DVD diskette includes VGA, Audio, System, USB and LAN driver. To install and configure you FX5638 system, you need to perform the following steps. System Driver Windows 7/8/8.1 X86/X64- System Driver Installs Intel QM87 system Chipset, the driver include the Core PCI, ISAPNP, PCIE, USB and IDE/SATA Device Drive. -
Page 60: Vga Driver
FabiaTech Corporation VGA Driver WIN7/8/8.1 X86/X64 Driver Step 1: To install the VGA driver, insert the DVD ROM into the DVD ROM device, and enter DRIVER>VGA>HASWELL >WIN32 or >WIN64. Step 2: Execute Setup.exe file. Step 3: The screen shows the SETUP type. Press any key to enter the main menu. -
Page 61: Audio Driver
FabiaTech Corporation Audio Driver WIN7/8/8.1 X86/X64 Driver Step 1: To install the AUDIO driver, insert the CD ROM into the CD ROM device, and enter DRIVER>AUDIO>ALC888>WIN8 > WIN32, or WIN64. Step 2: Execute 32bit_Win7_Win8_Win81_R273.exe file. Step 3: The screen shows the SETUP type. Press any key to enter the main menu. -
Page 62: Watchdog Timer
FabiaTech Corporation Watchdog Timer This section describes how to use the Watchdog Timer, including disabled, enabled, and trigger functions. The system is equipped with a programmable time-out period watchdog timer. You can use your own program to enable the watchdog timer. Once you have enabled the watchdog timer, the program should trigger the I/O every time before the timer times out. -
Page 63: Watchdog Timer Setting
FabiaTech Corporation Watchdog Timer Setting T The watchdog timer is a circuit that may be used from your program software to detect system crashes or hang-ups. The watchdog timer is automatically disabled after reset. Once you have enabled the watchdog timer, your program must trigger the watchdog timer every time before it times out. -
Page 64: Watchdog Timer Enabled
FabiaTech Corporation Watchdog Timer Enabled To enable the watchdog timer, you have to output a byte of timer factor to the watchdog register whose address is 2eh and data port is 2fH. The following is an Assemble program, which demonstrates how to enable the watchdog timer and set the time-out period at 28 seconds. -
Page 65: Watchdog Timer Trigger
FabiaTech Corporation al,28h ; Set timeout interval as 28seconds and start counting dx,al ;------------------------------------------ ; Exit extended function mode ;------------------------------------------ dx,2eh al,01h dx,al Watchdog Timer Trigger After you enable the watchdog timer, your program must write the same factor as enabling to the watchdog register at least once every time-out period to its previous setting. - Page 66 FabiaTech Corporation...
-
Page 67: Chapter 5 Technical Reference
FabiaTech Corporation Chapter 5 Technical Reference This section provider description the hardware that may occur when you operate the system, and also gives you the suggestions on solving the problems. Topic include: Technical Reference FX5638X Dimension Technical Reference Physical and Environmental Temperature: Operating -20°C ~ 50°C... -
Page 68: I/O Port Address Map
FabiaTech Corporation I/O Port Address Map Each peripheral device in the system is assigned a set of I/O port addresses, which also becomes the identity of the device. There is a total of 1K-port address space available. The following table lists the I/O port addresses used on the Industrial CPU Card. -
Page 69: Interrupt Request Lines (Irq)
FabiaTech Corporation Interrupt Request Lines (IRQ) There are a total of 15 IRQ lines available on the Industrial CPU Card. Peripheral devices use interrupt request lines to notify CPU for the service required. The following table shows the IRQ used by the devices on the Industrial CPU Card. -
Page 70: Serial Ports
FabiaTech Corporation Serial Ports The ACEs (Asynchronous Communication Elements ACE1 to ACE2) are used to convert parallel data to a serial format on the transmit side and convert serial data to parallel on the receiver side. The serial format, in order of transmission and reception, is a start bit, followed by five to eight data bits, a parity bit (if programmed) and one, one and half (five-bit format only) or two stop bits. - Page 71 FabiaTech Corporation Bit 2: Enable Receiver Line Status Interrupt (ELSI) Bit 3: Enable MODEM Status Interrupt (EDSSI) Bit 4: Must be 0 Bit 5: Must be 0 Bit 6: Must be 0 Bit 7: Must be 0 Interrupt Identification Register (IIR) Bit 0: “0”...
- Page 72 FabiaTech Corporation Bit 5: Stick Parity Bit 6: Set Break Bit 7: Divisor Latch Access Bit (DLAB) MODEM Control Register (MCR) Bit 0: Data Terminal Ready (DTR) Bit 1: Request to Send (RTS) Bit 2: Out 1 (OUT 1) Bit 3: Out 2 (OUT 2)
- Page 73 FabiaTech Corporation Bit 4: Clear to Send (CTS) Bit 5: Data Set Ready (DSR) Bit 6: Ring Indicator (RI) Bit 7: Received Line Signal Detect (RSLD) Divisor Latch (LS, MS) Bit 0: Bit 0 Bit 8 Bit 1: Bit 1...
-
Page 74: Appendix
FabiaTech Corporation Appendix Dimension a. FX5638 250(REF) -
Page 75: Fx5501K1- Wall Mount
FabiaTech Corporation b. FX5501K1- Wall Mount O4.5 O4.5 264(REF) 278(REF) -
Page 76: Fx5504K1- Pane Mount #1
FabiaTech Corporation c. FX5504K1- Pane Mount #1 O5.5 12.5 75(REF) -
Page 77: Fx5407K3- Pane Mount Kit #2
FabiaTech Corporation d. FX5407K3- Pane Mount Kit #2 64(REF) 12.5 12.5 75(REF) -
Page 78: Fx5622K1- 1U Rack-Mount
FabiaTech Corporation e. FX5622K1- 1U Rack-Mount 31.75 OTHER CHOICE...
Need help?
Do you have a question about the FX5638 Series and is the answer not in the manual?
Questions and answers