Table of Contents
Advertisement
Quick Links
USER MANUAL AND SPECIFICATIONS
NI cRIO-9074XT
Reconfigurable Embedded Chassis with Integrated Intelligent Real-
Time Controller for CompactRIO
8
7
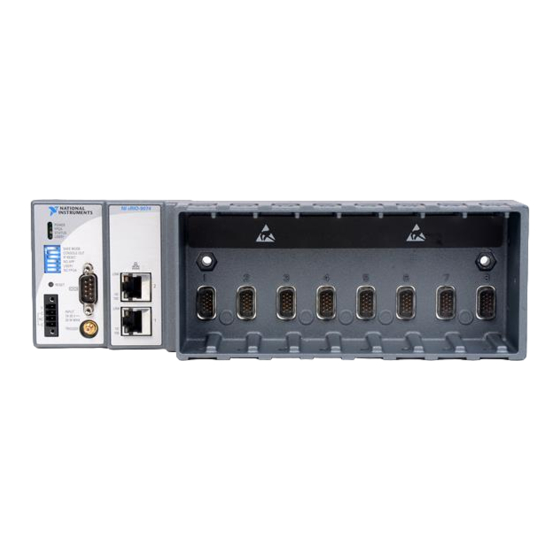
1. LEDs
2. RS-232 Serial Port
3. RJ-45 Ethernet Port 2
4. RJ-45 Ethernet Port 1
This document describes how to connect the cRIO-9074XT to a network and how to use the
features of the cRIO-9074XT.
Figure 1. CompactRIO cRIO-9074XT
1
POWER
FPGA
STATUS
USER1
SAFE MODE
CONSOLE OUT
IP RESET
NO APP
USER1
NO FPGA
RESET
V
INPUT
C
19-30 V
NC
20 W MAX
C
TRIGGER
6
2
NI cRIO-907x
LINK
10/
100
LINK
10/
100
5
5. SMB Connector
6. Power Connector
7. Reset Button
8. DIP Switches
3
4
Advertisement
Table of Contents

Related Manuals for National Instruments CompactRIO cRIO-9074XT


Summary of Contents for National Instruments CompactRIO cRIO-9074XT
- Page 1 USER MANUAL AND SPECIFICATIONS NI cRIO-9074XT Reconfigurable Embedded Chassis with Integrated Intelligent Real- Time Controller for CompactRIO Figure 1. CompactRIO cRIO-9074XT NI cRIO-907x POWER FPGA STATUS USER1 SAFE MODE CONSOLE OUT IP RESET NO APP USER1 NO FPGA LINK RESET...
-
Page 2: Safety Guidelines For Hazardous Locations
Safety Guidelines Operate the cRIO-9074XT only as described in this document. Caution Do not operate the cRIO-9074XT in a manner not specified in this document. Product misuse can result in a hazard. You can compromise the safety protection built into the product if the product is damaged in any way. If the product is damaged, return it to NI for repair. -
Page 3: Electromagnetic Compatibility Guidelines
Two M4 or number 10 panhead screws (for panel mounting only) • A number 2 Phillips screwdriver • Power supply Note Visit ni.com/info and enter the Info Code rdsoftwareversion determine which software you need to use the cRIO-9074XT. NI cRIO-9074XT User Manual and Specifications | © National Instruments | 3... - Page 4 Mounting the CompactRIO Reconfigurable Embedded Chassis You can mount the chassis in any orientation on a 35 mm DIN rail or on a panel. Use the DIN rail mounting method if you already have a DIN rail configuration or if you need to be able to quickly remove the CompactRIO chassis.
- Page 5 You will be unable to read the serial number after you have mounted the chassis. Caution Make sure that no I/O modules are in the chassis before mounting it. NI cRIO-9074XT User Manual and Specifications | © National Instruments | 5...
- Page 6 Mounting the Chassis on a Panel Panel or wall mounting is the best method for applications that are subject to high shock and vibration. You can use the NI 9905 panel mount kit to mount the cRIO-9074XT on a flat surface.
-
Page 7: Mounting The Chassis On A Din Rail
1.3 N · m (11.5 lb · in.). Figure 7. Installing the DIN Rail Clip on the cRIO-9074XT Insert one edge of the DIN rail into the deeper opening of the DIN rail clip. NI cRIO-9074XT User Manual and Specifications | © National Instruments | 7... - Page 8 Figure 8. One Edge of the DIN Rail Inserted in a Clip 1. DIN Rail Clip 2. DIN Rail 3. DIN Rail Spring Press down firmly on the chassis to compress the spring until the clip locks in place on the DIN rail.
- Page 9 Use a standard Category 5 (CAT-5) or better shielded, twisted-pair Ethernet cable to connect the chassis to an Ethernet hub, or use an Ethernet crossover cable to connect the chassis directly to a computer. NI cRIO-9074XT User Manual and Specifications | © National Instruments | 9...
-
Page 10: Wiring Power To The Chassis
Caution To prevent data loss and to maintain the integrity of your Ethernet installation, do not use a cable longer than 100 m. The first time you power up the chassis, it attempts to initiate a DHCP network connection. If the chassis is unable to initiate a DHCP connection, it connects to the network with a link- local IP address with the form . - Page 11 These options determine how the chassis behaves when the controller is reset in various conditions. Use the RIO Device Setup utility to select reset options. Access the RIO Device Setup utility by selecting Start»All Programs»National Instruments»NI-RIO»RIO Device Setup. NI cRIO-9074XT User Manual and Specifications | © National Instruments | 11...
- Page 12 Table 1. CompactRIO Reset Options Chassis Reset Option Behavior Do not autoload VI Does not load the FPGA bit stream from flash memory. Autoload VI on device Loads the FPGA bit stream from flash memory to the FPGA powerup when the controller powers on. Autoload VI on device reboot Loads the FPGA bit stream from flash memory to the FPGA when you reboot the controller either with or without...
-
Page 13: Configuring Dip Switches
You can put the controller into safe mode by powering it up either with the SAFE MODE switch in the ON position or with no software installed on the NI cRIO-9074XT User Manual and Specifications | © National Instruments | 13... -
Page 14: Ip Reset Switch
drive. Refer to the Measurement & Automation Explorer Help for more information about installing software on a controller and reformatting the drive on the controller. CONSOLE OUT Switch With a serial-port terminal program, you can use the CONSOLE OUT switch to read the IP address and firmware version of the controller. -
Page 15: Using The Reset Button
Reinstall software on the chassis. Refer to the Measurement & Automation Explorer Help for information about installing software on the chassis. NI cRIO-9074XT User Manual and Specifications | © National Instruments | 15... - Page 16 Number of Flashes Every Few Seconds Indication The chassis is in safe mode because the SAFE MODE DIP switch is in the ON position or there is no software installed on the chassis. Refer to Configuring DIP Switches section for information about the SAFE MODE DIP switch.
-
Page 17: Rs-232 Serial Port
SMB Connector Output Characteristics Minimum high-level output voltage With -100 µA output current 2.9 V With -16 mA output current 2.4 V With -24 mA output current 2.3 V NI cRIO-9074XT User Manual and Specifications | © National Instruments | 17... -
Page 18: Internal Real-Time Clock
Maximum low-level output voltage With 100 µA output current 0.10 V With 16 mA output current 0.40 V With 24 mA output current 0.55 V Driver type CMOS Maximum sink/source current ±24 mA Maximum 3-state output leakage ±5 µA current Input Characteristics Minimum input voltage Minimum low-level input voltage... -
Page 19: Power Requirements
MAINS voltage. MAINS is a hazardous live electrical supply system that powers equipment. This category is for measurements of voltages from specially protected secondary circuits. Such voltage measurements include signal levels, NI cRIO-9074XT User Manual and Specifications | © National Instruments | 19... -
Page 20: Safety And Hazardous Locations Standards
special equipment, limited-energy parts of equipment, circuits powered by regulated low- voltage sources, and electronics. Caution Do not connect the cRIO-9074XT to signals or use for measurements within Measurement Categories II, III, or IV. Note Measurement Categories CAT I and CAT O are equivalent. These test and measurement circuits are not intended for direct connection to the MAINS building installations of Measurement Categories CAT II, CAT III, or CAT IV. -
Page 21: Online Product Certification
Operating humidity (IEC 60068-2-78) 10% RH to 90% RH, noncondensing Storage humidity (IEC 60068-2-78) 5% RH to 95% RH, noncondensing Pollution Degree Maximum altitude 2,000 m Indoor use only. NI cRIO-9074XT User Manual and Specifications | © National Instruments | 21... -
Page 22: Environmental Management
This device contains a long-life coin cell battery. If you need to Cd/Hg/Pb replace it, use the Return Material Authorization (RMA) process or contact an authorized National Instruments service representative. For more information about compliance with the EU Battery Directive 2006/66/EC about Batteries and Accumulators and Waste Batteries and Accumulators, visit ni.com/environment/... -
Page 23: Worldwide Support And Services
(EMC) and product safety. You can obtain the DoC for your product by visiting ni.com/certification. If your product supports calibration, you can obtain the calibration certificate for your product at ni.com/calibration. NI cRIO-9074XT User Manual and Specifications | © National Instruments | 23... - Page 24 CONTAINED HEREIN AND SHALL NOT BE LIABLE FOR ANY ERRORS. U.S. Government Customers: The data contained in this manual was developed at private expense and is subject to the applicable limited rights and restricted data rights as set forth in FAR 52.227-14, DFAR 252.227-7014, and DFAR 252.227-7015. © 2012—2016 National Instruments. All rights reserved. 375874C-01 Mar16...
Need help?
Do you have a question about the CompactRIO cRIO-9074XT and is the answer not in the manual?
Questions and answers