
Subscribe to Our Youtube Channel
Related Manuals for Rose electronics RackView High-Resolution 17


Summary of Contents for Rose electronics RackView High-Resolution 17
- Page 1 RackView High-Resolution 17" Sliding KVM Drawer - 1920 x 1200 Installation Operation Manual 10707 Stancliff Road Phone: (281) 933-7673 Houston, Texas 77099 techsupport@rose.com...
- Page 2 RackView High-Resolution 17” KVM Drawer to be in good working order for one year from the date of purchase from Rose Electronics or an authorized dealer. Should this product fail to be in good working order at any time during this one-year warranty period, Rose Electronics will, at its option, repair or replace the Unit as set forth below.
- Page 3 DECLARATIONS OF CONFORMITY This is to certify that, when installed and used according to the instructions in this manual, the units listed and described here are shielded against the generation of radio interferences in accordance with the application of Council Directives 2014/30/EU and 2014/30/EU, as well as these standards: ■...
-
Page 4: Table Of Contents
TABLE OF CONTENTS Contents Disclaimer System Introduction Features Package Contents RackView Options RackView Model RackView Layout RackView Rear Panel Connector Layout Installation Procedure Installation of the RackView 17-inch Operation of the RackView 17-inch Cabling RackView to an External Device Connection to a PS2 or USB Server Connection to an External KVM Switch RackView Cables RackView Operation... - Page 5 TABLE OF CONTENTS Tables Table 1. RackView product and packaging dimensions ..............16 Table 2. RackView product and packaging dimensions (including a KVM switch) ......16 Table 3. Video resolution related to LCD specification ..............17 Table 4. DVI-D and VGA video formats .................... 19 Table 5.
-
Page 6: System Introduction
(See limited warranty). System Introduction Thank you for choosing the Rose Electronics RackView High Resolution 17" Console Drawer. This product is the result of Rose Electronics’ commitment to providing state-of-the-art solutions for today’s demanding workplace. -
Page 7: Package Contents
It is very important to mount the equipment in a suitable cabinet or on a stable surface. Make sure the mounting location has good ventilation, is out of direct sunlight, and away from sources of excessive dust, dirt, heat, water, moisture, and vibration. RackView High-Resolution 17" Manual... -
Page 8: Rackview Model
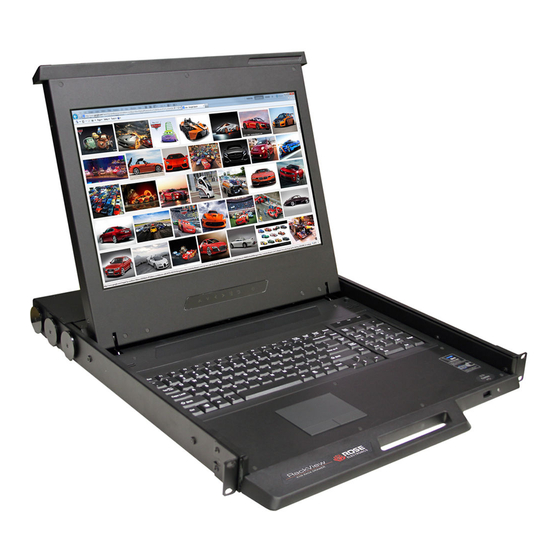
RackView Model The RackView is available as described below. RackView Layout RackView High-Resolution 17-inch color LCD Figure 1. RackView product layout - key features RackView Rear Panel Connector Layout The RackView rear panel includes an HD15(KVM) and DVI-D connector as standard. The HD15(KVM) connector supports VGA video, and also the keyboard/mouse interface. -
Page 9: Installation Procedure
Measure the depth of the front and rear rack rails Align each rear-mounting slide to a suitable length (depth) Step 3 Complete the Installation Fix the RackView Console Drawer into the Rack A set of mounting accessories is provided Figure 3. RackView installation procedure RackView High-Resolution 17" Manual... -
Page 10: Operation Of The Rackview 17-Inch
Operation of the RackView 17-inch Step 1 Hold the handle and slide out the RackView drawer Step 2 Flip up the LCD to a suitable viewing angle Step 3 Operate the RackView Console Drawer Figure 4. RackView console drawer operation RackView High-Resolution 17" Manual... -
Page 11: Cabling Rackview To An External Device
RackView, we suggest turning off the power to all devices. Apply power to connected devices only after the RackView has been powered-on. Rose Electronics is not responsible for any product damage or warranty claims caused in this way. -
Page 12: Rackview Cables
With the HDMI option installed, the RackView can be cabled to 3 different video sources as shown below. LCD Console Drawer HDMI HDMI Player DVI-D Server Figure 7. Connection showing 3 external devices connected to RackView FH RackView High-Resolution 17" Manual... -
Page 13: Rackview Operation
Locate the “Video Input Select” button on the OSD display control panel Push the Video Input Select button to toggle between VGA and DVI Input Select the appropriate Video Input format (VGA or DVI) OSD Selection OSD Selection Panel Figure 8. OSD menu selection RackView High-Resolution 17" Manual... -
Page 14: Osd Operation
PIP position: Enter into PIP position PIP source: Enter into the Sub source and sound source System reset: Return the adjustment back to factory setting Information: Select for Help Figure 9. RackView OSD configuration and settings RackView High-Resolution 17" Manual... -
Page 15: Picture In Picture And Picture By Picture Modes (Pip And Pbp)
OSD Menu → MISC → PIP Mode → Large / Small PBP Mode Display the Sub screen next to the Main screen. OSD Menu → MISC → PIP Mode → PBP Figure 10. PIP and PBP configuration RackView High-Resolution 17" Manual... -
Page 16: Figure 11. Pip And Pbp Settings And Operation
If the RackView KVM Drawer fails to synchronize correctly with the attached product (PC, Switch, Extender), and the monitor displays a distorted video pattern, press the screen power reset button once on the RackView keyboard tray to re-synchronize the video signal RackView High-Resolution 17" Manual... - Page 17 The Unit does not operate normally when all operating instructions have been followed. The Unit has been dropped or the case has been damaged. The Unit exhibits a distinct change in performance, indicating a need for service. RackView High-Resolution 17" Manual...
-
Page 18: Maintenance And Repair
This Unit does not contain any internal user-serviceable parts. In the event a Unit needs repair or maintenance, you must first obtain a Return Authorization (RA) number from Rose Electronics or an authorized repair center. This Return Authorization number must appear on the outside of the shipping container. -
Page 19: Appendices
Operating Humidity Operating: 20~90%, non-condensing Shock 10G acceleration (11ms duration) Vibration 5~500Hz 1G RMS random vibration Regulation/Approvals cUL, FCC, CE, RoHS2, REACH Compatibility Multi-platform - Mix PCs, SUNs, IBMs, HPs and DELLs. LCD Panel MTBF 20,000 hours RackView High-Resolution 17" Manual... -
Page 20: Appendix B - Part Numbers
RackView Options HDMI video with audio 3G/HD/SD-SDI video Trackball 2-button mouse option /nnnDC 12/24/48/125/250V DC power Keyboard Language Option: /UK, /FR, /IT, /DN, /BE, /NO, /DE, /ES, /PO, /SI, /SD, /DA, /JP, /TW. Add /nn to part RackView High-Resolution 17" Manual... -
Page 21: Figure 12. Rackview Chassis Dimensions
23.2 x 31.8 x 5.5 inch 12.1Kg 18.1Kg Table 2. RackView product and packaging dimensions (including a KVM switch) RackView Chassis Dimensions Top View Front View Side View Measurement in mm Figure 12. RackView chassis dimensions RackView High-Resolution 17" Manual... -
Page 22: Figure 13 Rackview Integrated Kvm Switch Models
Figure 13 RackView integrated KVM switch models Maximum Video Resolutions Supported with an Integrated KVM Switch Video resolution 16:10 Maximum 1920 x 1200 Supported 16:9 Maximum 1920 x 1080 Maximum 1600 x 1200 Table 3. Video resolution related to LCD specification RackView High-Resolution 17" Manual... -
Page 23: Figure 14. Rackview With Hdmi Video Option
HDMI, DVI-D, VGA, S-Video, BNC, and audio inputs. This option includes a factory fitted audio speaker on the keyboard tray. The 3G/HD/SD-SDI option will increase the standard RackView chassis depth from 18.9 inches to 20.86 inches (480mm to 530mm) Figure 16. RackView with 3G/HD/SD-SDI video option RackView High-Resolution 17" Manual... -
Page 24: Table 4. Dvi-D And Vga Video Formats
SG-SDI 48kHz, 16 / 20 / 24-bit, 2 CH, Synchronized / Asynchronized Video 3G-SDI 150m at 2.97Gb/s Max transmission distance HD-SDI 250m at 1.485Gb/s 75-ohm coaxial cable SG-SDI 480m at 270Mb/s Table 5. 3G/HD/SD-SDI video formats RackView High-Resolution 17" Manual... -
Page 25: Figure 17. Rackview With A Dc Power Connector Fitted
For example, adding 48VDC to a RackView 17” would result in RV1-CAKVT17/FHD/Kn/48DC part number. Figure 17. RackView with a DC power connector fitted Table 6. RackView DC power options The DC power option excludes the AC power adapter and power cord RackView High-Resolution 17" Manual... - Page 26 ▪ ▪ WWW.ROSE.COM sales@rose.com (800) 333-9343 ▪ ▪ Rose Electronics 10707 Stancliff Road Houston, Texas 77099 Rose USA (281) 933-7673 ▪ Rose Europe +49 (0) 2454 969442 ▪ Rose Asia +65 6324 2322 Rose Australia +61 (0) 421 247083 WWW.ROSE.COM...
Need help?
Do you have a question about the RackView High-Resolution 17 and is the answer not in the manual?
Questions and answers