Rose electronics Rackview 17” Installation And Operation Manual
Dual rail lcd kvm rack drawer
Hide thumbs
Also See for Rackview 17”:
- Installation and operation manual (25 pages) ,
- Installation and operation manual (18 pages) ,
- Installation and operation manual (20 pages)
Table of Contents

Subscribe to Our Youtube Channel
Related Manuals for Rose electronics Rackview 17”


Summary of Contents for Rose electronics Rackview 17”
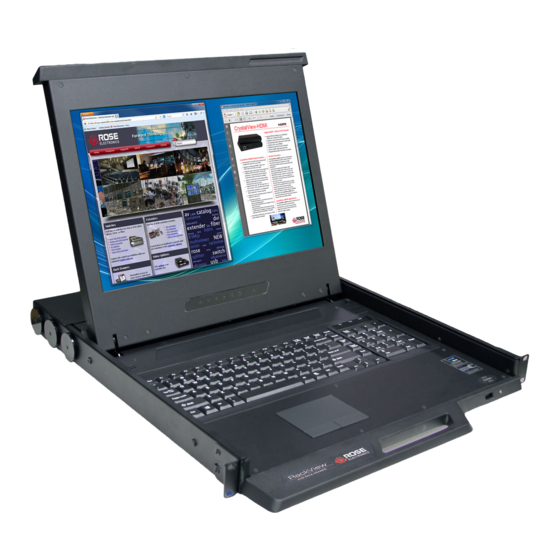
- Page 1 Rackview Dual Rail - KVM Rack Drawer INSTALLATION AND OPERATIONS MANUAL Rackview 15”, 17”, 19” Dual Rail LCD KVM Rack Drawer 1280 x 1024 Rose Electronics 10707 Stancliff Road Houston, Texas 77099 WWW.ROSE.COM Phone (281) 9337673...
- Page 2 LIMITED WARRA Rose Electronics warrants the Rackview Product to be in good working order for one year from the date of purchase from Rose Electronics. Should this product fail to be in good working order at any time during this one-year warranty period, Rose Electronics will, at its option, repair or replace the Unit as set forth below.
-
Page 3: Table Of Contents
Rose Electronics Part # MAN-RV1-CDKVT Printed In the United States of America – Revision 1.0 Table of Contents Safety Instructions Page 4 Pre-Installation and Package Contents Page 5 Layout Diagram and Dimensions Page 6-7 Installation Procedure Page 7-9 OSD Function and Front Panel Controls... -
Page 4: Safety Instructions
Safety Instructions Please read all of these instructions carefully before you use the device. Save this manual for future reference. • Unplug equipment before cleaning. Don’t use liquid or spray detergent; use a moist cloth. • Keep equipment away from excessive humidity and heat. Preferably, keep it in an air-conditioned environment with temperatures not exceeding 50º... -
Page 5: Pre-Installation And Package Contents
Pre-Installation and Package Contents Before Installation: It is very important to mount the equipment in a suitable cabinet or on a stable surface. Make sure the mounting location has good ventilation, is out of direct sunlight, and away from sources of excessive dust, dirt, heat, water, moisture and vibration. Unpacking: The equipment comes with the standard parts shown in package content. -
Page 6: Layout Diagram And Dimensions
Rackview Layout Diagram & Dimensions Rackview Dual Rail 15” Model Rackview Dual Rail 17” Model Rackview Dual Rail 19” Model Page 6 KVM Rack Drawer Dual Rail 15”-17”-19” WWW.ROSE.COM... -
Page 7: Installation Procedure
Rackview Product and Packaging Dimensions Product Dimension Packing Dimension Gross Model (W x D x H) approx (W x D x H) approx Weight Weight 449.8 x 443.4 x 44 mm 605 x 560 x 202 mm 10.5 kg 15.5 kg RV1-CDKVT15/DVI 17.7 x 17.5 x 1.7 inch 23.8 x 22.0 x 8.0 inch... - Page 8 Washers, nuts and keys Installation Procedure For a rack depth of 420-470mm (16.53 – 18.50”), with Rackview 15” and 17”, and for a rack depth of 480-530mm (18.90” – 20.87”) with the Rackview 19” Release the thumb screw on the front bracket (both sides). Page 8 KVM Rack Drawer Dual Rail 15”-17”-19”...
- Page 9 Install the front bracket and fix using cabinet screws. For a rack depth above 535mm (21.06”) with Rackview 15” and 17”, and for a rack depth above 595mm (23.42”) with the Rackview 19”. Remove the screws from the long assembled bracket. Slide the long bracket into the existing rails and fix with 5 cap screws (each side).
-
Page 10: Osd Function And Front Panel Controls
5. When the rack depth is greater then 680mm (26.77”) with Rackview 15” and 17”, and greater than 745mm (29.33”) with the Rackview 19”. Use the support bracket in place of (III) when the rack depth is greater than the limits shown above. OSD Function and Front Panel Controls Page KVM Rack Drawer Dual Rail 15”-17”-19”... - Page 11 Figure 1: OSD Panel Control Buttons for the Rackview 19”. On the Rackview 15” and 17” models, the OSD Control Panel is mounted vertically on the left side of the LCD screen. Navigating the OSD Menu There are eight different selectable menu items in the OSD. To operate the OSD, press the “Menu”...
-
Page 12: Cable Connections
Use the “Down” and “Up” button to adjust the brightness of the display. Press the “menu” button to enter. Contrast Press the “menu” button to enter. Use the “Down” and “Up” button to adjust the contrast of the display. Press the “menu” button to enter. Color Press the “menu”... -
Page 13: Configuring Display Settings
Select “No“ to return to the previous page. Exit Press the “exit” button to quit OSD menu. Power Indicator • GREEN ON • STANDBY • SUSPEND • Rear Panel Cable Connections Depending on which Rackview model you have purchased, the rear panel layout could look like this. 1 2 3 1 = PS2 keyboard connector 2 = VGA connector... -
Page 14: Specifications
For more information on configuring the display settings, refer to the manual that came with your video card. You can adjust the horizontal and vertical position, contrast, and brightness to better suit your video card and your personal preference. Refer to the OSD section of this manual for more information on using the on-screen menu to adjust the video display Before you begin, make sure that electrical power to all the devices you will be connecting up has been turned off. -
Page 15: Technical Support
CAB-DVIDMM006 DVID-MM Cable, 6ft (2.0m) /DCnn 12/24/48 DC power option Optional Items: (check with Rose Electronics for pricing and availability) Audio Option DC Voltage Option (12/24/48VDC) Technical Support If you are experiencing problems, or need assistance in setting up, configuring or operating your product, consult the appropriate sections of this manual. - Page 16 Rose USA (281) 933 7673 Rose Europe +49 (0) 2454 969442 Rose Asia +65 6324 2322 Rose Australia +61 (0) 421 247083 Rose Electronics 10707 Stancliff Road Houston, Texas 77099 © Copyright 2013 Rose Electronics. All rights reserved. Specifications subject to change without notice Page KVM Rack Drawer Dual Rail 15”-17”-19”...
Need help?
Do you have a question about the Rackview 17” and is the answer not in the manual?
Questions and answers