Banner Q4X Series Instruction Manual
Stainless steel analog laser sensor
Hide thumbs
Also See for Q4X Series:
- Instruction manual (46 pages) ,
- Quick start manual (14 pages) ,
- User manual (2 pages)

Related Manuals for Banner Q4X Series


Summary of Contents for Banner Q4X Series
- Page 1 Q4X Stainless Steel Analog Laser Sensor Instruction Manual Original Instructions 185624 Rev. E 21 November 2017 © Banner Engineering Corp. All rights reserved 185624...
-
Page 2: Table Of Contents
............................25 5 Abbreviations ................................27 6 Troubleshooting ................................29 7 Accessories ..................................30 7.1 Cordsets .......................................30 7.2 Brackets ....................................... 31 7.3 Aperture Kits—Threaded Barrel Models ............................. 32 8 Contact Us ..................................33 9 Banner Engineering Corp. Limited Warranty ........................34... -
Page 3: Product Description
Q4X Stainless Steel Analog Laser Sensor 1 Product Description Class 1 laser CMOS analog sensor with an analog output. Patent pending. • Reliably detects submillimeter distance changes • Continuous measurement of challenging targets from dark to reflective, out to 500 mm (threaded barrel models) or 310 mm (flush mount models), depending on model •... -
Page 4: Features
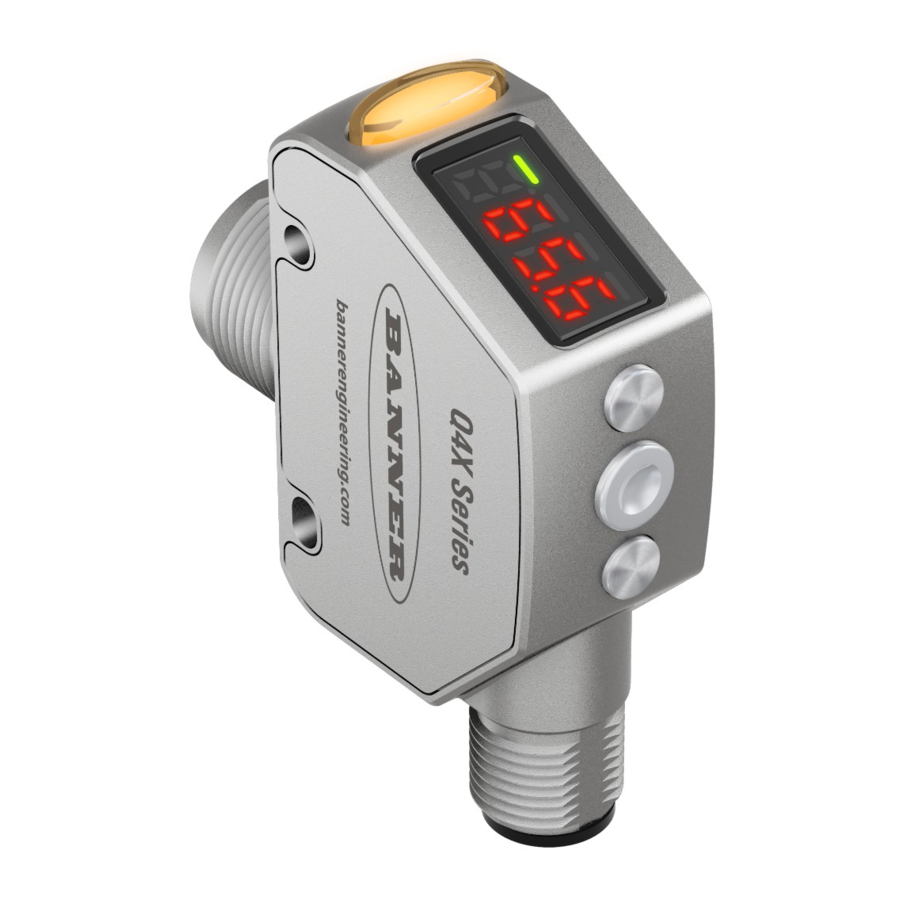
Q4X Stainless Steel Analog Laser Sensor 1.3 Features 1. Output Indicator (Amber) 2. Display 3. Buttons Figure 1. Sensor Features 1.3.1 Display and Indicators The display is a 4-digit, 7-segment LED. The main screen is the Run Mode screen, which shows the current distance to the target in millimeters. -
Page 5: Laser Description And Safety Information
Q4X Stainless Steel Analog Laser Sensor (SELECT)(TEACH) (+)(DISP) • Press and hold for longer than 2 seconds to start the • Press to change the distance setting for the 10 V (20 mA) currently selected TEACH mode (the default is two-point point;... -
Page 6: Installation
EXCEPT FOR DEVIATIONS PURSUANT TO CLASS 1 LASER NOTICE No. 50, DATED JUNE 24, 2007. LASER PRODUCT BANNER ENGINEERING CORP. 9714 10TH AVENUE NORTH MINNEAPOLIS, MN 55441 COMPLIES WITH IEC 60825-1:2007 2. Wrap the label around the Q4X cable, as shown. -
Page 7: Wiring Diagram
Q4X Stainless Steel Analog Laser Sensor 3. Check the sensor alignment. 4. Tighten the mounting screws to secure the sensor (or the sensor and the bracket) in the aligned position. 2.4 Wiring Diagram 12-30V dc – Analog Out Load Analog Gnd 1 = Brown Remote 2 = White... -
Page 8: Sensor Programming
Q4X Stainless Steel Analog Laser Sensor 3 Sensor Programming Program the sensor using the buttons on the sensor or the remote input (limited programming options). In addition to programming the sensor, use the remote input to disable the buttons for security, preventing unauthorized or accidental programming changes. - Page 9 Q4X Stainless Steel Analog Laser Sensor Top Menu Sub Menus Teach Process Selection two-point teach default setting) one-point teach Base Measurement Rate set Base Measurement Rate to 0.3 ms set Base Measurement Rate to 0.5 ms set Base Measurement Rate to 1.0 ms set Base Measurement Rate to 2.5 ms set Base Measurement Rate to 5.0 ms Averaging...
-
Page 10: Teach Menu
Q4X Stainless Steel Analog Laser Sensor 3.1.1 TEACH Menu Use this menu to select the TEACH mode. The default is two-point TEACH. • —Two-point • —One-point TEACH After the TEACH mode is selected, from Run mode, press and hold TEACH for longer than 2 seconds to start the TEACH mode and program the sensor. -
Page 11: Slope
Q4X Stainless Steel Analog Laser Sensor Table 3: Response Speed Filter Setting Base Measurement Rate 0.3 ms 0.5 ms 0.75 ms 1.5 ms 4 ms 8 ms 15 ms 30 ms 60 ms 120 ms 240 ms 0.5 ms 0.5 ms 1 ms 2 ms 5 ms... -
Page 12: Zero Reference Location
Q4X Stainless Steel Analog Laser Sensor Positive Positive Slope Slope Near Near Window Window Window Window Target Position Target Position The analog voltage output tracks slightly beyond the upper window limit (up to The analog current output tracks slightly beyond each window limit (from 3.8 mA 10.2 V) to 20.2 mA) Figure 11. -
Page 13: Loss Of Signal
Q4X Stainless Steel Analog Laser Sensor Display Reference Display Reference Zero = Near 10 V Shift = Off 50 mm (Default Setting) Zero = Far 10 V 50 mm Shift = Off Display Reference Display Reference Zero = Far 10 V 50 mm Shift = On Display Reference... -
Page 14: Input Wire Function
Q4X Stainless Steel Analog Laser Sensor If the maximum and/or minimum measurements are outside of the taught range values, the Loss of Signal option determines how the range is calculated. Option Sensor Behavior in Range Mode 0 V (4 mA) If the maximum or minimum measurement is outside of the taught range values, the sensor outputs 0 V (4 mA) to indicate an out of range measurement. -
Page 15: Display View
Q4X Stainless Steel Analog Laser Sensor Average Sample Input Input Signal Signal Measuring Period Measuring Period Measuring Period Measuring Period Inactive Inactive REMOTE REMOTE INPUT INPUT Active Active Hold Hold Hold Hold Measurement Measurement Measurement Measurement (Active Low shown) (Active Low shown) Figure 14. -
Page 16: Manual Adjustments
Q4X Stainless Steel Analog Laser Sensor Factory Default Settings Setting Factory Default Averaging ( Base Measurement Rate ( —1 ms Display View ( —Right-reading, no sleep mode Input Wire Function ( —Ignore all remote input pulses If the sensor was reset using the remote input, the sensor remains mode to allow use of the remote input. -
Page 17: Manual Adjustments In One-Point Teach Mode
Q4X Stainless Steel Analog Laser Sensor 3.2.2 Manual Adjustments in One-Point TEACH Mode Adjust the 5 V (12 mA) Midpoint 1. From Run mode, press to view and adjust the distance setting associated with the 5 V (12 mA) midpoint (the mid point of the analog span). -
Page 18: Reset To Factory Defaults Using The Remote Input
Q4X Stainless Steel Analog Laser Sensor Action Result Double-pulse the remote input. displays. 2. Select the desired TEACH mode. Action Result Pulses TEACH Mode Two-point TEACH The selected TEACH method displays for a few seconds and the sensor returns to Run mode. One-point TEACH 3.3.2 Reset to Factory Defaults Using the Remote Input Eight-pulse the remote input to apply the factory defaults and return to Run mode. -
Page 19: Teach Procedures
Q4X Stainless Steel Analog Laser Sensor Action Result displays and the sensor returns to Run Single-pulse the remote input to unlock the sensor. mode. displays and the sensor returns to Run Double-pulse the remote input to lock the sensor. mode. Triple-pulse the remote input to apply the operator lock to displays and the sensor returns to Run the sensor... -
Page 20: One-Point Teach
Q4X Stainless Steel Analog Laser Sensor Method Action Result Push Button Press TEACH to teach the target. The measurement value flashes briefly, and the sensor is taught the first target. flash alternately Remote Input Single-pulse the remote input. on the display. The 2-Pt indicator flashes. It is possible to skip teaching the 0 V (4 mA) point and continue to use the existing setting. -
Page 21: Sync Master/Slave
Q4X Stainless Steel Analog Laser Sensor 1. Present the target. Method Action Result Push Button Present the first target. The sensor-to-target distance must be within the The target's measurement value displays. sensor's range. Remote Input 2. Start the TEACH mode. Method Action Result... -
Page 22: Specifications
Q4X Stainless Steel Analog Laser Sensor 4 Specifications Sensing Beam Analog Linearity Visible red Class 1 laser, 655 nm Analog linearity performance matches accuracy performance curve (see Performance Curves—Threaded Barrel Models on page 24 and Performance Supply Voltage (Vcc) Curves—Flush Mount Models on page 25). -
Page 23: Dimensions
Q4X Stainless Steel Analog Laser Sensor Required Overcurrent Protection Certifications WARNING: Electrical connections must be made by qualified personnel in accordance with local and national electrical codes and regulations. Class 2 power Industrial Control UL Environmental Rating: Type 1 Equipment Overcurrent protection is required to be provided by end product application 3TJJ per the supplied table. -
Page 24: Performance Curves-Threaded Barrel Models
Q4X Stainless Steel Analog Laser Sensor Figure 23. Flush Mount Models 4.2 Performance Curves—Threaded Barrel Models Accuracy (90% to 6% reflectance) 1.25 1.00 0.75 0.50 0.25 DISTANCE (mm) DISTANCE (mm) DISTANCE (mm) Figure 24. 100 mm Models Figure 25. 300 mm Models Figure 26. -
Page 25: Performance Curves-Flush Mount Models
Q4X Stainless Steel Analog Laser Sensor Repeatability (90% to 6% reflectance) 0.35 Averaging = 1 Averaging = 1 Averaging = 512 0.30 Averaging = 512 Averaging = 1 0.25 Averaging = 512 0.20 0.15 0.10 0.075 0.05 DISTANCE (mm) DISTANCE (mm) DISTANCE (mm) Figure 27. - Page 26 Q4X Stainless Steel Analog Laser Sensor Repeatability (90% to 6% reflectance) 0.35 Averaging = 1 0.30 Averaging = 512 Averaging = 1 0.25 Averaging = 512 0.20 0.15 0.10 0.075 0.05 DISTANCE (mm) DISTANCE (mm) Figure 34. 110 mm Models Figure 35.
-
Page 27: Abbreviations
Q4X Stainless Steel Analog Laser Sensor 5 Abbreviations The following table describes the abbreviations used on the sensor display and in this manual. Abbreviation Description No valid signal in range One-point TEACH Two-point TEACH Average—Trigger output of Average measurement value Bottom Button Cancel... - Page 28 Q4X Stainless Steel Analog Laser Sensor Abbreviation Description Shift the Zero Reference Location after a TEACH Slave Span—analog window size Response speed TEACH process selection Trigger setting for tracking maximum measurement value Trigger setting for tracking minimum measurement value Trigger Trigger—Set the trigger type Volt Unlock/unlocked...
-
Page 29: Troubleshooting
Table 8: Error Codes Code Description Resolution EEPROM fault Contact Banner Engineering to resolve Laser fault Contact Banner Engineering to resolve Output short-circuited Check the wiring for an electrical short circuit and to ensure that the wiring is correct... -
Page 30: Accessories
Q4X Stainless Steel Analog Laser Sensor 7 Accessories 7.1 Cordsets All measurements are listed in millimeters, unless noted otherwise. Standard Cordsets Cable: PVC jacket, PUR (polyurethane) connector body, nickel-plated brass coupling nut Environmental Rating: IEC IP67 5-Pin Threaded M12/Euro-Style Cordsets—with Shield Model Length Style... -
Page 31: Brackets
Q4X Stainless Steel Analog Laser Sensor 7.2 Brackets All measurements are listed in millimeters, unless noted otherwise. SMB18FA.. • Swivel bracket with tilt and pan SMBQ4X.. movement for precision • Swivel bracket with tilt and adjustment pan movement for • Easy sensor mounting to precision adjustment extruded rail T-slots... -
Page 32: Aperture Kits-Threaded Barrel Models
Q4X Stainless Steel Analog Laser Sensor 7.3 Aperture Kits—Threaded Barrel Models APG18S O-ring Kit with glass lens to protect plastic sensor lens from Lens chemical environments and weld splatter damage. Housing Used with S18, M18, T18, TM18, and Q4X Ø 22.4 mm 12.7 mm Additional Information •... -
Page 33: Contact Us
Email: salesindia@bannerengineering.com Pune 411016, India Mexico Address: Phone: +52 81 8363 2714 or 01 800 BANNERE (toll free) Banner Engineering de Mexico Monterrey Head Office Website: www.bannerengineering.com.mx Edificio VAO Av. David Alfaro Siqueiros No.103 Col. Valle Oriente C.P.66269 Email: mexico@bannerengineering.com... -
Page 34: Banner Engineering Corp. Limited Warranty
MERCHANTABILITY OR FITNESS FOR A PARTICULAR PURPOSE), AND WHETHER ARISING UNDER COURSE OF PERFORMANCE, COURSE OF DEALING OR TRADE USAGE. This Warranty is exclusive and limited to repair or, at the discretion of Banner Engineering Corp., replacement. IN NO EVENT SHALL BANNER ENGINEERING CORP. BE LIABLE TO BUYER OR ANY OTHER PERSON OR ENTITY FOR ANY EXTRA COSTS, EXPENSES, LOSSES, LOSS OF PROFITS, OR ANY INCIDENTAL, CONSEQUENTIAL OR SPECIAL DAMAGES RESULTING FROM ANY PRODUCT DEFECT OR FROM THE USE OR INABILITY TO USE THE PRODUCT, WHETHER ARISING IN CONTRACT OR WARRANTY, STATUTE, TORT, STRICT LIABILITY, NEGLIGENCE, OR OTHERWISE.
Need help?
Do you have a question about the Q4X Series and is the answer not in the manual?
Questions and answers