Banner Q4X Quick Start Manual
Stainless steel analog laser sensor
Hide thumbs
Also See for Q4X:
- Instruction manual (46 pages) ,
- Quick start manual (14 pages) ,
- User manual (2 pages)
Table of Contents
Advertisement
Quick Links
Q4X Stainless Steel Analog Laser Sensor
Quick Start Guide
Class 1 laser CMOS analog sensor with an analog output. Patent pending.
This guide is designed to help you set up and install the Q4X Analog Sensor. For complete information on programming,
performance, troubleshooting, dimensions, and accessories, please refer to the Instruction Manual at
www.bannerengineering.com. Search for p/n 185624 to view the Instruction Manual. Use of this document assumes familiarity with
pertinent industry standards and practices.
For illustration purposes, the threaded barrel model Q4X images are used throughout this document.
WARNING: Not To Be Used for Personnel Protection
Never use this device as a sensing device for personnel protection. Doing so could lead to serious injury or
death. This device does not include the self-checking redundant circuitry necessary to allow its use in
personnel safety applications. A sensor failure or malfunction can cause either an energized or de-energized
sensor output condition.
Features
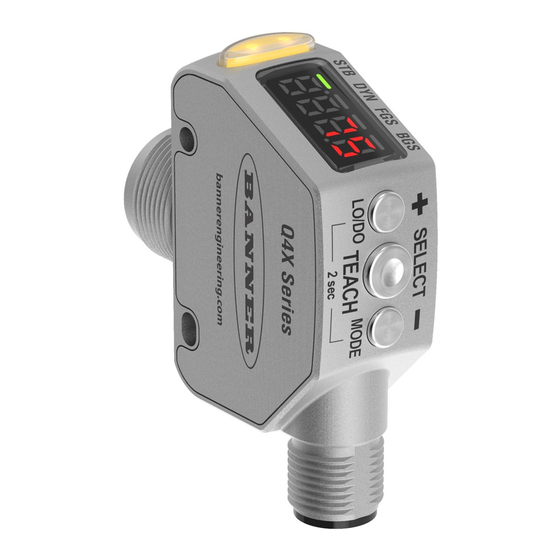
Figure 1. Sensor Features—Threaded Barrel Models
1
Display and Indicators
The display is a 4-digit, 7-segment LED. The main screen is the Run Mode screen, which shows the current distance to the target
in millimeters.
Figure 3. Display in Run Mode
Output Indicator
•
On—Displayed distance is within the taught analog
output window
•
Off—Displayed distance is outside of the taught analog
output window
Active TEACH Indicators (2PT and 1PT)
•
2-PT on—Two-point TEACH mode selected (default)
•
1-PT on—One-point TEACH mode selected
Buttons
Use the sensor buttons (SELECT)(TEACH), (+)(DISP), and (-)(MODE) to program the sensor.
Original Document
185623 Rev. F
2
1. Output Indicator (Amber)
2. Display
3. Buttons
3
1. Stability Indicator (STB = Green)
2. Active TEACH Indicators
3. Display Value Indicator (MM = Amber)
11 November 2020
Figure 2. Sensor Features—Flush Mount Models
•
2-PT = Two-Point TEACH (Amber)
•
1-PT = One-Point TEACH (Amber)
Stability Indicator (STB)
•
On—Stable signal within the specified sensing range
•
Flashing—Marginal signal, the target is outside of the
limits of the specified sensing range, or a multiple peak
condition exists
•
Off—No target detected within the specified sensing
range
Display Value Indicator (MM)
•
On—Display shows the distance in millimeters (default)
•
Off—Display shows the analog output value
1
2
3
185623
Advertisement
Table of Contents

Related Manuals for Banner Q4X


Summary of Contents for Banner Q4X
- Page 1 Class 1 laser CMOS analog sensor with an analog output. Patent pending. This guide is designed to help you set up and install the Q4X Analog Sensor. For complete information on programming, performance, troubleshooting, dimensions, and accessories, please refer to the Instruction Manual at www.bannerengineering.com.
-
Page 2: Laser Description And Safety Information
Q4X Stainless Steel Analog Laser Sensor (SELECT)(TEACH) (+)(DISP) • Press and hold for longer than 2 seconds to start the • Press to change the distance setting for the 10 V (20 currently selected TEACH mode (the default is two-point mA) point;... -
Page 3: Installation
Q4X Stainless Steel Analog Laser Sensor Installation Install the Safety Label The safety label must be installed on Q4X sensors that are used in the United Figure 4. Safety Label Installation States. Note: Position the label on the cable in a location that has minimal chemical exposure. -
Page 4: Sensor Programming
Q4X Stainless Steel Analog Laser Sensor Wiring Diagram 12-30V dc – Analog Out Load Analog Gnd 1 = Brown Remote 2 = White Teach 3 = Blue 4 = Black Shield 5 = Gray Note: Open lead wires must be connected to a terminal block. - Page 5 Q4X Stainless Steel Analog Laser Sensor Figure 12. Sensor Menu Map Top Menu Sub Menus Teach Process Selection two-point teach default setting) one-point teach 100/110, 300/310, & 500/510 mm Model Response Speeds 600/610 mm Model Response Speeds Base Measurement Rate set Base Measurement Rate to 0.3 ms...
-
Page 6: Basic Teach Instructions
Q4X Stainless Steel Analog Laser Sensor Basic TEACH Instructions Use the following instructions to teach the Q4X sensor. The instructions provided on the sensor display vary depending on the type of TEACH mode selected. Two-point TEACH is the default TEACH mode. -
Page 7: Specifications
Analog Voltage Outputs (Q4X..U Models): 2.5 kOhm minimum load Construction resistance Housing: 316 L stainless steel Analog Current Outputs (Q4X..I Models): 1 kΩ maximum load resistence at Lens cover: PMMA acrylic 24 V; maximum load resistance = [(Vcc – 4.5)/0.02 Ω] Lightpipe and display window: polysulfone... - Page 8 Q4X Stainless Steel Analog Laser Sensor Excess Gain using a 90% White Card—600/610 mm Models Table 3: Excess Gain ( Excess Gain Response · at 25 mm (600 mm models) · at 100 mm (600 mm models) · at 300 mm (600 mm models) ·...
-
Page 9: Performance Curves-Threaded Barrel Models
Q4X Stainless Steel Analog Laser Sensor Performance Curves—Threaded Barrel Models Accuracy (90% to 6% reflectance) Figure 13. 100 mm Models Figure 14. 300 mm Models 1.25 1.00 0.75 0.50 0.25 DISTANCE (mm) DISTANCE (mm) Figure 15. 500 mm Models Figure 16. 600 mm Models... -
Page 10: Performance Curves-Flush Mount Models
Q4X Stainless Steel Analog Laser Sensor Repeatability (90% to 6% reflectance) Figure 19. 500 mm Models Figure 20. 600 mm Models Averaging = 1 Filter = 1 Averaging = 512 Filter = 512 100 200 300 400 500 600 700... - Page 11 Banner Engineering Corp. Limited Warranty Banner Engineering Corp. warrants its products to be free from defects in material and workmanship for one year following the date of shipment. Banner Engineering Corp. will repair or replace, free of charge, any product of its manufacture which, at the time it is returned to the factory, is found to have been defective during the warranty period. This warranty does not cover damage or liability for misuse, abuse, or the improper application or installation of the Banner product.
Need help?
Do you have a question about the Q4X and is the answer not in the manual?
Questions and answers