
Subscribe to Our Youtube Channel
Related Manuals for FlyTek CLICK PRO


Summary of Contents for FlyTek CLICK PRO
- Page 1 CLICK PRO Manuale d’uso e manutenzione Operations and maintenance manual 100% MADE IN ITALY...
- Page 2 INDICE DELLE LINGUE - LANGUAGE INDEX Italiano ................. pag 4 English ................pag 14...
-
Page 4: Table Of Contents
Accensione ............ pag 7 Come fare il caffè ........pag 7 Vi ringraziamo per aver scelto la macchina da caffè CLICK PRO, un prodotto di alta qualità progettato, sviluppato, fabbricato e collaudato totalmente in Italia. Questo prodotto è una macchina da caffè a cialde ad utilizzo prevalentemente domestico. -
Page 5: Indicazioni Generali Di Sicurezza
Rivenditore in caso di richiesta di informazioni o di assistenza tecnica. ENERG ALIMENTAZIONE: 220-230 V CAPACITÀ SERBATOIO: 1,9 l IE IA CLICK PRO FREQUENZA: 50/60 Hz MATERIALE PRINCIPALE: acciaio POTENZA MAX: 2.000 W DIMENS. LxHxP: 230x340x410 mm PRESS. MAX GRUPPI CAFFÈ: 20 bar PESO: 12 Kg ca. -
Page 6: Installazione
INSTALLAZIONE Estrarre la macchina dall’imballo e collocarla su un piano stabile ed orizzontale, adatto a sostenerne il peso, in prossimità di una presa di corrente idonea. La macchina deve essere installata in un ambiente con temperatura minima di 15°C e massima di 25°C. Raccomandiamo inoltre di conservare l’imballo in tutte le sue parti per eventuali futuri trasporti. RIEMPIMENTO DEL SERBATOIO Togliere il ripiano scalda-tazze (rif. G) per accedere al serbatoio acqua. Estrarre il serbatoio tirando verso l’alto il gancio di colore nero, come indicato in Fig. -
Page 7: Collegamento Alla Rete Elettrica
COLLEGAMENTO ALLA RETE ELETTRICA La tensione di alimentazione della macchina non è modificabile dall’utente. Prima del collegamento alla rete elettrica, verificare che la tensione della rete corrisponda alla tensione di alimentazione della macchina indicata nella targhetta di identificazione. Se il cavo esterno di questo apparecchio è danneggiato, deve essere sostituito da un cavo speciale fornito dal Costruttore o dal servizio di assistenza. BECCUCCIO EROGAZIONE CAFFÈ... -
Page 8: Programmazione Elettronica Delle Dosi Pag
Se invece si desidera ottenere un caffè lungo, si deve premere il tasto 1 della pulsantiera. Una volta premuto uno dei tasti di erogazione, bisogna attendere circa tre secondi per l’inizio della fuoriuscita del caffè. Raggiunto il livello programmato, l’uscita del caffè si arresta automaticamente (ad eccezione di quando si preme il tasto 2). Se si vuole fermare anticipatamente la fuoriuscita, è sufficiente premere di nuovo il medesimo tasto di erogazione. Una volta che il caffè è stato erogato si consiglia di rimuovere la cialda per evitare che, asciugandosi, rimanga attaccata. Utilizzare esclusivamente le cialde del Vostro Fornitore. L’uso di cialde diverse da quelle per le quali la macchina è stata concepita può non garantire la stessa qualità... -
Page 9: Pulizia Del Gruppo Caffè
PULIZIA DEL GRUPPO CAFFÈ E DELLA LANCIA VAPORE Il gruppo caffè deve essere pulito settimanalmente. Per fare ciò bisogna procedere ad effettuare una erogazione senza cialda. Abbassare la leva pressa-cialda (rif. F), porre un bicchiere abbastanza capiente sotto il beccuccio di erogazione caffè (rif. B) e premere il tasto di erogazione caffè lungo (1); dopo circa tre secondi inizierà l’erogazione di acqua calda. Raggiunto il livello programmato, l’uscita di acqua si arresta automaticamente. La lancia vapore deve essere pulita giornalmente, se utilizzata. A tale riguardo, inserire la lancia vapore (rif. M) all’interno di una tazza o altro recipiente contenente esclusivamente acqua pulita e girare la manopola di erogazione vapore (rif. I) in senso antiorario fino a raggiungere la massima intensità di vapore. Dopo un minuto girare nuovamente la stessa manopola in senso orario fino ad arrestare completamente l’uscita del vapore. Attendere che la lancia vapore si sia sufficientemente raffreddata, dopodichè procedere alla sua pulizia esterna tramite un panno morbido inumidito di acqua calda. Eliminare tutte le incrostazioni (ad esempio di latte) per evitare che vengano ostruiti i fori di uscita del vapore. PULIZIA DELLA MACCHINA Non utilizzare la lavastoviglie per pulire la macchina o suoi componenti. Si danneggiano irrimediabilmente! Non usare altresì solventi e prodotti o materiali abrasivi. - Page 10 PROBLEMA POSSIBILE CAUSA SOLUZIONE Erogazione del caffè Serbatoio dell’acqua vuoto Riempire il serbatoio (pag. 6). insufficiente o impossibile Macinatura troppo fine Utilizzare una cialda nuova. Rivolgersi al Fornitore delle cialde. I caffè erogati sono freddi Tazze ceramiche fredde Preriscaldare le tazze con acqua calda, oppure utilizzare bicchierini monouso.
- Page 11 La Società costruttrice Tecno Meccanica S.r.l. con sede amministrativa sita in Via Marlianese 43, 51034 Serravalle Pistoiese (PT) ITALY Dichiara sotto la propria responsabilità che la macchina per il caffè espresso descritta in questo manuale: Modello: Click Pro Alimentazione: 220/230v 50/60hz Anno di costruzione: vedi targa CE È conforme alle Direttive: 2006/42/CE relativa al ravvicinamento delle legislazioni degli Stati membri relative alle macchine, che sostituisce la Direttiva 98/37/CE;...
-
Page 12: Condizioni Di Garanzia
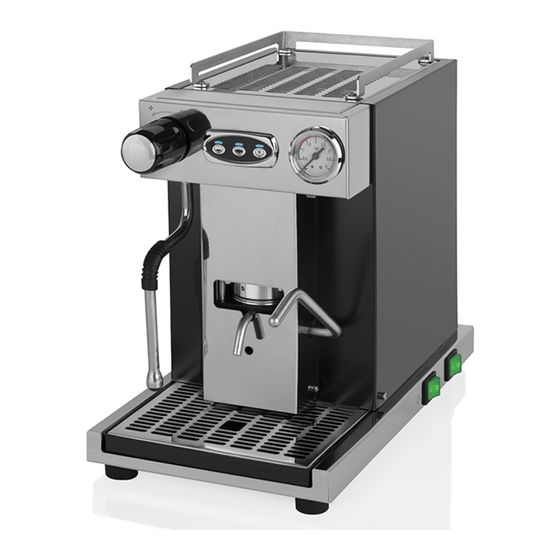
GARANZIA L’apparecchio è garantito per 1 anno dalla data di acquisto, salvo i termini di legge. La garanzia è limitata a difetti di fabbricazione o di materiali, non è estesa ai pezzi soggetti ad usura o a danneggiamenti alle parti delicate (interruttori, cavo di alimentazione, ecc.…), e NON è altresì estesa a danni conseguenti incuria od uso errato dell’apparecchio medesimo (ad esempio utilizzo di acqua con durezza superiore a 8°F e/o mancato utilizzo o sostituzione di idoneo filtro addolcitore, che possono causare incrostazioni di calcare). In caso di guasto coperto da garanzia, riportare l’apparecchio presso il Rivenditore dove lo stesso è stato acquistato, muniti di scontrino o fattura sulla quale deve essere riportato il numero di matricola, che deve corrispondere a quello posto sull’apparecchio. Solo in questo modo è garantito il ripristino gratuito delle funzionalità dell’apparecchio, mentre le spese di trasporto rimangono SEMPRE ad esclusivo carico del Cliente. La garanzia decade in caso di impiego improprio o manomissione, uso della forza e interventi non eseguiti da nostro personale specializzato. La nostra garanzia non limita comunque i diritti legali del Cliente. - Page 14 Tecno Meccanica S.r.l. All rights reserved No part of this manual may be reproduced, copied or divulged by any means without the prior written authorization of Tecno Meccanica S.r.l. Drip tray; B. Coffee spout; Heating light; D. Coffee dispensing switch panel; Pod-press lever; Cup warmer; Steam knob;...
-
Page 15: General Safety Instructions
Retailer in case of request for information or technical assistance. ENERG POWER SUPPLY: 220-230 V DRIP TRAY CAPACITY: 1,9 l IE IA CLICK PRO FREQUENCY: 50/60 Hz MAIN MATERIAL: steel MAX POWER: 2.000 W SIZE LxHxP: 230x340x410 mm MAX PRESS. -
Page 16: Installation
INSTALLATION Remove the machine from the packaging and place it on a stable surface, suitable to support its weight, near a suitable power socket. The coffee machine must be installed in an environment with a minimum temperature of 15°C and a maximum temperature of 25°C. Keep the original packaging in all its parts for possible future transport. TANK FILLING Remove the cup warmer (ref. G) to access the water tank. Remove the tank by pulling the black hook upwards, as shown in Fig. A. FIG. A WE RECOMMEND USING A SOFTENER AND ANTI-SCALE FILTER that needs to be periodically replaced. Should this not be done, scale deposits may form inside the machine that could jeopardize its proper functioning and the validity of the warranty. -
Page 17: Power Grid Connection
POWER GRID CONNECTION The supply voltage of the machine cannot be modified by the user. Before connecting the device to the power grid, check that the mains voltage corresponds to the machine’s supply voltage indicated on the identification plate. If the external power cable of this device is damaged, it must be replaced by a special cable provided by the Manufacturer or by the Customer Service. -
Page 18: Programmable Elecronic Dosing
If instead you want to make a long coffee, you have to press key 1 on the control panel. Once you have pressed one of the coffee dispensing keys, you have to wait about three seconds until the coffee starts to flow out. Once the programmed dose has been reached, the coffee dispensing stops automatically (except when you press key 2). If you want to stop the dispensing earlier, simply press the same key again. Once the coffee has been dispensed, we recommend removing the pod to prevent it from sticking as it dries. Please remember to use only pods provided by your Supplier. The use of different pods from those for which the coffee machine was designed may not guarantee the same dispensing quality. If the tray is not emptied, water may leak out. It is important to empty the drip tray (ref. -
Page 19: Coffee Group Cleaning
COFFEE GROUP AND STEAM WAND CLEANING The coffee group must be cleaned weekly. To clean it, you have to make a coffee without a pod. Lower the pod-press lever (ref. F), place a sufficiently large cup under the coffee spout (ref. B) and press the long coffee key (1); after about three seconds, hot water will start to flow out. Once the programmed dose has been reached, the water dispensing will stop automatically. The steam wand must be cleaned daily if used. To do this, place the steam wand (ref. M) inside a cup or other recipient containing only clean water and turn the steam knob (ref. I) anticlockwise until the maximum steam output is reached. After one minute, turn the same knob clockwise again until the steam output stops completely. Wait until the steam wand has cooled sufficiently, then clean its outer surface with a soft cloth dampened with hot water. Remove all deposits (e.g. milk) to prevent obstruction of the steam outlet holes. MACHINE CLEANING Do not use the dishwasher to clean the machine or its components. - Page 20 PROBLEM POSSIBLE CAUSE SOLUTION Insufficient or impossible Empty water tank Fill the tank (page 16). coffee brewing Grinding too fine Use a new pod. Contact coffee pod Supplier. Brewed coffees are cold Cold ceramic cups Preheat the cups with hot water or use disposable cups. Faulty heating system Contact the Supplier.
- Page 21 DECLARATION OF CONFORMITY The manufacturing company Tecno Meccanica S.r.l. with registered office located in Via Marlianese 43, 51034 Serravalle Pistoiese (PT) ITALY declares under its own responsibility that the espresso coffee machine described in this manual: Model: Click Pro Power supply: 220/230v 50/60hz Year of construction: see CE marking is in compliance with the following Directives: 2006/42/CE on the approximation of the laws of the Member States relating to machinery, replacing Directive 98/37/CE;...
-
Page 22: Warranty Conditions
WARRANTY The machine is guaranteed for 1 year from the date of purchase, unless otherwise provided for by law. The warranty is limited to manufacturing or material defects, is not extended to parts subject to wear and tear or damage to delicate parts (switches, power supply cable, etc..), and is also NOT extended to damages caused by negligence or incorrect use of the device (e.g. use of water with a hardness exceeding 8°F and/or non-use or replacement of a suitable water softening filter with consequent formation of scale deposits). In case of failure covered by the warranty, please return the device to the same Retailer where you purchased it, with a receipt or invoice showing the serial number, which must correspond to the number on the device.
Need help?
Do you have a question about the CLICK PRO and is the answer not in the manual?
Questions and answers