Table of Contents
Advertisement
Quick Links
SPH Grid PV-inverter
Installation and Operation Manual
N305 WeiYe Building, Pioneer Park XiaMen China 361006
Clenergy SPH Installation and Operation Manual
SPH MODELS
INCLUDED IN THIS MANUAL
SPH15
SPH20
SPH30
SPH40
SPH50
SPH60
Tel: +86-592-5781288
Fax: +86-592-5782298
Website: www.clenergy.com.cn
1500W
2000W
3000W
4000W
5000W
6000W
Page 1 of 26
Advertisement
Table of Contents

Subscribe to Our Youtube Channel
Related Manuals for Clenergy SPH50


Summary of Contents for Clenergy SPH50
- Page 1 1500W SPH20 2000W SPH30 3000W SPH40 4000W SPH50 5000W SPH60 6000W N305 WeiYe Building, Pioneer Park XiaMen China 361006 Tel: +86-592-5781288 Fax: +86-592-5782298 Website: www.clenergy.com.cn Page 1 of 26 Clenergy SPH Installation and Operation Manual...
-
Page 2: Important Safety Information
Incorrect installation, troubleshooting by unqualified persons or modification of the electrical wiring poses a safety risk to the installers, home/facility occupiers and other users/operators of the electric grid (AC utility). Page 2 of 26 Clenergy SPH Installation and Operation Manual... - Page 3 Do not install the unit, if it is damaged. Please contact your local dealer for a replacement. The SPH inverter is the latest transformer less design. Please check the requirements for your country regarding earthing regulations. Page 3 of 26 Clenergy SPH Installation and Operation Manual...
- Page 4 Most of the problems you may encounter can be solved by following the instructions inside the manual. Please keep this manual in a safe place for later use. Page 4 of 26 Clenergy SPH Installation and Operation Manual...
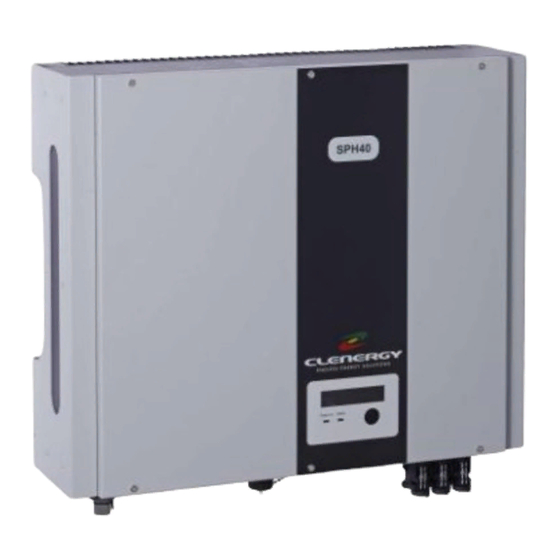
- Page 5 LCD Display: Showing the inverter status Operation LED, Blue, Working Mode RS232 Operation LED, Red, fault status AC connector Solar panel input Optional communication (DC) slot: SNMP and RS485 Display and connections Page 5 of 26 Clenergy SPH Installation and Operation Manual...
- Page 6 LCD Display: Showing the inverter status Operation LED, Blue, Working Mode Operation LED, Red, fault status AC connector Solar panel input (DC) Optional communication RS232 slot: SNMP and RS485 Display and connections Page 6 of 26 Clenergy SPH Installation and Operation Manual...
- Page 7 Display information switch inverter status Operation LED, Blue, Working Mode Operation LED, Red, fault status AC connector Solar panel input (DC) Optional communication RS232 slot: SNMP and RS485 Display and connections Page 7 of 26 Clenergy SPH Installation and Operation Manual...
- Page 8 For proper safety, this part must be designed by a qualified electrician or electrical installation technician. Utility: The electricity supply from the main electric grid system must be single phase 220V to 250V, 50Hz or 60Hz. Page 8 of 26 Clenergy SPH Installation and Operation Manual...
-
Page 9: Installation
Connection to electric grid must be approved by the electricity provider. The installation must be done by a certified electrician. The unit must be installed vertically in the orientation shown. 25cm Space 25cm Space Page 9 of 26 Clenergy SPH Installation and Operation Manual... - Page 10 4 mounting holes. 6. Fix four screws with spacer on the four corners of the mounting back plate. 7. Hang the inverter unit onto the mounting back plate and press down. Page 10 of 26 Clenergy SPH Installation and Operation Manual...
- Page 11 If not, adjust the mounting as necessary. CAUTION: The electrical installation of this unit must only be performed by electricians or technicians, qualified to install solar PV inverters. Page 11 of 26 Clenergy SPH Installation and Operation Manual...
- Page 12 Assemble the socket again. Insert the whole socket into the inverter. Twist the coupling ring to receptacle on inverter. Make sure it is perfectly matched and tightly fastened. Page 12 of 26 Clenergy SPH Installation and Operation Manual...
- Page 13 5. For SPH50 & SPH60, connect AC wires as follows: Disassemble the AC output female socket. Connect AC wires to connection socket as indicated: Female insert with coupling ring Pressing screw Lock key 1 AC wire Lock key 2...
-
Page 14: Step 4: Test The Installation
PV string does not exceed 20A DC. SPH15, SPH20 & SPH30 - 1 pair SPH40, SPH50 & SPH60 - 3pairs When connecting the DC terminals, ensure that the polarity is correct. Incorrect connection may permanently damage the unit! Step 4: Test the installation 1. -
Page 15: Inverter Status
M CPU Ver. xxx (Firmware version of Mater CPU ) S CPU Ver. xxx (Firmware version of Slave CPU) 1) If the display panel button is untouched for over 5 seconds, the display panel will return to “Working Mode”. Page 15 of 26 Clenergy SPH Installation and Operation Manual... - Page 16 Then press button for over 5 seconds LCD will show “Setting”, Language setting is 4) If the display panel button is untouched for over 5 seconds, the display panel will return to “Working Mode”. Page 16 of 26 Clenergy SPH Installation and Operation Manual...
- Page 17 LCD will show “Setting”, Contrast setting is OK Display Freeze (Lock) Press button to select: English or German. N W M Then press button for over 5 seconds LCD will show “Setting”, Language setting is OK. Page 17 of 26 Clenergy SPH Installation and Operation Manual...
- Page 18 Internal Master/Slave grid DC current mismatch Typical display panel messages The table explains typical display panel messages that occur depending on the SPH inverter operating status and display panel mode. Page 18 of 26 Clenergy SPH Installation and Operation Manual...
- Page 19 DC-Bus voltage too high or too low. DC Bus Low The device is unable to return to Device failure Device Fault normal status. Temperature too high Over The internal temperature is higher Page 19 of 26 Clenergy SPH Installation and Operation Manual...
- Page 20 The internal program is updating Updating Master CPU firmware Master Flash Master CPU through RS232 interface. The internal program is updating Updating Slave CPU firmware Slave Flash Slave CPU through RS232 interface. Page 20 of 26 Clenergy SPH Installation and Operation Manual...
-
Page 21: Communication Interfaces
The status of the inverter can be monitored via the communications interfaces using a PC with the monitoring software “Solar control”. The software is free. The software will be downloaded from www.clenergy.com.au/download.php. Download the “SPH - Monitoring Software V1.26” and install in your computer. -
Page 22: Troubleshooting
If inverter works normally, the LCD display panel will show “Working mode” and power is delivered to the electric grid. Otherwise the LCD display an error. Page 22 of 26 Clenergy SPH Installation and Operation Manual... - Page 23 3. After the cause is cleared, reconnect the grid power. Fault Check the status of the inverter. 4. If above actions do not fix the problem, the GFCI circuit may be faulty. Contact your inverter service representative. Page 23 of 26 Clenergy SPH Installation and Operation Manual...
- Page 24 (master) and redundant (slave) controllers of the inverter. Consistent or 2. Disconnect PV (+) or PV (-) from the input, start the unit Mismatch again. Fault 3. If this does not work, contact your inverter service representative. Page 24 of 26 Clenergy SPH Installation and Operation Manual...
-
Page 25: Specification
F/W upgrade Yes, via RS232 Technology Transformerless Waveform Sine PWM Mechanical W´D´H (mm) 362x312x131 362x312x131 362x312x141 384x464x131 515x464x142 515x464x142 Weight (kg) The product’s specifications are subject to change without notice. Page 25 of 26 Clenergy SPH Installation and Operation Manual... - Page 26 Fax: +49 69 7593 - 8200 www.clenergy-de.de Clenergy Australia (including the US and Pacific) 18/20 Duerdin St, Clayton VIC 3168 Tel: +61 3 9017 6688 Fax: +61 3 9017 6668 www.clenergy.com.au Page 26 of 26 Clenergy SPH Installation and Operation Manual...
Need help?
Do you have a question about the SPH50 and is the answer not in the manual?
Questions and answers