Table of Contents
Advertisement
Advertisement
Table of Contents

Related Manuals for ConMed Linvatec LS7500


Summary of Contents for ConMed Linvatec LS7500
- Page 1 The Linvatec LS7500 300 Watt Xenon Light Source Instruction Manual...
- Page 2 Proprietary Information This manual contains information deemed proprietary to Linvatec Corporation. The information contained herein, including all of the designs and related materials, is the sole property of Linvatec and/or its licensors. Linvatec and/or its licensors reserve all patent, copyright and other proprietary rights to this document, including all design, manufacturing methodology and reproduction.
-
Page 3: Table Of Contents
Table of Contents Page INTRODUCTION and OPERATION Intended Use ............1 System Features . - Page 4 Table of Contents Page TECHNICAL INFORMATION Light Source ............14 Lamp Module .
-
Page 5: Introduction And Operation
Read clean the Linvatec LS7500 Xenon 300 Watt and follow all warning and cautionary Light Source. The safe and effective use of this... - Page 6 8. Do not block air vents. Provide at least four 18. Wear a face shield or protective safety eye inches of free air space behind Light glasses and inspection gloves when han- Source. dling the lamp assembly. 9. Prior to each use, the Light Source and all 19.
- Page 7 25. Equipment grounding is vital to ensure safe equipment does cause harmful interference operation. Plug the power cord into a prop- to other devices, which can be determined erly earthed mains supply outlet whose by turning the equipment off and on, the voltage and frequency characteristics are user is encouraged to try to correct the compatible with those listed on the unit or...
-
Page 8: Symbol Definitions
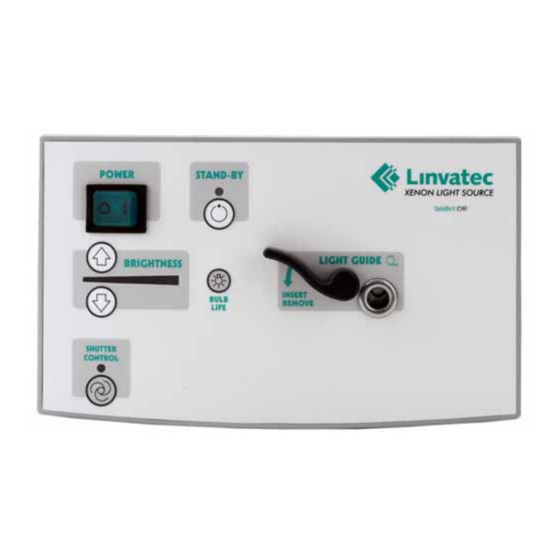
Caution: Federal Law restricts Rx ONLY Symbol Definitions this device to sale by or on the order of a physician. Power “OFF”, disconnected Bulb Life from mains Power “ON”, connected to mains Light Guide Stand-by. Iso-potential Ground Attention, consult accompany- ing documents or contact a Linvatec representative. -
Page 9: System Indicators
❶ ❷ ❸ ❻ ❹ ❺ Each sequential LED represents 25 lamp System Indicators hours. When less than 125 Hours, remaining LEDs will be Orange. When less than 50 hours, remaining LEDs will be Red. 1.5.1 Front Panel When Lamp Life has exceeded 500 hours, one LED will be Flashing Red. -
Page 10: Back Panel
❺ ❶ ❹ ❷ ❸ 1.5.2 Back Panel ❶ Fan — Provides cooling to the Light Source. Keep free of dust and dirt accumulation. ❷ Mains Power Receptacle — Accepts the power cable to provide AC power. ❸ Fuse Compartment — Contains the unit’s fuses. -
Page 11: Installation And Operation
Installation and Operation 1. Ensure there are no obstructions to the fan area and air vents with at least four inches of free space behind the light source. 2. Attach the AC power cord to the light source receptacle and to a properly earthed mains supply power outlet whose voltage and frequency characteristics are compara- ble with those indicated on the unit... -
Page 12: Maintenance
MAINTENANCE Lamp Replacement Turn the “POWER” switch off. Cleaning Unplug the light source. Wait at least 15 minutes for the lamp to cool before pro- The following maintenance procedures should ceeding. only be performed by qualified service personnel. Read all warnings and cautionary Wear a face shield or protective safety eye notices carefully before performing any service glasses when handling the lamp. - Page 13 5. Remove the lamp holder plug from the 9. After installation is complete, close and lamp holder socket by squeezing the tabs on secure the door. the side of the lamp holder plug and pulling NOTE: Follow local governing ordinances out horizontally.
-
Page 14: Fuse Replacement
Pull out existing fuses and replace only Fuse Replacement with factory supplied fuses as stated on the rear of the unit. Replace both fuses at the 1. Turn the “POWER” switch off and unplug same time. the light source. 2. Using a small screwdriver or similar tool, gently release the retention tabs on both sides of the fuse drawer and slide it out. -
Page 15: Troubleshooting
Troubleshooting Symptom Possible Cause Corrective Action ♦ Power cord is not plugged in or ♦ Plug power cord into receptacle Lamp will not ignite. is faulty. and/or Light Source. ♦ Replace power cord. ♦ “POWER” switch is not turned ♦ Place “POWER” switch in the on position. - Page 16 Symptom Possible Cause Corrective Action ♦ Brightness is set to minimum or ♦ Increase lamp brightness. Low light output. too low of an output position. ♦ Fiber optic light guide lenses are ♦ Clean light guide lenses. dirty. ♦ Lamp life is almost expired. ♦...
-
Page 17: Theory Of Operation
The power supply is a switch mode type with a Theory of Operation built-in, high voltage lamp ignitor and current regulator. The fans are powered from an The Xenon light source uses a replaceable short auxiliary 12VDC power output of the main arc xenon lamp with an integral elliptical supply. -
Page 18: Technical Information
TECHNICAL INFORMATION Light Source I.E.C. Equipment Classification: Type BF, Class 1, continuous operation Typical Operating Requirements: Input Voltage: 100 - 240 VAC Input Line Frequency: 50/60Hz Power Consumption: 475 VA Fuse: Fast Blow 6.5 Amps, 250 V Intensity Control: Manual or Automatic Weight: 12.5 lbs. -
Page 19: Power Cord Requirements
Power Cord Requirements 100/120 Volt (Linvatec Cat. No. C7104) Use only a listed (UL, CSA) detachable power cord manufactured to the following specifications. • Plug End • NEMA 5-15P hospital grade, 15 amps, 125V • Receptacle End • IEC 320/CEE-22, 6 amps, 250V/15 amps, 125V •... -
Page 20: Light Source Accessories
Light Source Accessories Description Part Number 300 Watt Xenon Light Source LS7500 300 Watt Replacement Bulb LS7501 5mm Universal Light Guide Cable C3278 3mm Universal Light Guide C3279 Wolf, Dyonics Scope Fitting 7451 ACMI Scope Fitting 7452 Storz, Olympus Scope Fitting 7453 Wolf / Dyonics Light Source Fitting 7455... - Page 24 EC Rep: Linvatec Europe B1070-Brussels, Belgium All rights reserved. Printed in USA W41-090-004 Rev. A 02/2004...
Need help?
Do you have a question about the Linvatec LS7500 and is the answer not in the manual?
Questions and answers