Table of Contents
Advertisement
Advertisement
Table of Contents
Troubleshooting

Related Manuals for ConMed Sabre 2400


Summary of Contents for ConMed Sabre 2400
- Page 1 Operator & Service Manual...
- Page 2 LIMITED WARRANTY For a period of two years following the date of deliv- ery, CONMED Corporation warrants the Sabre 2400 Electrosurgical Unit against any defects in material or workmanship and will repair or replace (at CONMED’s option) the same without charge, provided that routine maintenance as specified in this manual has been per- formed using replacement parts approved by CONMED.
-
Page 3: Table Of Contents
Table of Contents & List of Illustrations Section Title Page GENERAL INFORMATION ......... . . 1-1 Precautions . - Page 4 Section Title Page 3.1.5.1 Keyboard ..........3-7 3.1.6 Power Amplifier .
- Page 5 Figure Title Page Pure Cut Load Regulation ..........1-9 Blend Cut Load Regulation .
- Page 6 This page intentionally left blank.
-
Page 7: General Information
Indicator displays the resistance of the patient • Standard Coagulation: Monopolar Coagulation measured between the conductive contacts of the mode. The Sabre 2400 is highly effective in the return electrode. This information can be used by most demanding electrosurgical applications, the operating room staff to note high risk patients including underwater coagulation. -
Page 8: Precautions
• Simplified Controls: the user may command 1.1.1 Precautions in Equipment Preparation the full range of capabilities of the Sabre 2400 by means of a few easily understood controls. • Visually inspect all accessories before each Since Monopolar Cut, Monopolar Coagulation,... -
Page 9: Precautions In Patient Preparation
1.1.2 Precautions in Patient Preparation • Because of the risk of burns, needles should never be used as return electrodes for electrosur- • Electrosurgery should NEVER be performed gery. Return electrodes should be placed such that in the presence of flammable anesthetics, flam- as much of their conductive area as possible is in mable prep solutions, or in oxygen-enriched firm contact with an area of the patients' body... -
Page 10: Precautions In Use
• Refer all servicing to qualified personnel. Your at otherwise normal settings may indicate faulty CONMED representative will be happy to assist application of the return electrode, failure of an you in getting your equipment serviced. -
Page 11: Specifications
• The heat dissipation capability of the heat sink • Never remove or install any parts with power is severely impaired by activating the Sabre 2400 in other than its normal operating position. There are no tests requiring operation in any other posi- •... - Page 12 150mA max. with accessories per IEC CLASS 1, TYPE CF, IEC 601-2-2 Clause 19.101 b) when used with Defibrillator Proof approved accessories. See CONMED “IEC Recognized Electrosurgical Accessories” list, Cat. No. 60-5206-001. POWER DISPLAY ACCURACY: The greater of +/- 10% of display or +/-5 watts at rated Bipolar - Less than 1% per load.
- Page 13 OPERATING MODES AND NOMINAL OUTPUT PARAMETERS MODE MAX. POWER LOAD CREST MAX. OPEN (WATTS) RESISTANCE FACTOR CIRCUIT (OHMS) VOLT P-P MONO PURE CUT 2000 MONO BLEND 2200 MONO COAG 9000 BIPOLAR COAG 1.5-12.1* *(Bipolar Coag crest factor decreases as power setting increases.) CONTROLS: Monopolar Cut Power Increase Key: Gray UP push button...
- Page 14 CONNECTIONS: Monopolar Foot Switch Connector: Threaded, 4 Pin Bipolar Foot Switch Connector: Threaded, 3 Pin A.R.M. and REM TM compatible connector Two Pin Return Electrode Jack: Bipolar Accessory Jacks: Two blue banana jacks for RF output, plus black miniature banana jack referenced to bottom blue jack for handswitched bipolar operation.
- Page 15 1.3 EXPLANATION OF SYMBOLS HANDSWITCHED OUTPUT-CONNECTION FOR HANDSWITCHED MONOPOLAR ACCESSORIES PURE CUT WAVEFORM WITH MINIMUM THERMAL DAMAGE AND HEMOSTASIS FOOTSWITCHED OUTPUT-CONNECTION BLEND CUT WAVEFORM WITH FOR FOOTSWITCHED MONOPOLAR ACCESSORIES HEMOSTASIS STANDARD MONOPOLAR COAGULATION HIGH VOLTAGE OUTPUTS SINGLE FOIL-USED WITH ELECTRODES THAT DO NOT MONITOR CONTACT BIPOLAR OUTPUT-CONNECTION FOR QUALITY...
- Page 16 Figure 1.2 Blend Cut Load Regulation Figure 1.3 Monopolar Coagulation Load Regulation 1-10...
- Page 17 Figure 1.4 Bipolar Load Regulation POWER SETTING Figure illustrates the output power delivered to the rated load for all available output modes. Figure 1.5 Output Power vs. Power Setting 1-11...
- Page 18 This page intentionally left blank. 1-12...
-
Page 19: Initial Inspection
2.2 INSTALLATION 3. Connect a two-treadle monopolar foot switch The unit may be mounted on the CONMED and a single treadle bipolar foot switch to their cart, P/N 60-5201-004, or any stable cart or mating connectors at the rear of the unit. - Page 20 Confirm that releasing the of the foot switch, depress the Coag treadle. A Bipolar foot switch returns the Sabre 2400 to its cross key alarm tone shall sound. Release the Cut idle state. Verify that the Bipolar hand switch con-...
-
Page 21: Preliminary Performance Testing
Such a test will not damage the treadle, press the Cut mode hand switch control Sabre 2400 at moderate power settings (below and confirm that the Sabre 2400 continues to half the maximum power for the mode of inter- indicate actuation of cut-mode. Cross key tone est) if carried out for no more than a few seconds. - Page 22 The Resistance Power settings, Pad, and sound volume settings. Indicator will flash if the Sabre 2400 is in Dual The “P” location stores the Mode, Power, Pad, pad mode and the Set Point (10) has not been and sound volume setting last used before the properly established (see Monitor Set Key).
- Page 23 20. BIPOLAR MODE INDICATOR: This 2.4.2 Output Panel lamp lights when the unit is keyed in the bipolar mode. The output panel contains the power circuit breaker and the required patient connection jacks 21. SINGLE PAD MODE INDICATOR: The for electrosurgery. Refer to the OUTPUT PANEL indicator will light when this mode is in effect.
- Page 24 2.4.3 Rear Panel 3. POWER CORD: Supplies ac mains power to the unit. It should only be connected to a The rear panel contains the foot switch connec- source of power corresponding to that listed tors and power cord. Refer to the REAR PANEL on the nameplate.
-
Page 25: Output Panel
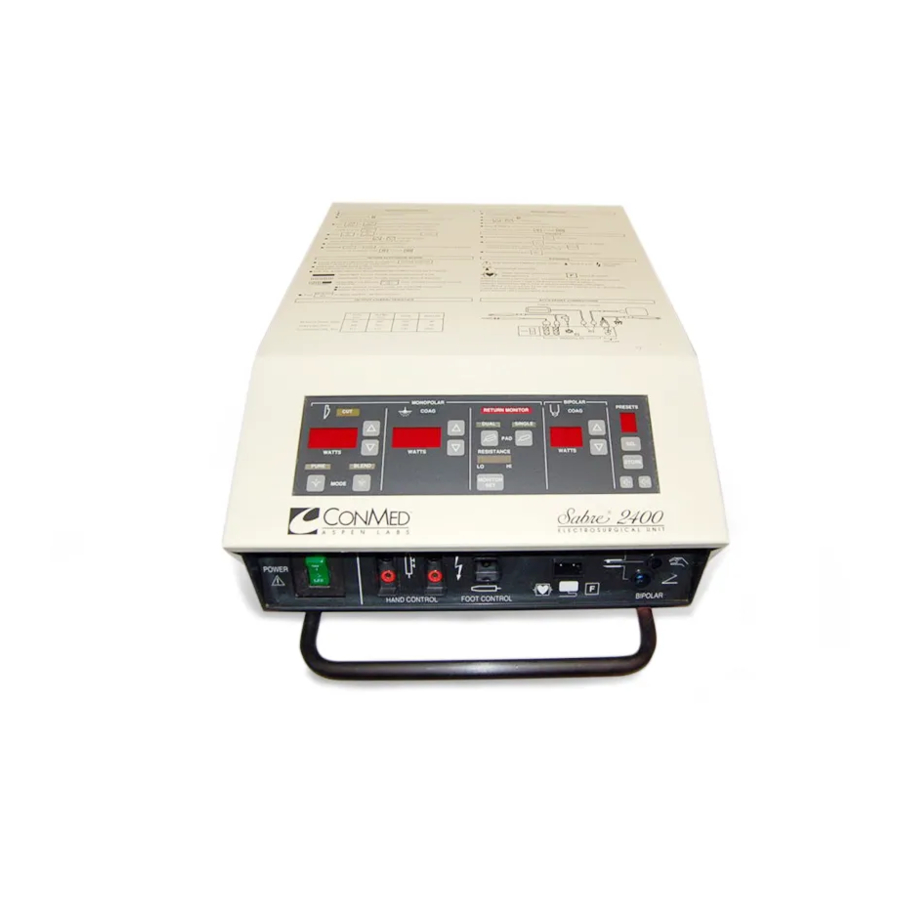
Figure 2.1 Controls, Displays & Connectors 23 22 MONOPOLAR BIPOLAR PRESETS COAG RETURN MONITOR COAG DUAL SINGLE RESISTANCE POWER POWER POWER STORE PURE BLEND MONITOR MODE 10 11 CONTROL PANEL PATIENT CONNECTIONS ELECTRICALLY ISOLATED. POWER HAND CONTROL FOOT CONTROL BIPOLAR OUTPUT PANEL MONOPOLAR FOOTSWITCH... -
Page 26: Operating Instructions
2.5 OPERATING INSTRUCTIONS >WARNING< ALWAYS STOW UNUSED ACCESSORIES 2.5.1 Preliminary Set Up IN A SAFE, INSULATED LOCATION SUCH AS A HOLSTER. 1. Ensure the Power Switch is OFF, then con- nect the power cable to a properly grounded and 4. Connect the foot switches, as required, to the polarized mating power receptacle. -
Page 27: Operation
In case of an internal failure, the Sabre 2400 will emit a loud tone to indicate that it has shut itself The Bipolar Coagulation waveform is designed to down. - Page 28 Figure 2.2 Patient Accessory Connections PATIENT CONNECTIONS ELECTRICALLY ISOLATED. POWER HAND CONTROL FOOT CONTROL BIPOLAR MONOPOLAR BIPOLAR 2-10...
-
Page 29: Theory Of Operation
This section contains the theory of operation for A5T1. Strapping options on TB1 set the unit for the Sabre 2400 circuitry. The functional block a given mains voltage range. Schematic 4.6 indi- diagram and schematics are located in Section cates the strapping options for the various mains 4.0. -
Page 30: Controller Hardware
Watchdog Timer Strobe (WDSTR). Each cycle is 25 +/- 2 milliseconds The Sabre 2400 Controller PWB Assembly is long. The WDT circuit must hear from the based on the 8031, a single chip, 8-bit micropro- microprocessor within a 18 to 34 msec window. -
Page 31: Power On Reset
The relay enable flag, /RLYEN-Q from U2-11, is 3.1.3.2 Power On Reset reset on power-up. This permits the microproces- sor (U3) to test the WDT during initialization The Power On Reset (POR) circuit consists of a without allowing RF to appear at the outputs. single chip specifically designed for this function. -
Page 32: Program Memory, Eprom
ISENSE voltage is proportional to the dc cur- is enabled by line PSEN going low during an rent drawn by the Sabre 2400 RF power ampli- instruction fetch. Address lines A13-A15 provide fier from the RF supply, RFSUP . When ISENSE... -
Page 33: Ifail Adc
“HLP-5” code examining waveforms. See Figure 3.2 for repre- and shuts down the Sabre 2400. sentative waveforms. 3.1.3.7 Waveform Generator U22 provides both buffer and enable functions for the waveform generator. -
Page 34: Software Initialization And Test Functions
However, since undetected failure of 27C256 11. Verify that the contents of program memory could escalate a minor failure to a serious con- in all locations where the program resides is intact sequence in the O.R. environment, the 27C256 using a 16-bit cyclic redundancy check. program is equipped with many fail detection and shutdown features. -
Page 35: Display Hardware
3.1.5 Display Hardware After turn-on, Q5 will be conducting hard and The Sabre 2400 display uses LED and incandes- the bipolar transistors will draw collector current cent lamp segment technology. Three HV5708 in proportion to their base current, which in turn drive chips (U19, U20, and U21) each contain is controlled by VBASE. -
Page 36: Output Section
The collector voltage may rise to many times the 3.1.7 RF Output Section value of the RF supply voltage RFSUP after turn off. Since the emitters are now disconnected, the CAUTION: Because of the high peak-to-peak collector-base voltage can take on the highest amplitudes of these waveforms, use oscillo- value which that junction will sustain with little scope probes that can withstand 2 KVpp mini-... -
Page 37: Aspen Return Monitor (A.r.m.)
3.1.8 Aspen Return Monitor (A.R.M.) the center tap of T4 primary. The voltage on the Circuitry and Software center tap is the average of the two collector volt- ages, so it appears as a full-wave rectified sine The A.R.M. Circuit converts the electrical resis- wave with a peak amplitude of one-half that on tance appearing in the return electrode circuit either collector. - Page 38 Figure 3.1 shows the approximate resistance vs. In Dual Foil Mode, the Resistance Indicator will number of illuminated bars in the resistance indi- be illuminated to indicate pad resistance in the cator. If no bars are lit, then the resistance is less range of 10 to 150 ohms.
-
Page 39: Isolated Handswitching/Footswitching
3.1.9 Isolated Handswitching/Footswitching The secondary winding T2-8 and T2-7 combine with D16 and C59 to produce an isolated dc The circuit for the handswitched accessories are voltage. When the bipolar hand switch is closed, electrically isolated using both magnetic and opti- the emitter of Q16 is pulled to the return of it's cal coupling. - Page 40 Figure 3.2 Waveform Generator Output A1TP1 is the BGATE signal, A2TP23 is the GATE signal. Note: The lower trace in each oscillogram is A2TP14 and is used as the trigger point source. Where there is noticeable aliasing in the bipolar modes, an expanded view of the waveform is included for clarity. 3-12...
- Page 41 Figure 3.2 Waveform Generator Output 3-13...
- Page 42 Figure 3.3 RF Output Waveforms 3-14...
- Page 43 Figure 3.3 RF Output Waveforms 3-15...
- Page 44 Figure 3.3 RF Output Waveforms 3-16...
-
Page 45: Maintenance
This section contains information useful in the the top edge of the Base Assembly. See Figure maintenance and repair of the Sabre 2400. While 4.2. To close the Top Cover, lift it upward until the unit has been designed and manufactured to... -
Page 46: Display Pwb Assembly A7
Clorox Company. 4.4 PERIODIC INSPECTION Equipment: Volt-Ohmmeter, Simpson 260 or equivalent The Sabre 2400 should be visually inspected at least every six months. This inspection should Procedure: include checks for: Connect the ohmmeter between the earth ground prong of the power plug and the footswitch con- •... -
Page 47: Output Power
4.1 correct for the load regulation characteristics 3 test leads, 1m max. length of the Sabre 2400. This results in output cur- rent levels that may be different from the power setting when the P=I 2 *R calculation is done Procedure: 1. -
Page 48: Rf Leakage
2 - Test leads, 1 m max. length able accessory jack. 3 - Test leads, 10 cm max. length 4. This measurement applies only to Sabre 2400 P/N’s 60-5600-003 and 60-5600-015. Measure Wooden table approximately 1 m from floor. A1 C67 and C68 in circuit resistance to confirm a value greater than 20M ohm resistance. -
Page 49: Rf Leakage From Inactive Outputs
4.5.5 RF Leakage from Inactive Outputs >WARNING< Equipment: Same as in Section 4.5.4 HAND CONTROL ACTIVATIONS SHOULD BE KEYED USING 3'' OR LESS Procedure: WELL INSULATED JUMPER(S). USE OF AN INSULATING ROD TO INSERT THE 1. Set the unit for full power Standard Coag and JUMPER IS ADVISED TO PREVENT RF Bipolar Coag. -
Page 50: Line Frequency Leakage
Equipment: (See UL 544 or ANSI/AAMI amperes. HF-18) 2. Since the Sabre 2400 monopolar active outputs Line Reversing Switch are disconnected by relays when the unit is not activated, active-to-neutral leakage tests must be... -
Page 51: Aspen Return Monitor (A.r.m.) Calibration Check
This section describes the method to check the front panel. calibration of the A.R.M. circuitry. 2. Power up the Sabre 2400 in the RUN Equipment: Non-inductive Decade Resistance Mode. Select Dual Foil Mode and confirm that Box (DRB) with attached dual foil return elec- Resistance Indicator has all 10 green bars flash- trode cable. -
Page 52: Calibration And Adjustments
4.6 CALIBRATION AND ADJUSTMENTS bration is corrected. The Sabre 2400 is calibrated without selecting • On initial entry to CAL Mode, a calibration or adjusting components. Instead, calibration validity test is done. If the test passes, then all factors necessary to compensate for unit-to-unit points in all modes are considered calibrated;... - Page 53 • After a fully calibrated mode is entered, making tered and calibration completed or corrected to a change to any one calibration point will cause fix the problem. all of the other points in that mode which have not yet been checked to be declared uncalibrated. •...
-
Page 54: Power Calibration General Information
• Each point is calibrated by activating the Sabre 2400's typical load regulation characteristics unit, then using that mode's Power Increase or in that mode. The actual load regulation curve for... -
Page 55: Output Power Calibration Procedure
If this resistance steps 6 & 7 for Pure, Blend and Coag until all is not available, the Sabre 2400 may be calibrated points are calibrated (no points are flashing). using 300, 400 or 500 ohm loads. -
Page 56: Calibration (Pad)
12. Activate the unit in Bipolar mode and use the 4. Press “SEL ”. The unit will then momentarily Bipolar Power Increase/Decrease keys to match display “CAL ” and proceed to display “C-C” in the target value. Deactivate the unit when the the Cut Power Window. -
Page 57: Troubleshooting
This section explains the troubleshooting aids code in the Monopolar Cut and Coag power built in to the Sabre 2400 and provides a guide level displays. This loop takes /RFEN false, forces to their use. Not all failures can be covered in a... - Page 58 Table 4.7 HLP Codes and Possible Causes HLP Meaning When Performed Possible Causes Read/Write ability Initialization Faulty A2U3 (8031) of 8031 internal and operation memory is impaired. Program memory CRC Initialization Faulty A2U9 (27256) check error. and operation Faulty A2U3 (8031) Faulty A2U8 (74573) Open or shorted Address, Control, or Data buss lines.
- Page 59 Table 4.7 HLP Codes and Possible Causes HLP Meaning When Performed Possible Causes Detection of a shorted Initialization Shorted hand or foot control. hand or foot control Faulty A2U6 (8255) Shorted bypass caps on control lines. Incomplete Cal Cal Mode One or more power or ARM cal points not calibrated on return to CAL menu.
-
Page 60: Watchdog Timer Troubleshooting
In Diagnostics 2, the unit operates exactly as 4.7.3.1 Accessing Watchdog Timer in normal RUN mode and will deliver RF to Diagnostics (dIA 1) the output jacks, except the following software routines which detect hardware faults are not To enter diagnostics 1, enter the CAL MODE per executed: section 4.6.1 then select “dIA”... -
Page 61: Base Voltage Generator Troubleshooting
DISPLAY MODE WDSTR PERIOD RYLEN RETURN MONITOR ERROR Normal 25.0 mS Unaffected Dark Late 38.0 mS Unaffected Flashing Early 15.0 mS Unaffected Bright Lockup 25.0 mS Dark* *on initial entry to Mode 4 Table 4.8 dIA 1 Modes feature not checked automatically is lockout, at 300W . -
Page 62: Waveform Generator Troubleshooting
After successful testing of the VSENSE circuit, likely cause. Check the A1T5 shield lid for connect a 300 ohm 250W load resistor to the good electrical and mechanical contact with the unit's RF outputs. Select Monopolar Pure Cut shield cup, and capacitors A1C55 and C56 for and slowly increase the power setting while proper value and connection. -
Page 63: Rf Amplifier Troubleshooting
4.7.7 RF Amplifier Troubleshooting 2. Remove the screw and compression washer from the transistor being removed. Slightly bend The first step in troubleshooting a Power the transistor away from the heatsink to make Amplifier (PA) is to remove all PA collector and desoldering easier. -
Page 64: View Mode (Dia3)
(0 to 4.98V) or 19.531 mV/bit. To enter Description of Part diagnostics 3, enter the “SEL ” key. The menu will CONMED Part Number (if known) display dIA 1. Using the Coag up key select dIA Quantity Desired 3, then press the “SEL ” key again. The variable... -
Page 65: Replaceable Parts
4.10 REPLACEABLE PARTS The following is a list of replaceable parts available from CONMED Corp. See Section 4.9 for ordering information. Many of the more common parts are available from local electronic suppliers. Not all parts are used on all assembly versions. Refer to schematics for details. - Page 66 U3-10 62-4238-001 IC, OPTOISOLATOR OPTI 1264A XF1,3,5,7 62-0295-003 FUSE CLIP XF2,4,6,8 62-0295-002 FUSE CLIP 62-4704-001 PWB, Sabre 2400 POWER 62-0274-001 SEALANT, RTV 62-4240-001 STANDOFF, NYLON WIRE 1" 62-0260-001 CABLE TIE 0.085 WIDE 62-0260-002 CABLE TIE 0.190 WIDE 62-3429-003 INSULATOR PAD, TRANSISTOR...
- Page 67 Ref. Des. Part Number Description ASSEMBLY: Micro/Control Board (A2), 61-4796 C1,4,6-12,15,16,21-22 62-0267-002 CAP , 0.1uF 50V CERAMIC 24-27,29-31,45-48,64,66-68,74 C2,3 62-2844-001 CAP , 1uF 50V PE C14,71,75,80,86 62-0268-001 CAP , 10 uF 16V ELEC. C17,38,40-44,49-56,58 62-0267-001 CAP , 0.01uF 50V CERAMIC C18,23,39,57,63,69,70,72 62-0267-003 CAP , 0.33uF 50V CERAMIC...
- Page 68 IC, X24C04 512 x 8 EEPROM 62-3457-001 IC, 8255-2 62-1714-001 IC, 74LS138 U8,29 62-4848-001 IC, 74HCT573 61-4797-001 IC, Sabre 2400 CONTL PROGRAM EPROM 61-4797-002 IC, Sabre 2400 Program EPROM HI ISO 62-4606-001 IC, 8155-2 62-4849-001 IC, MAX500BCPE 62-3394-001 IC, LM324 U13,14 62-1374-001 IC, ULN2003 62-1362-001...
- Page 69 Ref. Des. Part Number Description ASSEMBLY: Control Panel (A3), 62-4908 62-4908-001 CONTROL PANEL ASSEMBLY: Cover (A4), 61-4930 (Not available as a complete assembly.) 61-4796-001 ASSY, A2 MICROPROCESSOR PWB 61-4796-002 ASSY, A2 MICROPROCESSOR PWB 62-4908-001 CONTROL PANEL 61-4913-001 A7 DISPLAY ASSEMBLY 62-4781-001 CABLE, FLAT RIBBON, A2 62-7032-001...
- Page 70 62-4193-006 CONNECTOR, RECEPTACLE, 600V , 6 POS. A1P1 62-3682-003 CONNECTOR,.156,HOUSING W/LOCK,3PIN A5W1 61-4780-001 HARNESS, FOOTSWITCH, Sabre 2400 61-4173-003 OUTPUT PANEL ASSY., Sabre 2400 A1P10 62-1389-001 PLUG (.100) A5W2 62-4274-002 POWER CORD, ASSY, Sabre 2400 A5R1, A5R2 62-0362-005 RESISTOR, 200 OHM, 50W , 1%...
- Page 71 Ref. Des. Part Number Description ASSEMBLY: Output Panel (A6), 61-4173 A1P4-7 62-3682-201 CONNECTOR, 0.156, TERMINAL TIN A1P6 62-3682-004 CONNECTOR, 0.156, HSG, 4PIN A1P9 62-3682-202 CONNECTOR, .0156 TERMINAL GOLD A1P4,P7 62-3682-003 CONNECTOR, 0.156, HSG, 3PIN A1P5,P9 62-3682-002 CONNECTOR, 0.156, HSG, 2PIN J1,2,4,5 62-0304-002 BANANA JACK, BLK...
- Page 72 RES. NET, 8X390 16 PIN DIP RN7,8 62-2861-002 RES. NET, 5X200, 6 PIN SIP U1-U12 62-1374-002 IC,DRIVER, ULN2004 62-4912-001 PWB, DISPLAY A7, Sabre 2400 LED 62-2772-001 CONN, SOCKET STRIP , 10 PIN ASSEMBLY: Footswitch Harness (A5W1) A1P8 62-1389-005 CONNECTOR, PLUG, 6 PIN A5J1...
- Page 73 Figure 4.1 Rear Panel Screw Locations COVER ASSEMBLY COVER SCREWS - REMOVE TO OPEN MONOPOLAR FOOTSWITCH BIPOLAR FOOTSWITCH US PATENT NOS. 4,569,345 - 4, 617,927 - 4,848,335 - 4,961,739 AND PAT.PEND. IDENTIFICATION LABEL BASE ASSEMBLY 4-29...
- Page 74 Figure 4.2 Subassembly Locations A3 CONTROL PANEL ASSEMBLY A7 DISPLAY BOARD ASSEMBLY A2 CONTROLLER ASSEMBLY A4 COVER ASSEMBLY A1 POWER BOARD A5T1 TRANSFORMER ASSEMBLY A5 BASE ASSEMBLY A6 OUTPUT PANEL ASSEMBLY 4-30...
- Page 75 Figure 4.3 Power Board Assembly NOTE: This layout is for models 60-5600-002, -004 & -005 only. See Figure 4.6 for -003 and -015 versions. REPLACE FUSES MARKED 2.5 A TP14 4 5 6 TP15 BGATE +11UNREG TP13 VBASE /GATE +22UNREG TP10 T2-10 T2-9...
- Page 76 Figure 4.4 Micro/Controller Board Assembly 4-32...
- Page 77 Figure 4.5 Display Board Assembly RN11 RN10 4-33...
- Page 78 Figure 4.6 Power Board Assembly NOTE: This layout is for models 60-5600-003 & -015 only. See Figure 4.3 for -002, -004 and -005 versions. REPLACE FUSES MARKED 2.5 A TP14 4 5 6 TP15 BGATE +11UNREG TP13 VBASE /GATE +22UNREG TP10 RFSUP T2-10...
Need help?
Do you have a question about the Sabre 2400 and is the answer not in the manual?
Questions and answers