
Related Manuals for LaCimbali S39 TE


Summary of Contents for LaCimbali S39 TE
- Page 1 S39 TE USE AND INSTALLATION Translation of the original instructions 936-398-000 (rev. 1835)
- Page 2 An updated, electronic version of the manual can be accessed from the website shown at the bottom of the page, using the credentials below. https://order.gruppocimbali.com/explorer/spareparts/page/login User ID: guest PW: Entr@nc3...
-
Page 3: Table Of Contents
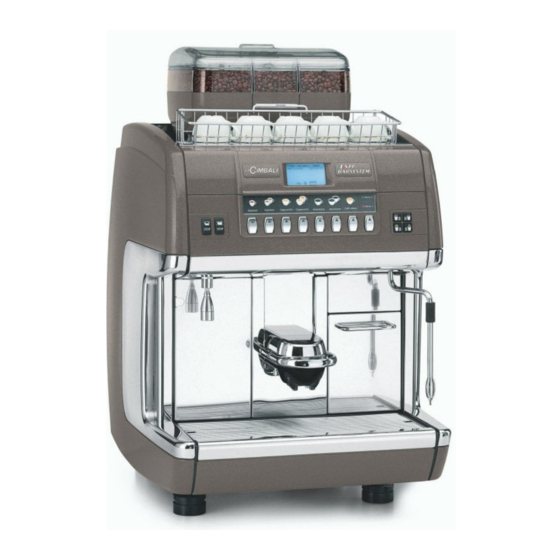
Dear Madam, Dear Sir, Congratulations on your new Cimbali! With this purchase, you have chosen an advanced espresso coffee machine built using the most functionality, but also provides you with all the tools you need to do your job in the best possible way. We recommend that you take some time to read this Use and Maintenance Booklet. - Page 4 S39 TE (13) (15) LEGEND Delivery spout 13 Steam dispensing knob 23 Main switch Selection panel 14 Hot water outlet 15 Steam pipe 35 Hot water “STOP-continuous” key Graphical display Coffee hoppers 15a Turbosteam steam pipe * 39 Card services slit...
- Page 5 Type of machine Fluid Capacity [ L ] [ bar ] [ °C ] Service boiler 2 bar 133° C water/steam 12 bar 133° C water 0.32 Heat exchanger 360(14.2) 388(15.3) 534(21) 672(26.5) ~167(6.6) ~117(4.6) * with INOX feet h = min. 866 (34.1) * with ABS feet h = min.
- Page 6 Symbols Generic warning WARNING: Electrical Hazard WARNING: Trapping Hazard, Take Care with Hands WARNING: Hot surface Environmental protection These pages of the manual are for the use of the worker operating the machine. 4 EN...
-
Page 7: General Rules
1. General Rules Please read the warnings and rules in this User’s Manual carefully before using or handling the machine in any way because they provide important information regarding safety and hygiene when operating the machine. Keep this booklet handy for easy reference. •... -
Page 8: Transport And Handling
WARNING authorized technicians. Carefully read the warnings and rules in this manual because they provide important information regarding safe installation, use and maintenance of the machine. Keep this booklet handy for easy reference. 2.1 Transport and handling Packaging • The machine is delivered in a robust cardboard package, with appropriate internal protection. The package features the standard symbols indicating rules to be followed when handling and storing the appliance. -
Page 9: Installation Rules
2.2 Installation Rules • Before plugging in the appliance, make sure that the information on the nameplate (voltage, etc.) matches that of the electrical and water systems. • • Completely unwind the power-supply cable. • from the counter. Keep in mind that the highest surface on the machine (the cup-warmer tray) sits at a height of at least 47 inches (1.2 meters). -
Page 10: Electrical Installation Rules
3. Electrical Installation Rules Prior to installation, make sure there is a circuit breaker installed with a distance between the contacts that allows for complete disconnection when there is a category III overload and that provides protection against current leakage equal to 30 mA. The circuit breaker must be installed on the power-supply in compliance with installation rules. -
Page 11: Installation Check-Up
5. Installation Check-up WARNING: AFTER INSTALLATION, CHECK TO SEE IF THE MACHINE IS WORKING PROPERLY (see the Installation Module C) WATER CONNECTIONS • No leaks from the connections or tubes FUNCTIONING • Boiler and operating pressures are normal. • The pressure gauge is working properly. •... -
Page 12: Rules For The Worker Operating The Machine
6. Rules for the worker operating the machine BEFORE YOU START WARNING: BEFORE YOU START OPERATING THE MACHINE, WASH THE INTERNAL COMPONENTS FOLLOWING THE INSTRUCTIONS INDICATED BELOW. THESE STEPS MUST BE REPEATED AT LEAST ONCE A DAY AND WHEN THE MA- CHINE HAS NOT BEEN OPERATED FOR MORE THAN 8 HOURS. -
Page 13: Maintenance And Repairs
7. Caution WARNING: Hot surface Danger of Burns ACHTUNG: ATTENTION: Great care should be taken when ATTENZIONE: in the vicinity of these areas GENERAL The manufacturer disclaims all liability for damages to items or persons due to improper use or due to the coffee machine being used MACHINE CLOSE-DOWN for purposes other than its intended use. -
Page 14: Dismantling The Machine
9. Dismantling the machine Electrical equipment cannot be disposed of as Suitable differentiated waste disposal so ordinary urban waste. that the machine can then be recycled, treated and disposed of in an environmentally friendly manner contributes To protect the environment, please proceed to avoiding possible negative effects on the in compliance with the local laws in force. -
Page 15: Description Of The Control Panel - Keyboard
10. Description of the control panel - Keyboard DESCRIPTION OF THE COMPONENTS Graphical display 12 Hot water button 13 Steam dispensing knob “RES” key (to quit programming mode/ 25 Special key 27 "i" key (displays the number of cycles) 28 Milk circuit wash key - automatic wash "PRG"... -
Page 16: Daily Powering
11. Daily powering AUTOMATIC SWITCH OFF (see service time menu) “Before setting the machine at work, make sure The machine switches off automatically to the programmed that the main electric power switch is on and timetable. During the phase of switch off, on the display it that the mains water cock has been turned on”. -
Page 17: Dispensing Of Beverages - Coffee
12. Dispensing of beverages - Coffee GENERAL INFORMATION Place the cup (or cups) under dispenser (1) of the required group. Adjust the height of the dispenser (1) if necessary. Press the coffee dispensing key relative to the selected dose. The led of the selected key lights up and dispensing commences. -
Page 18: Dispensing Of Beverages - Cappuccino / Milk (Cappuccino-Maker Version)
12.2 Dispensing of beverages - Cappuccino / milk (Cappuccino-Maker version) GENERAL INDICATIONS Milk is a delicate biological product and can easily at a storage temperature no higher than 41°F (5°C) from the moment the container is opened and throughout its entire period of use. -
Page 19: Dispensing Of Beverages - Hot Water / Steam
12.4 Dispensing of beverages - Hot water / steam HOT WATER: GENERAL INSTRUCTIONS Place the appropriate container under the hot water dispenser (14). Dispensing with automatic dosing Press one of the hot water dispending keys (12) corre- sponding to the desired dose. The programmed dose of hot water will pour from the dispenser (14) and will stop automatically. -
Page 20: Cleaning Operations
13. Cleaning operations For correct application of the food safety s y s t e m ( H A C C P ) , p l e a s e f o l l o w t h e instructions in this paragraph. - Page 21 Automatic wash (if programmed) Washings modality only for machines with cappuccino maker To be performed at the end of the working day or when Function - after each milk cycle has terminated, the timer requested by the machine. The machine will issue a message on the display "Execute count-down starts (from 10 to 99 minutes, OFF disabled function).
-
Page 22: Milk Circuit Wash With Liquid Detergent
Milk circuit wash with liquid detergent Milk requires total hygiene. Therefore, clean thoroughly as indicated. 1) The message "EXECUTE WASHING MILK CIRCUIT" appears on the display at the set hour. April 2015 Wednesday 10:19:41 EXECUTE WASHING MILK CIRCUIT 2) Position the vessel under the hot-water outlet and under the coffee/cappuccino delivery spout of the machine (adjusting height if necessary). -
Page 23: Group Wash With Detergent Tablet
Group wash with detergent tablet To perform the wash cycle, follow this procedure: 1) The message "EXECUTE WASHING GROUP" appears on the display at the set hour. April 2015 Wednesday 10:19:41 EXECUTE WASHING GROUP 2) Open the decaffeinated coffee panel (18) and insert a tablet close the panel (18). -
Page 24: Caution
13. Cleaning operations STEAM TUBE (15) AND HOT WATER DISPENSER (14) Wash with hot water and a clean cloth or sponge, removing all organic matter. Thoroughly rinse. Clean up the inner part of the steam dispenser operating in the following way: direct the tube towards the cup tray, and paying particular NOTE: the procedures described below can also be carried out when the machine is switched off. -
Page 25: Check Control Messages
14. Check Control Messages The check-control messages are divided into two groups: 1. Messages in explicit mode: they position on the last line at the bottom of the Display (5). They are cancelled on each new cycle and then appear again if the cause that generated them returns 2. - Page 26 Messages in explicit mode Softener This message is displayed when the softener resins need Once regeneration has been completed, to be regenerated. (Follow the instructions on softener keep the RESET key pressed for maintenance). proximately 8 seconds to cancel out the message.
-
Page 27: Customer Programming
CUSTOMER PROGRAMMING 16. Clock adjustment Use the "+" (30) and "-" (31) keys to adjust the 19 March 2014 clock. wednesday 15:15:04 The time increases (or decreases) one minute each time the key is pressed. If one of the keys (30 or 31) is pressed and held down for more than 10 seconds, the minutes setting stops and the hours setting increases (or decreases). -
Page 28: Service Time Menu
Service time menu "WASH 1" AND "WASHES 2 ÷ 5" Pressing the PRG (29), the following message will These are scheduled washes that are independent of the appear on the display: wash cycles related to the switching on and switching off SERVICE TIME phases. -
Page 29: Data Menu: Counters
18. DATA menu: COUNTERS key. The following will appear on the display: Access the DATA MENU, pressing the “i” (27) key. The following will be displayed: COUNTERS MENU N° coffee DATA MENU N° milk COUNTERS MENU N° water ACCOUNTING N° steam N°... -
Page 30: How To Access The Programming Mode
19. How to access the programming mode NOTE ONLY if the item “Customer Progr.” is set on “YES" Note and the item “Program. block” is set on “NO". turns into “ ” or a slide bar with minimum and maximum To access programming press the PRG settings appears: following message will appear on the display:... -
Page 31: Key Menu - Cappuccino Selection
19.2 Key menu - Cappuccino selection - cold milk emulsion (cold foamed milk dispensing time, Press one of the cappuccino dispensing keys (32) (the relative led will remain on). The following message will - water dose (volumetric dosage pulses, from 0 to 1999, appear on the display: KEY MENU - coffee dose... -
Page 32: Key Menu - Hot Water Selection
19.4 Key menu - Hot water selection Press the hot water dispensing key (12). The following KEY MENU message will appear on the display: Type water dispens. time 20.0 The following hot water selection parameters can be - water dispensing time (from 0 to 60, with increments of 0.1 seconds). -
Page 33: Grinders Manual Handling
20. Grinders manual handling The operations described below are only Use the “+” (30) key to open the grinders (values 27, 28, possible if the grinder control setting is NO. 29, etc.) or the “-” (31) key to close them (values 25, 24, 23, etc.): Pos. -
Page 34: Illustrations
Illustrations Fig. 1 - see Installation Rules chapters Fig. 2 MACHINE Install a water feeding tap Fig. 3 WATER MAINS MAX. PRESSURE A) possible 87 psi (6 bar) Ø 3/8 GAS water-treatment device (for pressure beyond this value, install a pressure reducer) DRAIN Fig. - Page 36 The Manufacturer reserves the right to modify the appliances presented in this publication without notice GRUPPO CIMBALI SpA - 20082 BINASCO (MILANO) ITALY CERT. NR. 50 100 3685 / 10877 / 11721...
Need help?
Do you have a question about the S39 TE and is the answer not in the manual?
Questions and answers